We use tables to display data in rows and columns. You can determine
the number of rows and columns using special table elements, and you
can add row and column headings, as well as a heading for the entire
table. An intersection of a row and a column is a cell.
Table cells can span multiple rows and/or columns.
You can change the appearance of your table's borders, colours,
and cell alignment using CSS.
This lesson focuses on
the HTML code required to create accessible tables.
The Table Elements
A table is made up of several different elements:
Basic Table Structure
<table>
The main container for the table.
All other table elements are descendants of the <table> element.
The <table> element is not allowed to have children other than
the other table elements (but a <table> should not contain
another <table> element).
<tr>
The Table Row element
Defines a single row of cells in the table.
The <tr> element's children should only consist of <td>
and <th> elements (each of which defines a single cell).
<td>
The Table Data element
Defines a single cell in a table row.
<td> generally contains the content of the cell it defines.
This CodePen shows how each of the three basic structure elements
are used to create a basic table:
It's important to note that by default, a table and its cells don't have
borders: I've added some in the CSS tab of the CodePen. Feel free to fork
the CodePen or copy the code so you can have a basic template that you
can use to create tables with borders.
Note also that you only need to define the table itself, and then the
rows of the table, and then the cells in each row. You do not need
to define the actual colummns: they are automaticaly defined when
you add cells (table data elements) to each table row. For example,
in the CodePen, each table row element contains 3 TD elements, so
therefore each row contains 3 cells, causing the table to have 3 columns.
Of course, you could write code that places a different number
of cells in each row of a table. We'll talk about this in the
next section when we talk about spanning rows and columns.
Exercise
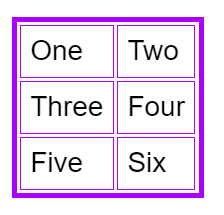
Fork the CodePen below (or copy the code, if you prefer) and use it
to create a table like the one in the image below.
Tables make much more sense when you add row and/or column
headings and titles. This also sometimes adds issues for users
with screen readers, so it's important that you review your tables
and think about how they will work for users that are visually
impaired.
Row and Column Headings
A heading is just a cell that sits on top of a column
or at the beginning of a row, although you can technically add
heading cells anywhere in your table.
You can add a row or column heading by using the
<th> (Table Header) element instead of the <td> element
for a cell. The <th> element's content is automatically centered and displayed
in a bold font, but you can customize this later with CSS.
Here is an example of a table with both row and column headings:
When using the <th> element, you should
use the scope attribute to define the context of the
table header: this is important for screen readers so that a user knows
if the header is a row header or column header. Use scope="col"
for a column header and scope="row" for a row header.
Sometimes your table might have a cell that intersects the first
row and column that contains no heading text at all. For this,
you would use an empty <td> element, since it has no meaningful
content for a screen reader. You can see a working example of this
in the page W3C-WAI
Tutorial: Tables with Two Headers. Example 1 is
a great example of this, and you can also start to imagine how difficult it will
be for a user with a screen-reader to read this kind of table without the use
of the scope attribute!
Table Captions
The <caption> element adds a title or description
to the table. This element is optional, but if it is used, it must be the
first child element of the <table> element.
The caption element also helps users with low vision or screen readers:
they can read/hear the caption first and then decide if they
should skip over the table or not.
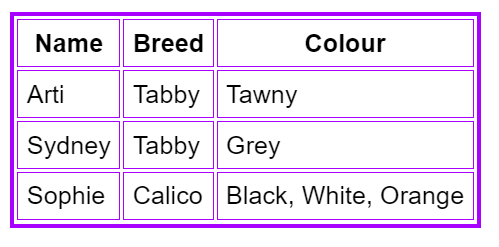
Here's a practical example with the <caption> element, and
also row and column headings. Notice that
by default, the caption appears above and outside the table,
but you can change this with CSS.
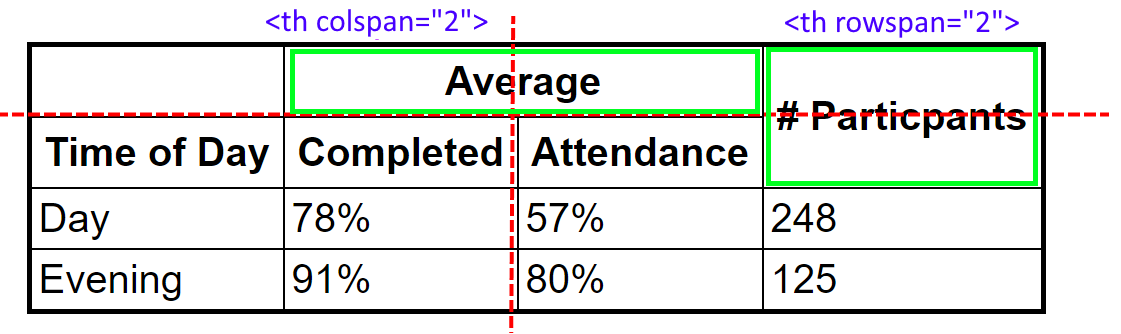
It's common to have table cells that span multiple rows and/or multiple
columns. For example, the table below has a column header ("Average")
that spans across 2 columns (the 2nd and 3rd columns), and another header
("# Participants") that spans 2 rows (the 1st and 2nd rows).
This table of attendance data has two cells that span multiple rows
or columns.
To span multiple columns, you add the colspan attribute to the
<th> or <td> element, and assign colspan the number of columns
you want the cell to take.
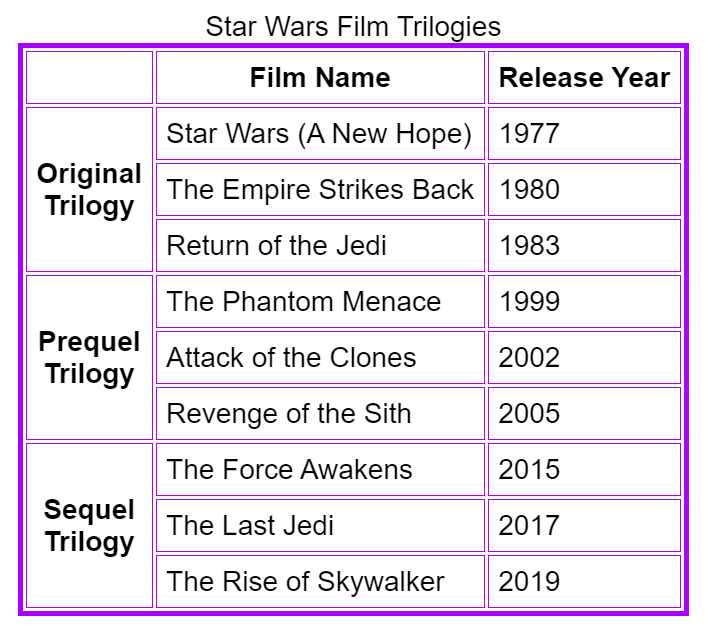
Notice that in the above example, the "Original Trilogy" cell spans
across 3 columns, so it has the colspan="3" attribute.
It also has the scope="colgroup": this aids accessibility,
telling a screen-reader-user that this column heading is for a group of
columns, and not a single column.
To span multiple rows, you add the
rowspan attribute to the <th> or <td> element, and
assign rowspan the number of rows you want the cell to take.
Notice that in the above example, the "Original Trilogy" cell spans
down 3 rows, so it has the rowspan="3" attribute.
It also has the scope="rowgroup": this aids accessibility,
telling a screen-reader-user that this row heading is for a group of
rows, and not a single row.
Coding around a cell with a rowspan is a bit more difficult than coding
around one with a colspan. The best way to get the hang of it is
to practice! We'll go through one example below, and then you can
try some exercises on your own.
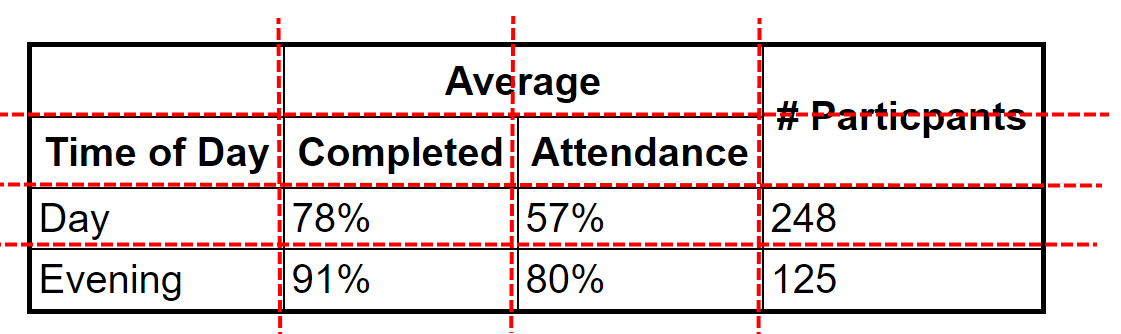
If you're stuck trying to figure out which cells should have
colspan and which cells should have rowspan,
it's helpful to sketch your table and draw lines where the obvious
rows and columns are. In the image below, you can see that I added the
red dashed lines where I saw rows and columns. It's clear by counting
between the red lines that there are four rows and four columns.
Draw lines where you see the rows and columns should be
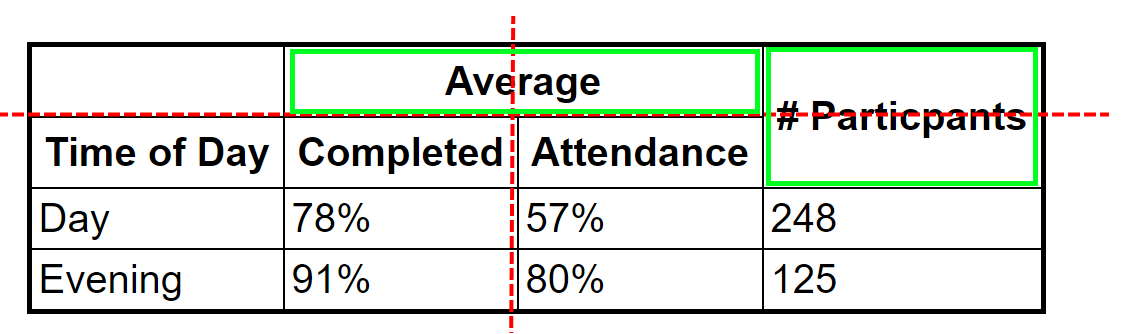
You can clearly see that the "Average" cell spans across columns 2 and 3:
this is shown by the red dashed line running down the middle of the cell. Similarly,
you can also clearly see the "# Participants" cell spans down rows 1 and 2:
this is shown by the red dashed line running across the middle of the cell.
This tells you that the "Average" cell takes up 2 columns, and the "# Participants"
cell takes up 2 rows.
We can see two cells that take up multiple rows/columns
If you examine all the other cells, you'll see that none
of them have the red dashed line running through them, therefore they all take
up 1 row and 1 column (which is the default for all TD and TH elements).
To start coding the table, you add the <table> container and then
go row by row. If you would like to try this demo, you might wish
to fork one of the earlier CodePens so that you have the CSS that adds
the borders to your table, otherwise this will be a bit difficult to see.
For example, let's look at the code for the first row of the table:
Each row consists of 4 cells. The first row has the following cells:
The empty cell that intersects the column with the row headers and
the row with the column headers.
The cell with the header "Average". This takes up 2 columns.
The cell with the header "# Participants", which takes up one cell.
This cell does take up two rows, though.. so we add rowspan="2"
but we'll discuss further this in a moment.
So we've defined three cells, but one of those cells takes up 2 columns.
Now we can tackle the second row. The second row has the following
cells:
The "Time of Day" header cell.
The "Completed" header cell.
The "Attendance" header cell.
We do also have the "# Participants" cell, but remember: we already
created this in row 1 with a rowspan of 2, so it already exists. We
don't need to create it again.
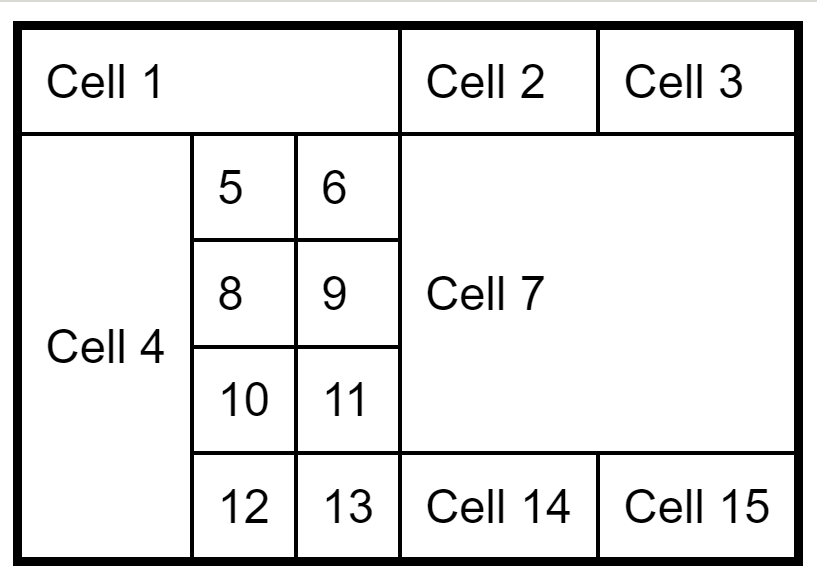
Create the following table:
A table with various rows and columns
This picture shows a generic table with several rows
and columns. The table is structured as:
Row 1: Three cells, the first contains "Cell 1", the
second contains "Cell 2" and the third contains "Cell 3".
Row 2: A tall cell that contains "Cell 4". To the right of
Cell 4 is a set of 8 cells - 2 cells wide, 4 cells high.
Each cell contains a number. They are, from left to right and
top to bottom: 5, 6, 8, 9, 10, 11, 12, and 13. All of these
cells - Cell 4 and the numbered cells, are under Cell 1.
Beside the group of 8 numbered cells is a larger cell that
contains "Cell 7". Cell 7 is underneath Cell 2 and Cell 3.
To the left of Cell 7 are the cells with the numbers 6, 9, and
11. Under Cell 7 (and to the right of the cell containing the
number 13), are 2 more cells side-by-side. Those 2 cells
contain "Cell 14" and "Cell 15". Cell 14 lines up perfectly
with Cell 2 and Cell 15 lines up perfectly with Cell 3 (Cell 7
sandwiched between the two groups of cells). It's helpful
to use some kind of tactile tool to lay out each cell, or you
can simply use popsicle sticks or toothpicks (I stick them to
the table with sticky putty to keep them from moving).