Refresh
this page because I am probably still making changes
to it.
In this lesson you'll learn the basics of relational
database structure and how to create a simple database
on cPanel. You'll also learn to use PHPMyAdmin to
add tables and populate them with data. Lastly,
you'll learn how to connect your PHP application
to a database using PHP Data Objects.
Resources
Visit and bookmark the
MySql Web Site.
This is the official home of MySql. There's lots of great
tools and information here,
including the
documentation.
A database is a collection of tables that contain data
you can store and use in your applications (not just for web
applications: you can use a database with any programming
language).
We'll be using a free database called MySQL. MySQL is very popular
among web developers.
Intro to MySQL
MySql is a database system that runs on a server and allows developers
to store data that can be used to create interactive, data-driven web
applications. Developers can create pages that allow a user to view, search,
add, edit, and delete data from the database.
Many web sites make use of databases: blogs, news sites, game sites, retail
stores, media sites, and many more. MySQL is one of the most popular database
systems in use; it's used by companies and organisations such as
Facebook, Wikipedia, Twitter, Google, Yahoo, Flickr, Youtube, various government
organisations including NASA and the United Nations, Sears, Walmart, Verizon Wireless, Nokia,
Associated Press, BBC News, NHL, New York Times, Slashdot, McAfee, Symantec, Zynga games,
Amazon, Craigslist, eBay, PayPal, and many, many more.
MySQL is free, fast, and efficient, and can handle very large databases. It also works on
a variety of platforms.
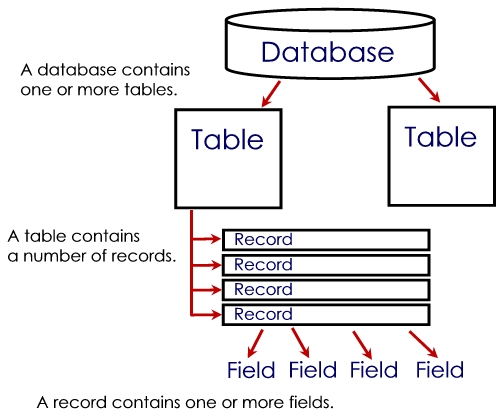
Database Concepts
Before we define what a database is, we should start from the bottom of what is commonly
called the data hierarchy.
The data hierarchy shows the different
components that make up a database. You will encounter these components repeatedly
throughout most of your courses that deal with programming, database development and
implementation, and even systems analysis.
Hierarchy of data for a database
It's easier to explain how the
data hierarchy works when you start from the bottom.
Fields or Columns
If you examine the image to the left, you'll see a number of fields
at the bottom
of the screen. A field is a piece of information that describes an entity.
Fields are also called columns, because they represent the
columns in a table of data.
For example,
as a student entity, fields that describe you would
be first name, last name, student
number, the name of the program you're enrolled in,
the semester you're in, etc. Each
field is one piece of information. You can't make a field
that describes more than one
thing. For example, you can't have a "grades" field because
you have more than one grade.
However, you could have a field for the grade you received in a
specific course, such as
your grade for PROG10082.
A field doesn't always have to have a value. Some fields
can be empty. For example,
if you register at the college but haven't been accepted yet,
the value for the field
that defines the term you're in would be empty, because you
haven't started school yet.
On the other hand, some fields must have a value. For example,
every student must have
a student number, and you wouldn't be allowed to have information
in a database on a
student if the student had no student number.
Records or Rows
A group of fields that are related and describe one element
in an entity make up a
record. Records are also called
rows because they represent the
rows in a table of data. For example, the fields student number,
first name, last name,
address, phone number, and program code could all be the
fields in a student's
record. Each record describes one element, or one item.
For example, a student
record describes one specific student, and an inventory
record describes one
specific item in inventory.
Tables
A table is a group of related
records that describe a particular entity.
For example, a group of student records would describe all the students
in the college, and would probably go in the Student table. A group of
customer records would go in the Customers table, because they all pertain
to the company's customers.
A table always has a specific structure or
schema, and each record in a table must
follow that structure. For example, the schema of the Students table
could look like this:
Table Name: Students
Field Description
Data Type
Size
Comments
student number
String
9
primary key
first name
String
50
last name
String
50
program code
String
6
foreign key - Programs
current g.p.a.
Float
n/a
In this simplified example, each record in the table contains five fields
(each row contains five columns).
Most of the fields are Strings whose field size is identified by the number
of characters. The one numeric field Float has n/a as its size because
non-string values are usually of a fixed size (for example, an integer is
Java is 8 bytes).
A table may or may not contain records. For example, a table that is created
and opened for the first time will probably be empty, or a table that records
a day's transactions in a store will be empty at the start of the day when the
store opens. In addition, with many tables the programmer can't possibly know
how many records will be in the table at any given time. Most tables will
allow a user to add and delete records as needed, so the number of records in
a table is dynamic and changes. As a programmer for a database, you would
need to take all these things into account.
Databases
A database is a collection of tables, and those tables are usually related in some way.
For example, a small, independent coffee shop might have a database with tables called
Suppliers, Inventory, PriceLists, and Employees. The Suppliers table will contain
records for each of the companies the coffee shop uses to purchase supplies, utilities
such as hydro and water, and raw materials (such as coffee beans, flour for pastries,
etc). The Inventory table would contain records for each of the items, products, and
raw materials the coffee shop has in inventory at any given time. A typical
Inventory record might contain fields for the item identification (we'll talk
more about this in a moment), item description, quantity on hand, re-order point
(how many items you gets down to before you must re-order more of this item), and
supplier identifier (so you know where to find the supplier information for this product
in the Suppliers table).
Database Server
A Database Server is an application that runs on a server machine
(the machine itself might be a dedicated database server, or there
might be several machines for the database server).
Database server software manages the users of a database and
the permissions those users have, the individual databases
and their tables, and the various connections that users make
to the various databases.
A database server can have several databases.
For example, a large company could have an Employee Database
and a Manufacturing Database. The Employee database would be
used by HR and management for contacting employess,
paychecks, taxes, work assignments, etc.
The Manufacturing database would be used by the manufacturing plant staff and
management to manage information about the products they manufacture,
the parts, suppliers, vendors, etc.
Another example: A large social media platform might have a
database for Employees and a separate database for their
application's users, postings, user activity, media, etc.
Primary Key Fields
Each table must have a special field called the primary key. A proper
table in a relational database must not contain any duplicate records. For
example, what if you had two customers both named Fred Smith, and one of the
Fred's phoned and wanted information about their account balance. You could
probably ask for some kind of identifying information like an address (what
if they were parent and child and lived in the same house?) or a birth day (what
if they were room mates with the same name who happened to have the same
birthday?) but, however unlikely it is that these things would be the same,
it's still possible. As a programmer, NEVER assume that just because something
is unlikely, it will never happen! What if the two Fred Smiths were actually
the same person who somehow got added twice to the same Customers table? This
is also possible.
To avoid duplicate records, and to ensure that two records which appear similar
are in fact different, we use primary key fields. A primary key is a special
field that uniquely identifies each record. For example, no student in the
college has the same student number as any other student, so that is used as
the primary key in the student table. Books have an ISBN (international
standard book number) which is unique for every book that is published by a
certain publisher, so that could be used as a primary key in a Books table.
When you're designing some tables, it might not be obvious what the primary
key should be. In a lot of these cases, you may need to make one up. This
is how things like Product I.D.'s and Supplier I.D.'s get created. In one of
your systems analysis courses, you'll probably spend a bit of time learning
about how to make up a good format for a primary key field or I.D. field.
Sometimes you'll have a field that is actually a primary key from another table.
This is called a foreign key and is used as a reference to the other table.
For example, in your coffee shop's inventory table, each record might contain a
Supplier ID field. When you need to get the supplier contact information because
you've run out of a product, you look up the inventory item's Supplier ID in the
Suppliers table to find out who this supplier is. We do this to avoid redundant
data - it would be a waste of space to store all the supplier's information with
each inventory item!
Exercises
See how well you understood the concepts you've read so far!
Besides Students, what other tables do you think would exist
in a database for Sheridan College? What would be the primary key
field for each of those tables?
What would be the structure of a table called Courses that
kept track of all of your courses and the final grade you got
in each course?
Make up three examples of records with field values for the
Courses table in #2.
Setting Up a Database
This quick tutorial will allow us to set up some tables and data that we can
use with PHP and HTML forms. This is by no means a complete lesson on how to
use a database (you will take at least one course on that next year!) but it's just
enough to allow you to do simple things with PHP and HTML forms.
Creating a Database
First, we need to set up a database. Log into your CPanel account
on the dev server: go to dev.fast.sheridanc.on.ca:2083 if you're
in the college or https://cpanel.login.dev.fast.sheridanc.on.ca
if you're at home
(where "login" is your own login name) and enter your dev.fast
credentials.
Note: if you're logging in from an unsecure network (e.g. from home)
your browser might block access to CPanel. Chrome gives you some advanced
options on the page that can allow you to access CPanel "at your own risk".
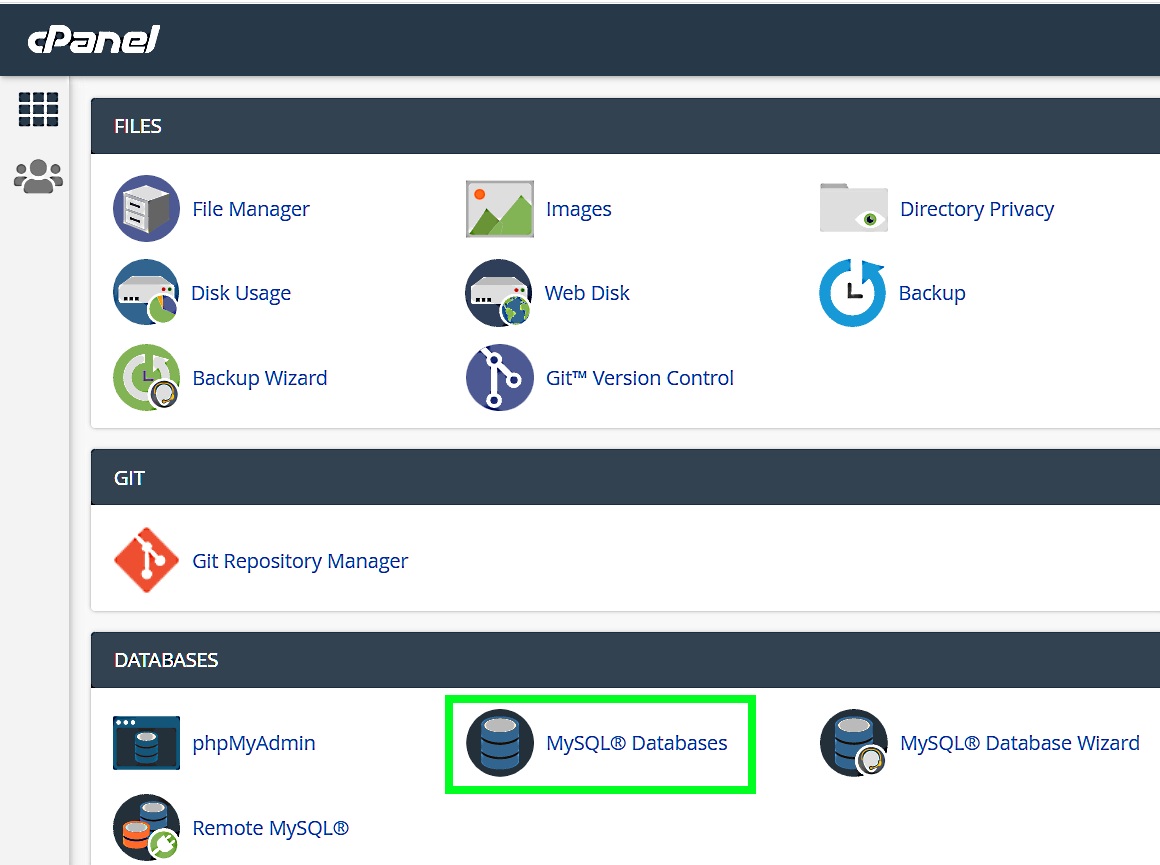
Once you've logged into CPanel, go to the third heading "Databases" on the
page and click on "MySQL® Databases".
Click on the MySQL Databases icon
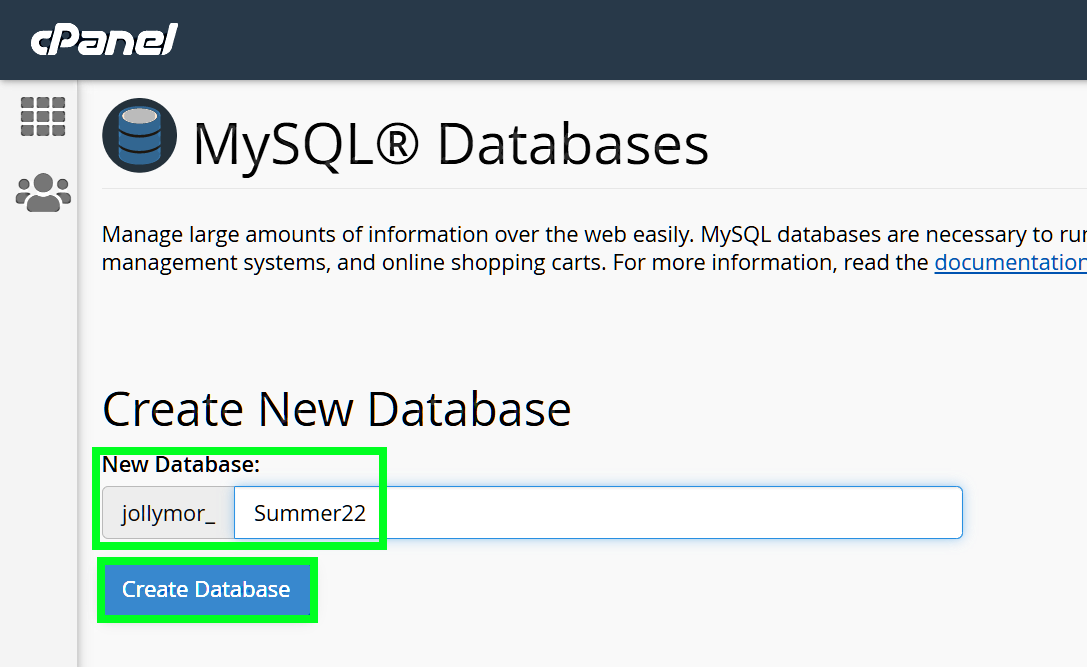
At the top of the screen you can add a new Database. Enter a Database name
and then click the "Create Database" button.
Create a new Database
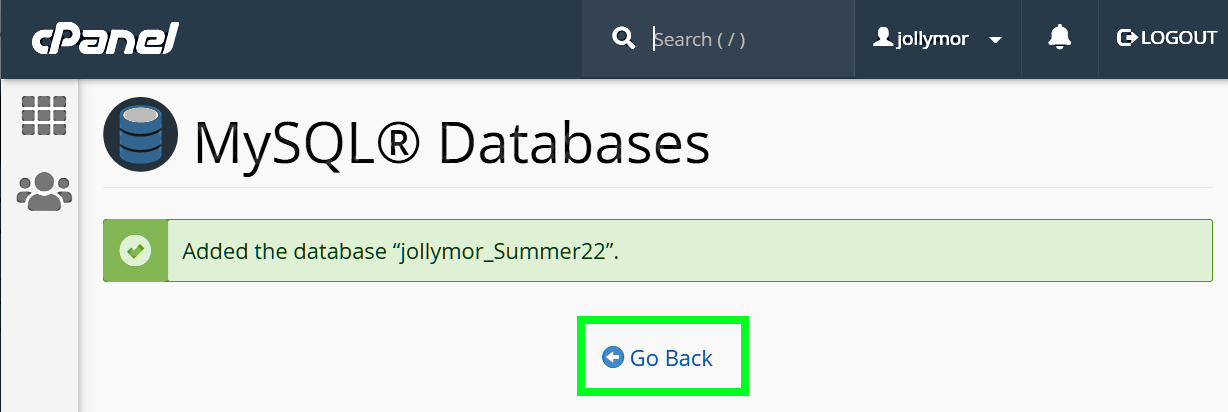
Once you create your database, you'll see a message on the screen that
your database was created successfully. You can click the "Go Back" link
to go back to the main Database page.
Database has been created
Now we can go back to cPanel: Click the little icon in the top left
of the page that looks like a grid of 9 little boxes.
Adding a Table
Now we need to add a table to our database. We do this in the PHPMyAdmin
tool in CPanel. Locate the PHPMyAdmin icon in the Databases section on the
main CPanel page and click it.
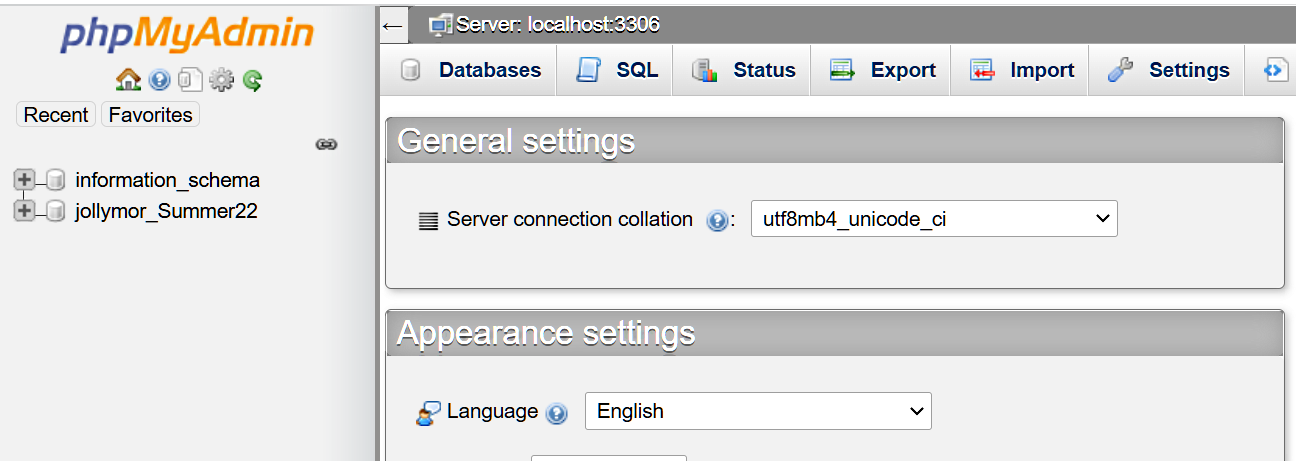
In the main PHP Admin screen, the left side will show a list of the databases
already on your SQL server. You will see a default database called
information_schema. You shouldn't touch this database, as it's
needed by the database server and web server.
In the same area, you should also see your own database(s) you
created.
Database list in PHPMyAdmin
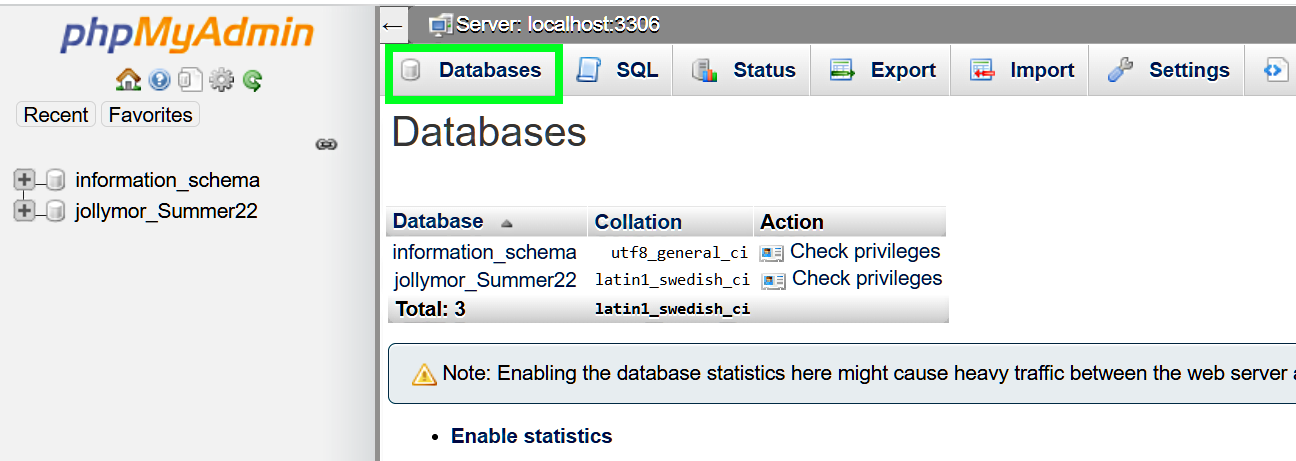
Across the top you'll see various tabs or buttons that allow you to view and
configure items on the server. Click on the Databases tab:
you should see another list of the same databases.
Select the Databases tab
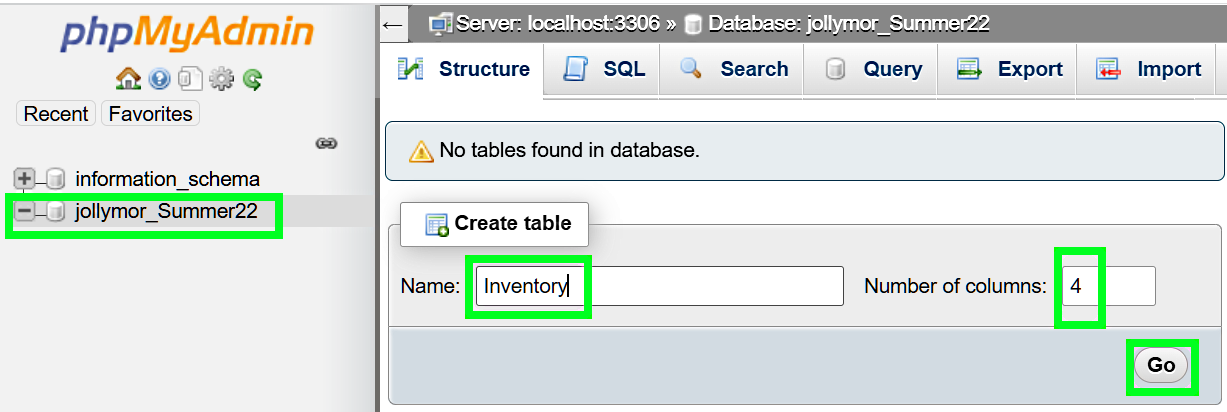
You can select to work with one of your databases by clicking it
either in the list on the left side or on the Databases screen.
Select a database and we'll add a table to it.
When you select a database, you'll automatically be taken to the
Structure tab where you are prompted to create a new table (if you
already have tables in this database, you'll see them listed at
the top of the screen).
Create a new Inventory database by typing "Inventory" in the
Name: field and "4" as Number of Columns: then click the GO
button.
Add a new table to the database
This next screen is where you will add the different columns
or fields to your table. Each row of fields allows you to configure
a single field for your table. We're going to add the following
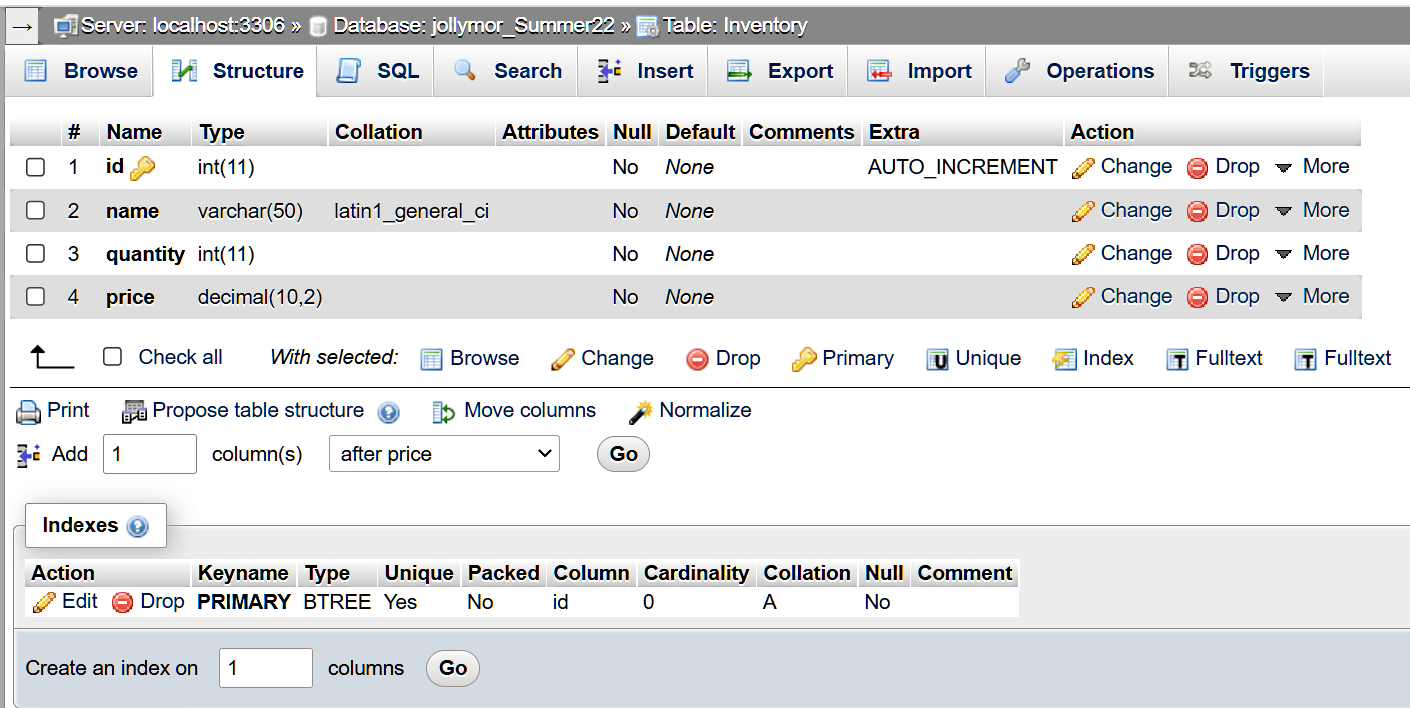
fields to our Inventory table:
Table Name: Inventory
Field Description
Data Type
Size
Comments
id
integer
n/a
primary key, auto number
name
String
50
quantity
integer
n/a
price
float
n/a
Let's start by adding our Primary Key
field:
In the first row of fields, enter the following values for each field
(if a field isn't listed here, leave it blank):
Name: id
Type: INT
Index: PRIMARY (this will open a small dialog, just
leave all the defaults and click GO to dismiss the dialog)
A_I: check this (A_I is short for Auto Increment,
which causes this field to increment automatically)
Now, create the remaining three fields in the same way:
The name field:
Name: name
Type: VARCHAR (varchar is a String data type)
Length: 50
Collation: latin1_general_ci (this sets the default
encoding scheme for this field - they're grouped by type,
so you can find this option under the "latin1" heading)
The quantity field:
Name: quantity
Type: INT
The price field:
Name: price
Type: DECIMAL
Length/Values:10,2
After adding all the fields, locate the COLLATION: field
underneath the Structure grid. Use the drop-down list
to set the table collation to latin1_general_ci. This will
set the entire table's default collation, which is handy if you
want to add more fields later.
When you're finished, your page should look like this one:
All four fields have been configured
When finished, click the "Save" button in the bottom-right corner.
If everything was successful, you'll briefly see a screen with the progress
and then a message that the table was created successfully. You should
then see the final structure of your Inventory table.
The final structure of the Inventory table
Adding Records
Now that we have a table, let's add some records to it. Click on the
Insert tab at the top of the screen.
This screen gives you a couple of sets of fields where you can
add new record data: each block of fields will add one record (although
you can leave one blank if you only need to add one record).
When adding records, we don't need to add the ID field value:
we set up the id field as an auto_increment field, so there's no
need to type in a value, one will be added automatically.
Add the following data in the first group of fields as the
first record:
name: Apples, Basket
quantity: 10
price: 3.50
Now add the following data in the next group of fields as the
second record:
name: Nectarines, Basket
quantity: 7
price: 4.00
2 records being added to the table
To save your records, click any of the GO buttons.
To save and add more records, select "Insert another new row"
In the dropdown list on the bottom of the page beside
"and then", then click on the GO button below that.
On the next screen you can see the actual SQL query that
added your records to the database. If you click the
BROWSE tab up at the top of the page, you can view the records
in tabular format.
The records have been added and we're adding
new ones.
Use the same process to add four more records to your Inventory
table:
name: Carrots, bunch
quantity: 1
price: 2.25
name: Cucumber, field
quantity: 1
price: 1.00
name: Tomato Cherry, Basket
quantity: 1
price: 5.00
name: Tomato, Vine Ripened
quantity: 4
price: 5.25
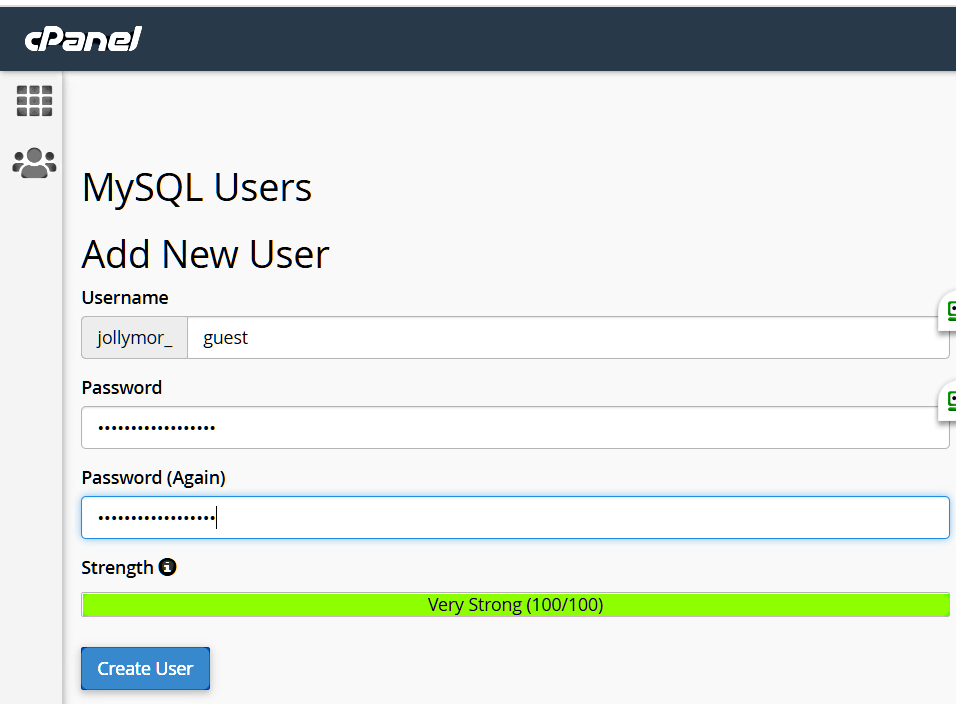
Adding a Guest User
Now that we have a table with some records, we'll want to
create some PHP pages that access those records. However,
we need a guest account for this. If we use our own
credentials within our PHP page, anyone using that page
will be able to do things like alter the structure of
our tables or even delete the entire database using
SQL queries. To keep our data safe, we use a guest account
with limited permissions in our PHP pages that access our
databases.
Go back to the main cPanel page (it should still be open in another tab)
and click on the MySQL Databases icon like you did before.
Scroll down the page until you see the "MySQL Users" section.
Here you can enter the name and password for your guest user.
Add the following data to the fields:
Username: guest
Password: syst10199_Summer22 (feel free to use a different
password, but don't forget what it is!)
Password (Again): syst10199_Summer22
This will create a user with the username login_guest
where login is your own login name.
Add the new user data
Once you've entered all the data, click the Create User
button.
If everything was ok, you'll be shown a success message. Click
the link to go back to the Database page.
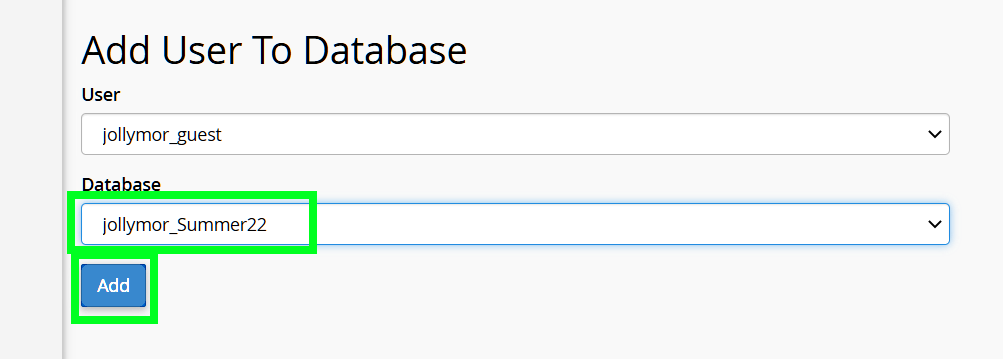
Users don't automatically have access to every database. You need
to give them access. Scroll down the page to the "Add User
to Database" section.
Select the user account you just created and then select the
database with your Inventory table. Then click the ADD button.
Add the new user to the database
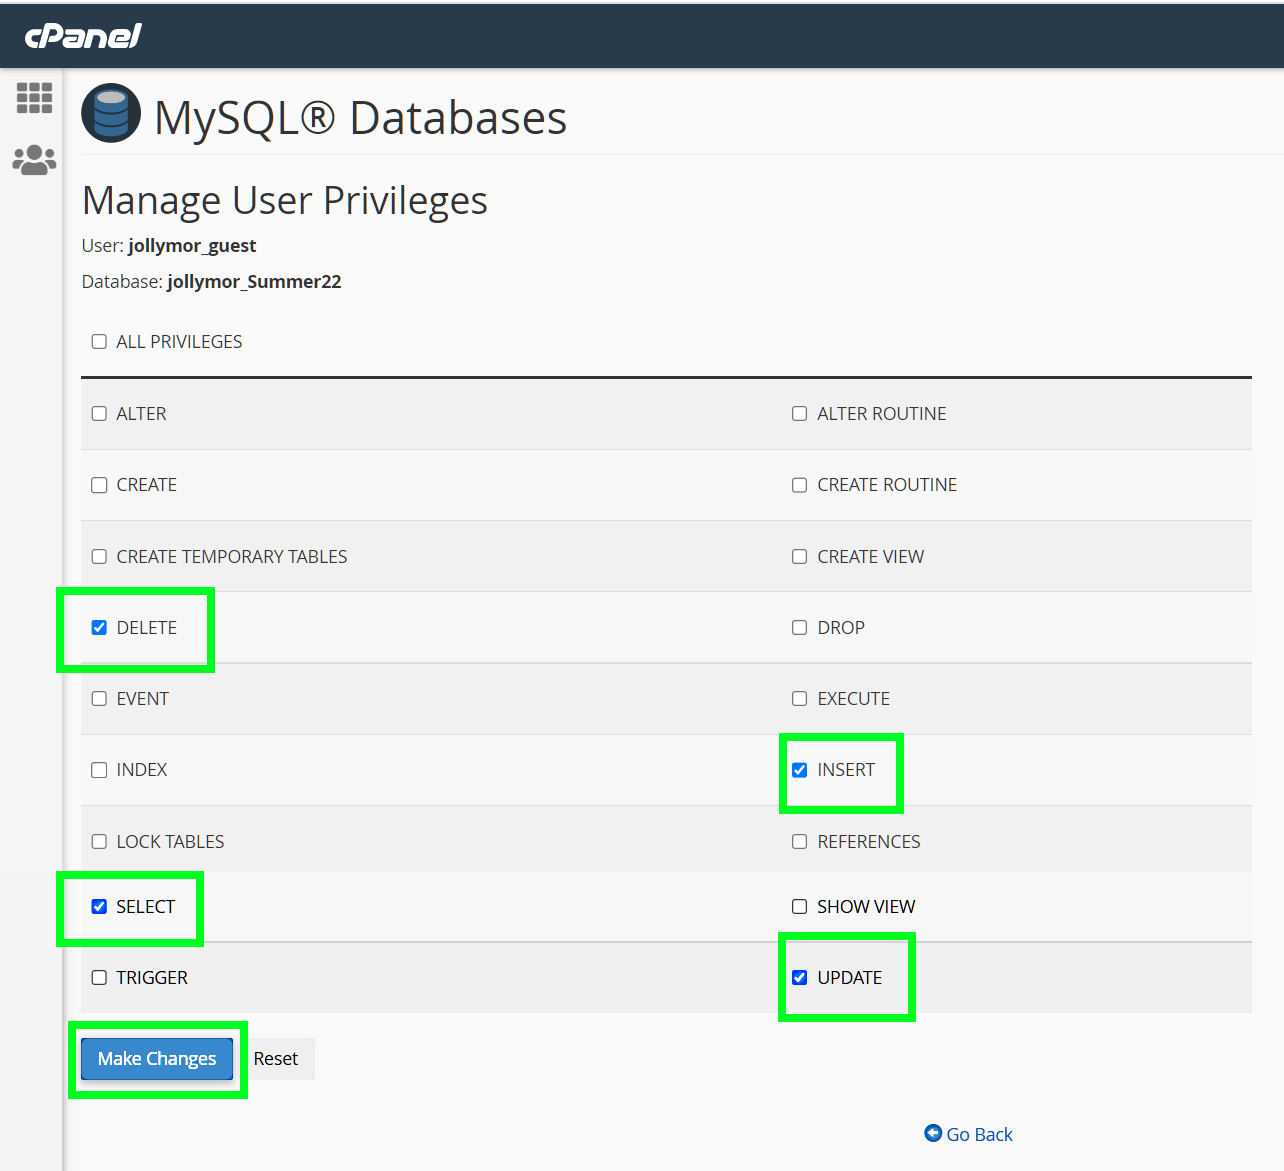
The next screen asks you to choose the permissions this user should have.
You should only ever give your guest account the minimum permissions
required. If all you need is to be able to browse a catalog, then
all your guest account needs is SELECT permissions (permission to use
SELECT query).
We'll be using our guest account to learn how to perform
SELECT, UPDATE, DELETE, and INSERT queries, so make sure you
select those four permissions in the permissions list.
When you're done, click the "Make Changes" button.
Choose SELECT, UPDATE, DELETE, and
INSERT permissions.
Database Access with PHP
Now we're ready to access our records in our Inventory table using
PHP code.
Create a new project in your editor.
Add a PHP file called
"config.php". This is where we store our connection data.
We keep this separate because it's usually used in several
different php programs, and it's also safer to keep it
in a separate file.
Add the following variables to your config.php file:
Make sure you put your own guest account user name and password
in the $user and $passwd variables. Note that we're using
plain text for the credentials and that's fine for now.
In a security course, you would learn how to properly encrypt
sensitive data.
Save the config.php file.
Connecting to the Database
There are a variety of ways to connect to and use your database.
We'll be using PDO
(PHP Data Objects). PDO has some advantages over other techniques:
It allows you to use named parameters for queries, which makes your database applications
safe from SQL Injection Attacks.
If you want to write PHP programs that access other types of database
servers (e.g. Oracle, SQLite), you won't have to learn anything new: PDO code works for
a variety of different database servers.
PDO is object oriented, so you'll begin to see some of the OOP syntax that PHP
uses. It's definitely not the same as Java or similar
languages, but it's not difficult to pick up.
Making a Database Connection
In any programming or scripting language, you will need to establish a
connection with your database or database server and then select the
database you wish to use. In PHP this is done by instantiating the PDO
object using the PDO() Constructor:
$dbConn = new PDO("connectionString", "username", "password");
The PDO constructor requires a connection string, user name, and password:
The connection string includes a bit of
information about the database to which you wish to connect:
The database driver name, followed by a colon. E.g. "mysql:"
The server that hosts the database (the name of the database server). This
is defined by assigning the server name to the "host" parameter. E.g.
"host=localhost"
The name of the database you'd like to use. This is defined by assigning
the name of the database to the dbname parameter. E.g.
"dbname=employees"
Separate the host name and database name paramter statements with a semi-colon.
For example, an entire connection string might look like this:
"mysql:host=localhost;dbname=employees"
The user name you want to use to connect to the
database. For yourself,
you would put your admin account user name.
For applications that are allowing
guests or users to view data, you would use the name of the guest account, or
the user name that a user has input into an HTML login form.
The password belonging to the account you are using to connect
to the database.
Earlier you created variables in the config.php
file for the account info of the guest
account, so that's the one we'll use to connect to the Inventory database:
Create a new file connect.php. Add a statement that
includes (requires) the config.php file and creates a a new
connection to the database:
<?php
    require_once("config.php");
    $dbConn = new PDO("mysql:host=$hostname;dbname=login_Summer22", $user, $passwd);
?>
(use your own database name for the dbname parameter!!)
The $dbConn variable is an object variable; it's an instance of the PDO object.
You can learn more about the PDO object on the
PHP.net PDO page.
Connection Errors
It's always possible that there could be problems connecting to the database.
PDO allows you to use a standard try-catch block to catch any
PDOException objects:
The code above will display any error messages, if any. $ex is the
PDOException object that is thrown.
getMessage() is the accessor
method in the PDOException class that allows access to the PDOException's
message data member. This data member contains the error message
associated with the error that occurred. Notice that we don't use
dot notation in PHP when accessing members of a class. Use the minus
or dash symbol, followed by the greater than symbol.
We can make this re-usable by using a function to return the
database connection object if there is a successful
connection. If the connection fails, we can't do much of
anything so we terminate the script with appropriate
error messages:
Add an index.php HTML file, and add a PHP block above your
!doctype element
that includes the connect.php file. You should use a
require() function, since we can't use the database
in the index.php page without the dabase connection we've
defined in the connect.php file.
$dbConn = require_once("connect.php");
This will attempt to connect to the database and if
successful, $dbConn will contain the PDO connection object;
otherwise, it will stop the script and display the error message
in the error log and/or on the page.
You could then use this to perform database operations:
<?php
    $dbConn = require("connect.php");
    // if we reach this line, we successfully connected and can start
    // performing queries on our database
?>
<!doctype html>
... rest of the main page
Now that you know how to connect to a database, you're
ready to write code that creates records from user
input data!
Overview of SQL Queries
SQL
stands for Structured Query Language and is used to
invoke commands on a database. Programs like Microsoft Access,
Oracle, and Postgre, and others allow you to use SQL to create
databases, tables, fields, and to populate records with field values.
When working with PHP and HTML forms, you can use SQL to
store data in database tables, modify or delete those records, or
even look up information that was entered previously. We use the MySql
server for this, because it's free, easy to use, and
readily available to us. Note that the SQL you learn
here (and you'll learn much more of it next year in the database courses)
you can use in Microsoft Access, with Oracle, or anywhere else you have
access to SQL.
A query is a statement you
that executes on an SQL server to perform some kind of operation.
Queries can create databases and tables, search existing tables for matching records,
add new records, modify and delete records, and many other kinds of things.
There are four categories of queries, but we're only concerned with one of them
in this course:
those written with DML statements.
DDL stands for
Data Definition Language and refers to statements
that define the database, its tables, and their schema.
DML stands for Data
Manipulation Language and refers to statements
that manipulate the database data in some way, such as editing a record.
DCL stands for
Data Control Language and refers to statements that perform
administrative tasks such as like changing user account permissions.
TCL stands for
Transaction Control Language and refers to statements that
manage changes made by DML statements, such
as rolling back to a state before a record update was made.
This course will focus on four specific types of DML queries:
INSERT statements create or add
new records or rows in a table.
SELECT statements read records
from the database tables and are often used to retrieve a list
of items or search for items in one or more tables.
UPDATE statements update or
edit one or more existing records.
DELETE statements delete one or
more records in a database table.
These four statements are often referred to as the
CRUD operations,
where CRUD stands for "Create Read Update Delete".
Many applications are dedicated to CRUD operations.
In the next four lessons, we'll look at each one of the
CRUD operations using PHP and MySQL.
Preparing and Executing SQL Statements
To execute a query on our database, we first must prepare an SQL
statement. Prepared statements are a feature of PDO.
They allow you to
create SQL statements and re-use them, and it does this much more quickly
and efficiently than not using prepared statements. To start, you use the
PDO object's
prepare() method:
For our examples below, let's pretend that the $sqlQuery
variable contains a very basic SELECT query:
SELECT * FROM Inventory;
This query will retrieve all of fields/columns of all
of the records/rows from the inventory table.
Notice that your SQL statements should end in a semi-colon.
To prepare this statement to be executed, we would use
the PHP code:
$statement = $dbConn->prepare($sqlQuery);
The prepare() method accepts a string that contains the
SQL statement you'd like to execute and returns a
PDOStatement object. The prepare()
method will examine the SQL query and get it ready to execute.
If the server is unable to prepare your statement, then
the prepare() method will return the value false.
The PDOStatement object models a statement that is ready to execute.
It contains a method
execute(),
which will execute the prepared statement and contain
the results of the query. Once you've invoked the
prepare() method,
you can then invoke the execute() method on the
statement object that was returned by prepare().
The execute() method will return true if it was
able to successfully execute your query statement, or
false if it was unable to execute your query
statement.
Here's an example of how you would typically
use these two functions on an open database connection:
The execute() method returns true if the statement succeeded,
and false if the statement failed. You could use this value to show feedback
to the user, if necessary:
<?php
    $statement = $dbConn->prepare($sqlQuery);
    $execOk = $statement->execute();
    if ($execOk) {
        // do whatever you like with the results
    } else {
        // error executing query:
        print_r($dbConn->errorInfo());  // for debugging
        $statement->debugDumpParams();  // for debugging
    }
?>
In the else block above, we display the value of
$dbConn->errorInfo(). The
PDO object's errorInfo() method contains error
information of any error that might
have occurred during the last operation on the statement object. We also
execute debugDumpParams() on the statement object:
this prints out the
actual SQL query, number of parameters, parameter values, etc. This
can be helpful if your error is in the SQL statement.
The print_r() method is used for debugging: it prints out the values
of a variable, array, or object in human-readable form.
It's similar to var_dump().
PDO->errorInfo() returns an array with 3 elements:
Element 0 is the state code
Element 1 is a driver-specific error code (these vary, depending on the
type of database server/driver)
The last element is a driver-specific error message.
You could use the last element in an error message, if
you wanted:
<?php
    $statement = $dbConn->prepare($sqlQuery);
    $execOk = $statement->execute();
    if ($execOk) {
        // do whatever you like with the results
    } else {
        // show user feedback: error executing query
        echo "<p>Error executing query: " . $dbConn->errorInfo()[2] . "</p>";
        print_r($dbConn->errorInfo());  // for debugging
        $statement->debugDumpParams();  // for debugging
    }
?>
Exercise
1. Using PHPMyAdmin, add a Course table to your database
with the following fields:
Table: Courses
Field Name
Type
Size
Comments
course_code
Varchar
9
Primary Key
course_title
Varchar
50
credits
Decimal
5,2
grade
Decimal
6,2
Populate your Course table with a few sample records.
2. Write a segment of code that connects to your
database, uses the Courses table, and then executes the query
"SELECT * FROM Courses;".