Refresh
this page because I am probably still making changes
to it.
One of the main reasons people want to learn PHP is so they can
write server-side scripts that process HTML forms! In this lesson
you'll learn how to retrieve form inputs inside your PHP script,
how to protect your program from cross-site scripting attacks,
and how to validate your input data.
Prerequisites
Before doing this lesson, make sure you've gone through the
following lessons first:
So you have an application that uses an HTML form to
get user inputs: but how do you access that input data
in your server-side PHP script? First of all, your form's
action="" attribute needs to define which
program/file/script should recive the form input data.
That program will then execute its code to process the
form data (e.g. perform calculations, create objects,
read/write a database, etc). If you want the current
page that contains your form to also process the form
data, you can set the action attribute
to the current file name or leave the attribute out
entirely. For example, if you have a form inside a page
called foo.php, either of these will cause the form
to be processed by the same foo.php page:
<form action="foo.php">
<form>
When a form is submitted
using the SUBMIT button, the user's inputs in the form are
sent along in an HTTP Request object that goes to the server.
Form data is sent as a query string that is
either sent in the request URL or in the request body.
When your form's method attribute is set as
method="get", it uses the GET method to
send the request. In this case, the data is sent as
key-value pairs in the URL of the request.
If your form's method is setas method="post",
the request is sent using the POST method. This means that
the data is sent as encoded key-value pairs in the
HTTP Request body.
Query Strings
A query string consists
of a set of key-value pairs separated by the &
(ampersand) symbol. The key is the form input element's
name="" attribute value, and the value is
the value that the input element contains i.e. the value the user typed,
selected, or checed. We'll look at how different types of form input
elements send their input value to the query string later in this
lesson.
For example, if you have a form with some inputs defined as:
When the user submits the form using the SUBMIT button after
entering "Foo Bar" as the name, "me@me.com" as the email,
and "555-5555" as the phone number, the query string will be built as:
The user input "Foo Bar" contains a space, which is encoded
as a + when it's added to the query string.
The @ symbol in the email address is also
encoded as the value %40
Each key-value pair is formatted as "key=value" when it's
added to the query string.
Other special characters in the URL
might also be encoded, but you don't have to worry
about it at all: when you send and then later receive the
values in the query string, the encoding and decoding is
automatic. The characters that are encoded are generally ones that
have special meaning in URLs (such as the @ symbol) or that make the URL
invalid (such as a space).
GET vs POST methods
What's the difference between GET and POST?
The GET method sends your query string in the URL.
A ? (question
mark) separates the query string from the file being
requested. For example, using the form and sample
inputs in the earlier example,
which is processed by the file contact.php, the
GET request would appear as:
The POST method doesn't use the URL to send the query string in the
request. It sends the query string in the body of the request.
A request (and a response, for that matter) consists of a header
and a body. The header contains information about the
request such as the type of content the request is willing to accept in the
response (and in what encoding scheme and languages), the size of the
content/data that was sent in the request, what kind of data is being
sent in the request, where the request came from and using which browser,
and lots of other information.
The request body contains the data that was sent along in the request.
It might not only include a query string. For example, if you were uploading
a file, the body of the request would contain the file you were uploading.
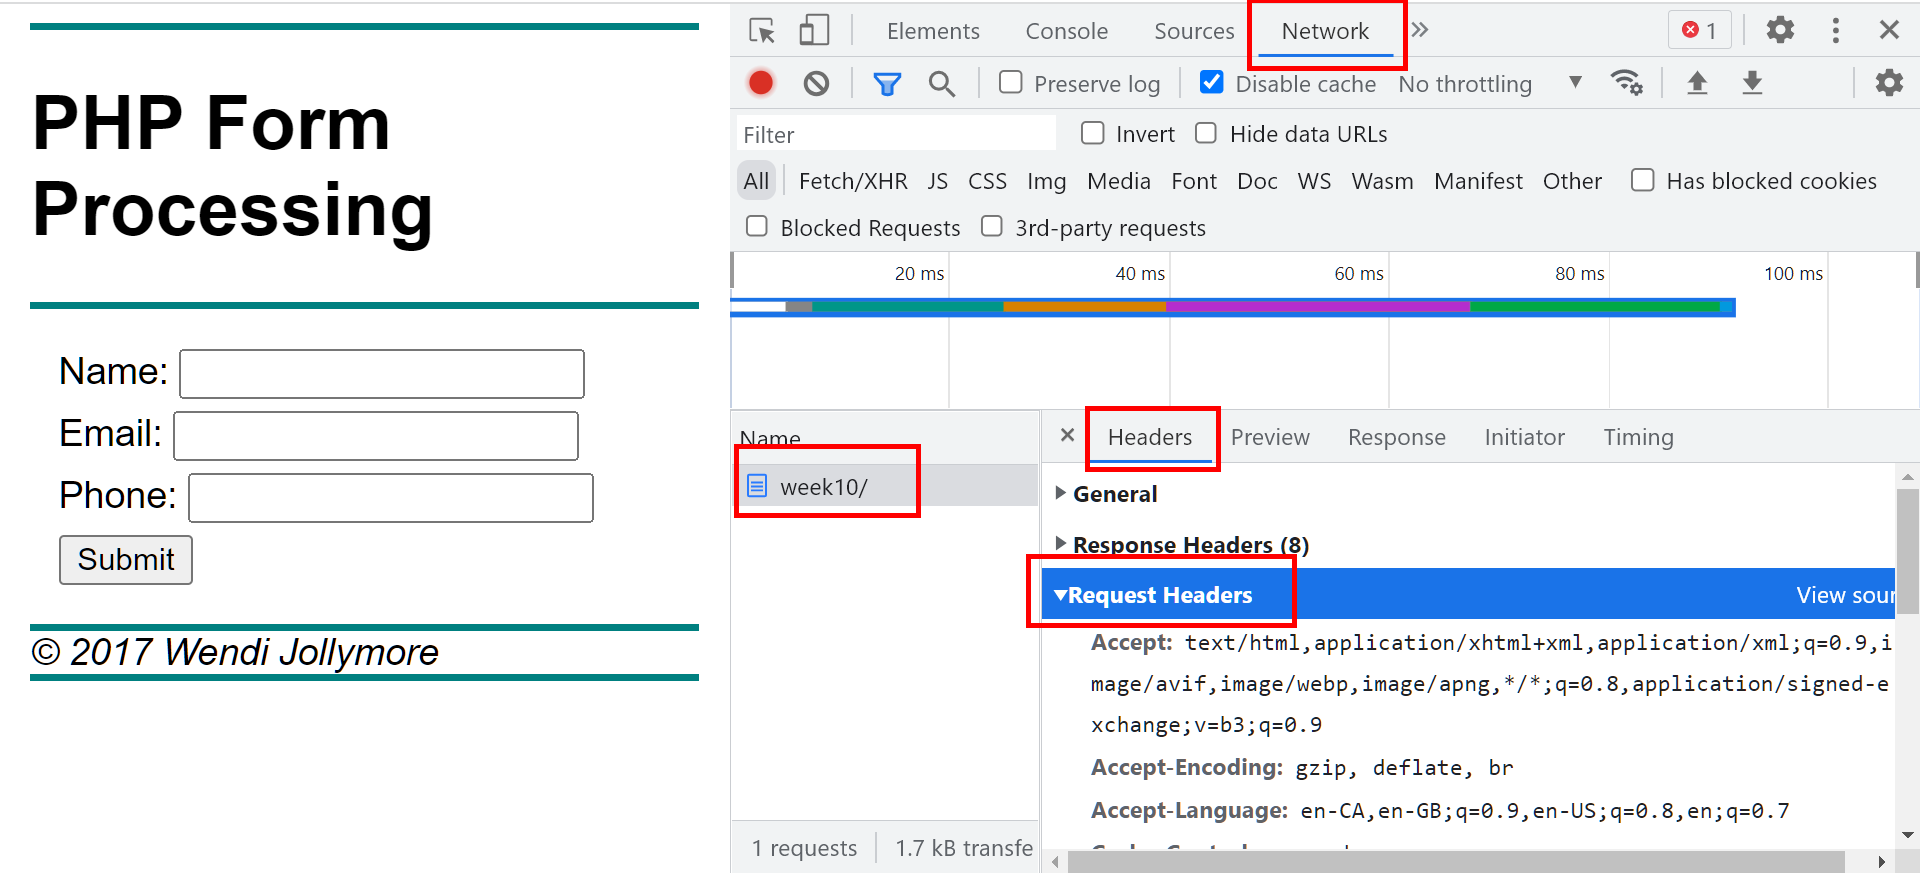
You can use your browser's developer's tools to view the request headers and
body: Using Ctrl-Shift-J to open the developer's tools, go to the Network tab
and then refresh the page you want to view. You can view the request headers
by selecting the request:
Select the request in the list on the left and you can view the
Request Headers on the right.
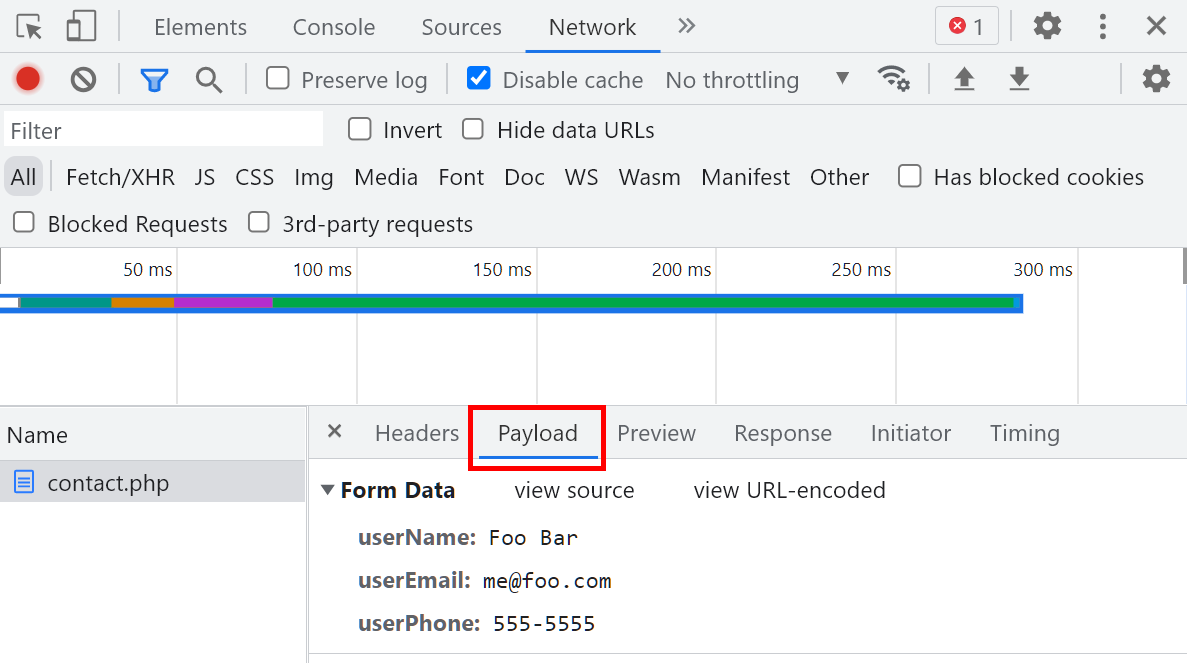
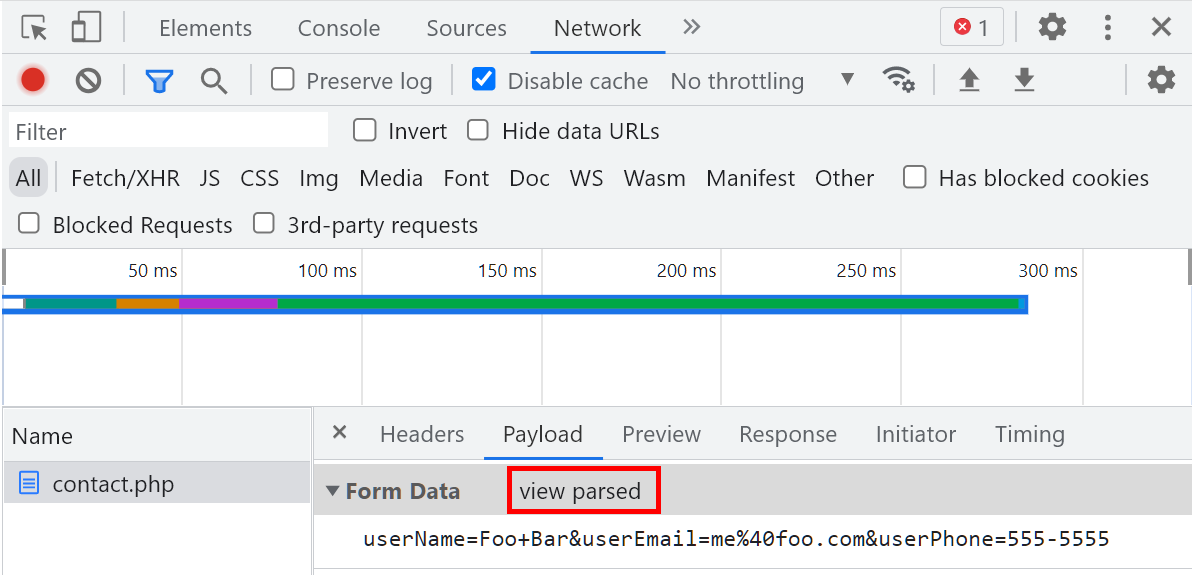
For a request that has a query string, either in the URL as a GET request or
in the request body in a POST request, you will see a "Payload" tab beside
the "Headers" tab. You can view the query string in its raw form or
formatted as it might look in the form.
Use the Payload tab to view the query string. View the query string in its raw, encoded form
Both GET and POST send the query string as encoded, plain text
but there are still some significant differences when it comes down
to making a choice between GET or POST.
GET vs. POST Request Methods
GET
POST
Data is sent as key-value pairs as part of URL, therefore
data is visible to a user
data is visible when page is bookmarked or
in the browser history
data can be cached
it's extremely easy to hack
Data is sent inside the HTTP request body, therefore
data is not visible to a user
data is not visible when page is bookmarked
nor in the browser history
data can't be cached
it's more difficult to hack (but still not difficult)
Data can only be plain text
Data can be plain text, objects, binary data, etc.
Data is limited to the size limit of a URL (generally
2,048 characters)
There is no limit to amount of data you can send
No problems reloading the URL or using the browser's BACK
button to go back to the URL
When browser reloads/revisits the page, the form data
must be resubmitted
So you can see that using a GET request makes the form data visible to anyone.
Not only in the browser window, but it will appear if the requested page is
bookmarked. Also, when a request travels from the client to the server, it
makes many stops at various routers along it's route: there are many paths the
request can take to get from source to destination and as it passes through a
router on the way, the router caches the request. Anyone with access to the
router's cache can easily see the query string in the URL. This means any data
sent with a GET request has the potential to be seen by a lot of different
people!
A POST request sends the data within the request body, so it's not as easily
visible - it doesn't appear in the URL so it won't appear in bookmarks or
a router cache. This doens't mean your data is safe, though: you would have
to encrypt sensitive data and send it ofer Secure HTTP (HTTPS) for it to be
safe. You'll learn those things in a course on network security.
Lastly, when the user refreshes a page, the browser requests that page again.
This means if your request is to process some form data, that form data
will be sent to the server again and the page that's processing the
data will execute again. This might not be an issue for a lot of applications,
but what if your form is asking for data to add a new record to a database?
If your processing script inserts that record into a database or adds it
to a file, refreshing or reloading that page will cause the script to
execute again, and it will add the new record to the database/file a second
time, and every time the page is refreshed. This causes redundant records
and might even cause data integrity exceptions on a database server.
With a GET request, your browser will allow the user to refresh a page, but
with a POST request, the browser will warn the user that they're about to
re-submit the form and cause the form inputs to be processed again by
the program. The user has the option of confirming form re-submission so
you can't prevent it, but at least they will get a warning and have the
opportunity to say no.
With these things in mind, here are the standard industry guidelines
to use when trying to decide if you should use GET or POST:
Use POST when:
Transmitting Sensitive Data: since POST
doesn't send the data
as part of the URL, you should use it for sensitive
data like logins, personal data, payment information, etc.
Writing to a File/Database: if you use GET,
the user can reload/refresh the page, which causes whatever
method you're calling to execute again with the same data.
Using POST requires a resubmission of the data, so the
user is less likely to accidentally perform a file/database
write with the exact same data multiple times.
Transmitting Large Amounts of Data
or Mixed Types of Data: POST has
no restrictions on the amount and type of data
you want to send, whereas GET can only handle 2k-4k
characters and those characters can only be ASCII
characters.
If none of the above conditions apply, use GET.
GET is a lot faster than POST.
Accessing the Query String
Once you've created your form and decided which request method
to use, you can write the PHP script that processes the form.
How you access the query string depends on what request method
your form used: The query-string key-value pairs are stored
in an associative array called $_GET for GET requests or
$_POST for POST requests.
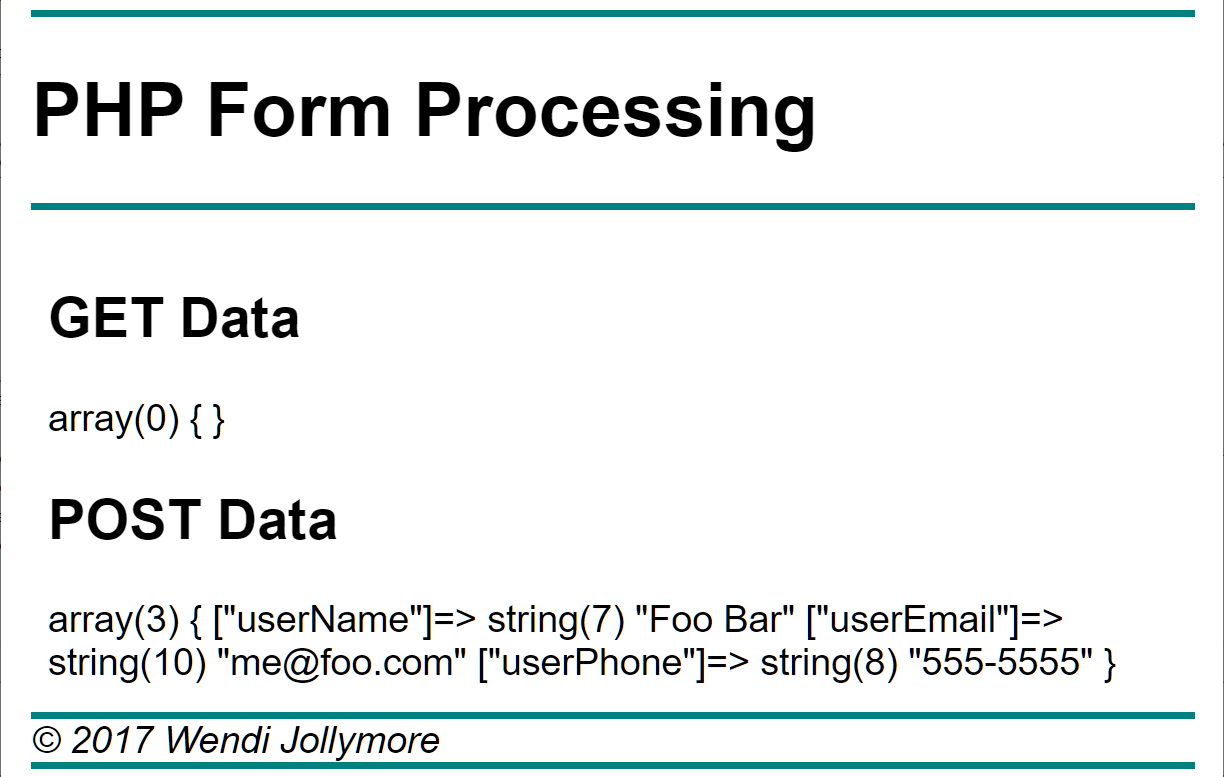
To see what the data looks like, add the contact form from
the earlier examples to an HTML page (e.g. index.html)
and then create a contact.php page that
contains the minimal HTML, a header and footer, and
a <main> element containing the following PHP block:
Upload both your form page and your contact.php script to your server,
then load your form page. Fill in some data and click the SUBMIT button.
You should then see either GET or POST form data, depending on which
method="" you used in your form element:
My form used a POST request.
The $_GET and $_POST arrays are global variables, so you can
use them anywhere in your code. Both $_GET and $_POST are
associative arrays - the key-value pairs correspond to the key-value
pairs in the query string sent to the PHP script.
This means you can easily access any specific form element
by the form input element's name value:
<?php
  // if your form used method="get":
  $userName = $_GET["userName"];

  // if your form used method="post":
  $userName = $_POST["userName"];

  echo "<p>$userName</p>";
?>
If a user doesn't fill in one of our text fields, that query string pair
contains an empty value. For example, when I don't enter a phone number, my
var_dump() of the $_GET/$_POST array appears as:
In this example, I'm assigning a value to $username using the conditional
operator: if the
userName input value in the query string isn't empty, I assign it
to $userName, otherwise I assign the
default name of "anonymous" to the variable $userName.
Getting input values from regular text inputs like type="text",
type="email", type="password", and text="number" and also from the
<textarea> element are pretty straight foward, because the value
in the query string contains whatever value the user typed.
But what about radio buttons, check boxes, and selection lists?
Radio Buttons and Check Boxes
Recall that radio buttons are a set of options from which the user can
select only one. They all share the same
name attribute value. When
radio button data is sent to the server, the key in the $_GET[]/$_POST[] array
is the name attribute of the radio button group.
The value for that key
is the value attribute for the selected radio button. For example:
In the above form, you have three radio buttons in a group called optColour.
The code below checks to see if the optColour field was sent to the server.
If it is, the value in optColour (the value
of the selected radio button
is stored in the $colour variable), otherwise the $colour variable
gets a null-string (which I just chose as an example: in other
programs you might assign a different default value):
For check boxes, if the check box is not checked, then that
field is not sent to the server.
Understand this clearly:
it will not send a key-value pair for an unchecked
checkbox at all.
The checkbox's key-value pair is only
sent to the server if the check box is checked.
The value that is sent corresponds to the selected
checkbox's value="" value:
When this box is checked on form submission, the key-value pair
chkPhp=true is added to the query string.
To retrieve the value of the check box, make sure it's set using isset().
If the check box was unchecked, nothing is sent to the server and
$_GET/$_POST["chkPhp"] will give you an error because "chkPhp" is not a valid index:
$likePhp = isset($_POST["chkPhp"]);  // if you want the value true or false
$likePhp = isset($_POST["chkPhp"]) ? "yes" : "no";  // if you want some other value
Here, in the first example,
we check that the chkPhp field value was sent to the server. If it was,
we store the boolean value true in the $likePhp
variable (because isset() returns a bool value),
otherwise we store false.
In the second example, I just used the strings "yes" and "no", but you
can put whatever values are most appropriate for your application.
Selection Lists
Selection lists work similarly to radio buttons:
the name="" attribute of the <select>
element is the key and the value=""
value of the selected <option> is the value assigned
to that key. For example, if we have this selection
list in our contact form:
If the user selects "Mississauga Hazel McCallion" in the list, the
key-value pair campus=hmc is added to the query string.
Try it and add a statement that stores the value in a variable if it
was sent in the query string and it's not empty, then display the
value on the page.
Cross-Site Scripting Attacks
An important part of processing your input data is to make sure
that you avoid injection attacks like
XSS (Cross-Site Scripting).
XSS occurs when a user attempts to hack your pages
by injecting malicious code into a form field. For example, say you have a form with
an input field like so:
<h1>PHP XSS Example</h1>
<p>This is an example of XSS.  Type something in the field below and then click Submit.</p>
 <form method="post"> <! no action, so this page does form processing -->
  <p><input type="text" name="txtInput" id="txtInput" placeholder="Type anything."><br>
  <input type="submit"></p>
</form>
<p><?= $input ?></p>
In our form, the last paragraph element is displaying the value
of the PHP variable $input.
Inside the head section of your document, add the following
PHP code:
This small script checks to see if "txtInput" was sent along with the
HTTP request: if it is, we store it in the $input variable, otherwise
the $input variable gets "Default Output Here".
What would happen if a user typed the following text into
the txtInput field?
<script type='text/javascript'>let elems = document.body.children;for(let el of elems){el.innerHTML = 'Gotcha!';}</script>
If you upload your file and try it out by pasting the script up above into
your input field, you'll find that the script executes after the form
is submitted and replaces some of the elements on the page with the
text "Gotcha!". It stops at the paragraph that contains the PHP $input
because the script overwrote itself!
Sample Output after trying XSS
This example was a simple one, and it's not really that malicious,
but if we can do something this simple, imagine what someone with
malicious intents could do!
There are a few functions you can use to avoid XSS on your PHP
pages. Many of these functions will also help you with validation
of your input data, as we'll see in the next two sections.
Filters and Filter Functions
The easiest and most powerful way to prevent XSS attacks is by
sanitizing your input data with Filters.
The Filter extension can be used on any data
that comes from an "unknown orgin" or contains "unknown values".
In other words, you would use it on data that comes from the user, a
data file, and sometimes even from a database.
The filters are divided into categories,
which include:
Validation filters: filters that check to see if a value contains
a specific data type (such as boolean, float, or integer), or
a valid email, url, regex, mac address, or ip: They ensure that the data
is of the correct type and in the correct format. You tell the filter
the criteria you would like to check and the filter
will tell you if the data matches that criteria or not. If the value is
valid, the value is converted to the desired type (if appropriate) and returned, otherwise
nothing is returned. The filter does not change the data that it's validating.
Sanitization filters: filters that ensure the data is
safe by escaping or removing characters that will cause problems.
You tell the filter what category of sanitization you want (e.g. regular
string, an email address) and the filter will make sure the data contains
no inappropriate characters - the filter will remove any characters that
don't match the filter criteria and return the string as a valid value.
For example, these can strip out characters to return a valid email address
or integer value. The filter will change the data to make it
safe or clean.
In this section, we'll focus on sanitization filters and we'll
cover validation filters in the next section.
The simplest way to use filters is by using the
filter_var() and
filter_input() functions.
Both of these functions apply a filter to a string and then return the
filtered string. For example, you could filter a string so that
only a boolean value is returned, or filter a string so that
only characters permitted in a valid URL are returned.
The filter_var() and filter_input()
functions have the following formats:
data is the data value you want to sanitize/validate.
inputType is an integer indicating which array contains
the input you want to validate/sanitize. Possible values include INPUT_GET
(if you want a variable from a GET request's query string) and INPUT_POST
(if you want a variable from a POST request's query string).
variableName is the name of the variable (the key)
from the input source of the value that you want to validate/sanitize.
filter is the type of filter you want to apply.
options is an associative array containing the options
you want to set for the filter. This is optional.
The difference between filter_var() and filter_input() is that
filter_var() accepts a specific data value to validate/sanitize,
but filter_input() retrieves the data value for you from an
external source, such as the $_GET or $_POST arrays. For example,
If you wanted to sanitize an input defined as name="userEmail"
from a POST request, you would use either of these:
Despite the syntax, these two statements look like they do the same thing but
there is a significant difference: when used to retrieve an input variable
that doesn't exist (such as an input for a checkbox that was left
unchecked), filter_var() will return an empty string "" and give an
exception that $_POST['whatever'] is using an undefined index, but filter_input()
will return null and doesn't give any error. If you're using filter_var(),
you'll have to include a function like isset() to check for an empty value.
For example, if you wanted to sanitize an input string to ensure that
it doesn't contain any suspicious characters:
// cleans up the email input and stores it in $cleanEmail
$cleanEmail = filter_input(INPUT_POST, "userEmail", FILTER_SANITIZE_EMAIL);
echo $cleanEmail;
There is also a smaller difference: filter_input() is using a pre-populated
array for $_POST or $_GET, so if you have code that modifies an element
of $_GET or $_POST, filter_var() will use the current element value of
the $_GET/$_POST array whereas filter_input() will use the original values.
You can see this if you try the following code on your contact form inside
your contact.php file:
echo "<p>Email after filter_var:<br>";
$cleanEmail1 = filter_var($_POST["userEmail"], FILTER_SANITIZE_EMAIL);
var_dump($cleanEmail1);
echo "</p><p>Email after filter_input:<br>";
$cleanEmail2 = filter_input(INPUT_POST, "userEmail", FILTER_SANITIZE_EMAIL);
var_dump($cleanEmail2);
echo "</p>";

echo"<p>Changing the post value for email...</p>";
$_POST["userEmail"] = "arti@cat.com";

echo "<p>Email after filter_var:<br>";
$cleanEmail1 = filter_var($_POST["userEmail"], FILTER_SANITIZE_EMAIL);
var_dump($cleanEmail1);
echo "</p><p>Email after filter_input:<br>";
$cleanEmail2 = filter_input(INPUT_POST, "userEmail", FILTER_SANITIZE_EMAIL);
var_dump($cleanEmail2);
echo "</p>";
Try it all with the value foo@foo< >.co;m (you'll
have to edit your HTML form and change the input type to "text" for your
email field).
Both methods can also return the bool value false
if the filter fails, so you can also use them in an if statement
or a conditional:
// sanitize email and then validate it
$isClean = filter_input(INPUT_POST, "userEmail", FILTER_SANITIZE_EMAIL);
$validEmail = ($isClean) ?
    filter_var($isClean, FILTER_VALIDATE_EMAIL) : "";
Another useful method is filter_has_var(). This method returns true if
an variable of a specific type exists in $_GET or $_POST:
if (filter_has_var(INPUT_POST, "userEmail") {
    $cleanEmail = filter_input(INPUT_POST, "userEmail", FILTER_SANITIZE_EMAIL);
} else {
    $errorMessages[] = "Error: Email address is required.";
}
Once you know how to sanitize input values, you can then validate those
values.
Validating Input Data
Form validation should not only be done on the client side, but
also on the server side. In fact, any time you are sending any
data to a PHP script, you should validate that data. As discussed
earlier, the reasons are:
Technologies used for client-side validation may not be
supported in the user's browser (e.g. an accessible browser might
not use JavaScript, a certain browser may not support many of the
HTML5 validation constraint attributes, etc).
A re-usable PHP script might not necessarily be called
from a form/page that uses client-side validation - you can use
the same PHP script for lots of different forms and not all of
them will have client-side validation.
Even if your data comes from a reliable source, it's too easy
for users to inject malicious code into input fields. Your script
should always check for this and fix the code, as appropriate.
There are several techniques you will use when validating form data
on the server side using PHP. You will often use more than one technique
at a time, depending on the data and what's being done with it. We
will look at the following:
Checking for Empty Fields
Checking for Valid Values/Types
String functions
You can easily check for empty fields and valid values and types
using validation filters - we learned about using
sanitization filters in the previous section. Using validation
filters is simply a matter of using validation filter flags
instead of santization filter flags.
For example, if you wanted to validate an input string to see if it's a
valid email address:
// clean and validate email address
if (filter_has_var(INPUT_POST, "userEmail")) {

   // sanitize, first!
   $emailInput = filter_input(INPUT_POST, "userEmail", FILTER_SANITIZE_EMAIL);

   // if sanitization succeeeded, validate
   if ($emailInput) {
      $email = filter_var($emailInput, FILTER_VALIDATE_EMAIL);

      // if validation failed
      if (!$email) {
        $errorMessages[] = "Email address is invalid.";
      }
   } else {  // sanitization failed
        $errorMessages[] = "Email address contains invalid characters.";
   }
} else {  // missing email input
  $errorMessages[] = "Email address is a required field.";
}
Note that you will still have to add the necessary code to check for
an input's correct values, such as ensuring a number is within the
correct range or that a new username contains the right number of
characters.
Other Useful Functions for Sanitization
You might also find the following functions helpful if you are
working with other kinds of data or just need something simpler in
an appropriate situation:
Removes any special characters that have special meaning
in HTML, specifically the pointy brackets < and >, the
ampersand &, and double-quotes. The symbols
are replaced with HTML entities (e.g. & and >).
This is a subset of htmlentities() - it does the same thing but only with those
five symbols. For example, if $data contains
the value:
Removes the back-slashes from a string that are used
to create escape characters. For example,
a \" will be converted to a " and \\ will be converted to
\.
Escapes any single- and double-quotes in a string, as
well as the back-slash character and the value NUL ("null byte",
which is a character that indicates the end of a string).
Checking for Null/Empty Values
There are a few functions you can use to check and see if a value
exists or contains a null-value. You can use these when using
filter_has_var() isn't appropriate:
Returns true if the input
field was "set", and false if it wasn't
sent. A variable/element is not set if it was declared but
never assigned any value or if it is a form field that was never sent
to the server in the HTTP request.
Note that if the "fieldName" element was sent but is empty,
isset() will return true.
I actually use isset() when I'm retrieving selection list, check box,
or radio button inputs in a POST request over HTTPS instead of filter
functions since their input values have usually been defined in
the HTML code (if the values come from a database, then I'll use filters)
Returns true if the value contains any
falsy value (e.g. "", 0, "0", 0.0, NULL, false, or is not set (declared,
but never assigned a value, or never sent to the server). If $input
contains anything else, empty() returns true.
is_null() returns true if $input is null:
if it contains null or NULL or if it
was declared but never assigned a value
(or a field element never sent to the server).
Checking for Valid Values/Types
Another set of functions allows you to check a value to see if it's
of a certain type or contains a certain value:
Lastly, the string functions you learned about in an
earlier lesson can be used
to validate input data. Functions like strpos(),
stripos(), substr(), strtolower(),
strtoupper(), strlen(), strcasecmp(),
and preg_match() can all be used
to aid in validation of string values. For example, you could use
these to check and see if a product code had the right number of characters
or that a product status field contained a certain set of values:
Exercises
1. Client-Side Validation Review
In Second Life, the Boomer
Esiason Foundation is holding a St.
Patrick's Day party on
Boomer
Island at Cystic Fibrosis University.
The party includes a Costume Contest, where residents create and dress up in
St. Patrick's Day outfits, and are then judged by the audience
members. The event host, Gramma Fiddlesticks, requires a web application
that records voting results to a web database that
is used to display contest results
on the CFU web site for all to see.
Audience members judge the the costumes by voting for the person
they think should be in first place, then voting for the person they
think should be in second place, then voting for the person they
think should be in second place.
The application should display a form in an HTML file
that allows Gramma to record
voting results the contest. She will count
the number of first place votes, second place votes, and third place
votes a contestant receives from the audience. Then she will enter
the contestant's name and their number of votes in the form fields.
When Gramma clicks the
Submit button, the form data is sent to the server.
The server-side script will
assign 3 points for each first place vote, 2 points for each 2nd place
vote, and 1 point for each third place vote (we'll do the database
portion in a later exercise). The total number of
points is then sent back to the client in a formatted web page.
See the screen shots below:
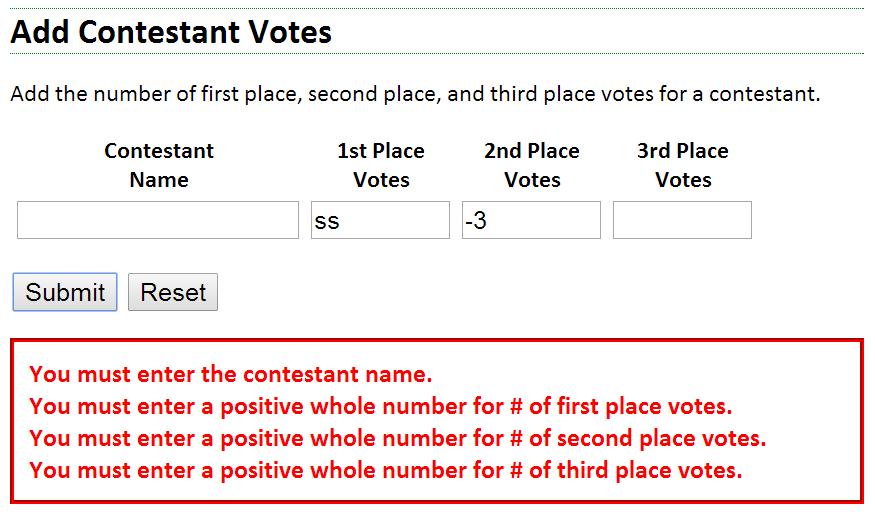
Gramma enters the contestant name and #'s of votes.
When the submit button is pressed, a JavaScript function should be called
that validates the data entered. If any data is invalid, user-friendly error
messages should be displayed in a div or paragraph element below the form.
Data is considered invalid if:
Contestant name is missing.
The numeric fields are empty or contain non-integer values.
The numeric fields contain a value less than 0.
Once you have the JavaScript validation working, you can add the pattern, title,
and required attributes to your form fields for browsers that support these
HTML5 attributes. Do not remove your JavasScript: your user might be using
a browser that doesn't support one or more of these attributes; also
recall that you can't use regex to test for valid values (e.g. if a number
is less than 0).
Errors appear if data is invalid.
If all the data is valid, the data is sent to the "addVote.php" script
on the server. We'll write the php script in the next question.
2. PHP Form Validation
The addVote.php script from the previous question should grab each of the 4 values sent from the
main form, calculate the vote total, and then display the vote total on
the page:
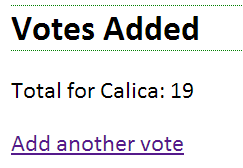
The vote total is displayed for the contestant
3. Validation, Checkboxes and Radio Buttons
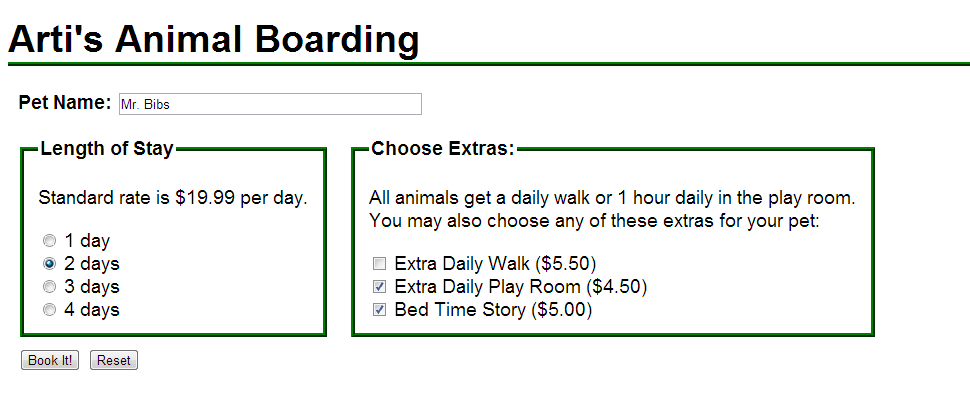
In a new project, set up a form for a short-term animal boarding business.
The user enters the pet's name, selects the number of days the animal
is staying (radio buttons for 1, 2, 3, or 4 days), plus a series of check
boxes for selecting various extras. See the screen shot below:
Pet Boarding Screen
Your form should invoke a php program when submitted. The PHP program
should perform the following tasks:
define a constant for the price per day (19.99)
perform any validation as described below
get the form data for the pet name, number of days, and extras
calculate the total amount for the days booked
calculate the total amount due (remember that extra costs are per day)
display the invoice as shown below
Validation
The following validation should be performed both on the client
side and the server side. The invoice should only be displayed
if all fields are valid:
The pet name and number of days must be filled in.
The pet name field should be safe (make sure there's no XSS attempt).
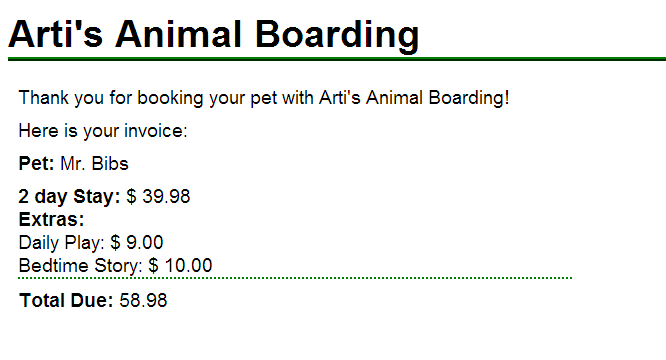
pet boarding invoice
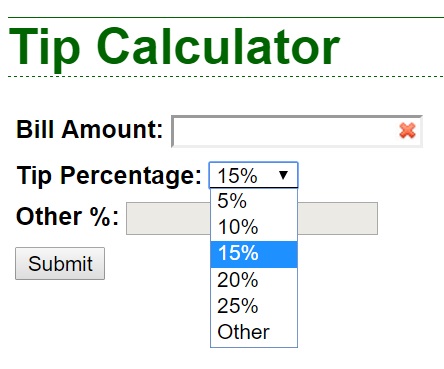
4. Tip Calculator
Create a Tip Calculator that retrieves a bill amount and allows the
user to select a tip percentage from a drop-down (select) element.
The list should include an "other" option that allows the user
to enter a tip percentage not listed (provide an extra text field for
the alternative tip percentage).
Basic Tip Calculator screen
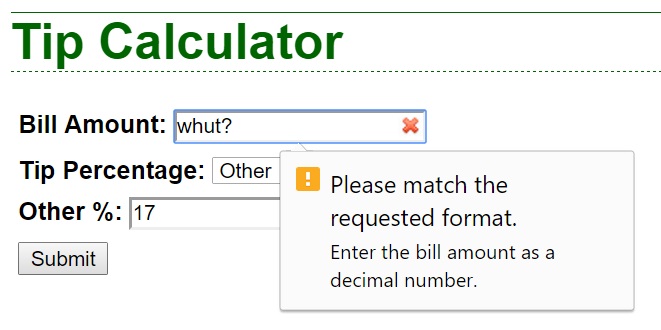
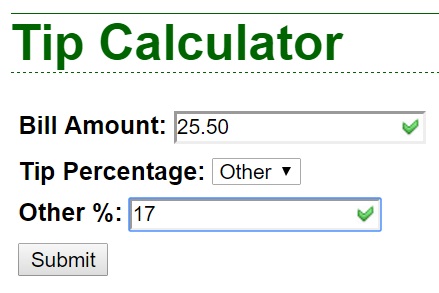
The bill amount is mandatory and must be a numeric value, and can be a floating point
number. The alternative tip percentage field is mandatory only if
the "Other" option is selected in the drop-down list. If this field is
used, it must also contain a valid numeric value which
can be a floating-point number.
Basic Tip Calculator screen: Bill amount must
be a valid floating point value.Basic Tip Calculator screen: Other Tip value must
be filled in when OTHER is selected in the list (shows invalid)Basic Tip Calculator screen: Other Tip value must
be filled in when OTHER is selected in the list (shows valid)
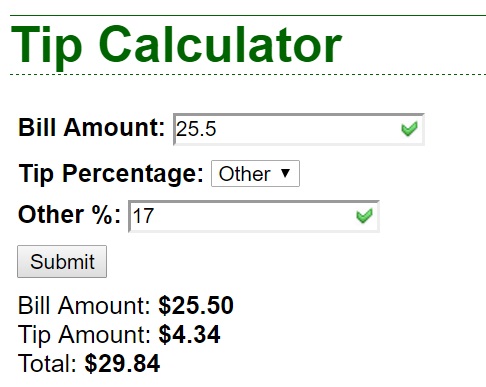
If the inputs are valid, calculate and display the tip amount and
total bill amount as shown below:
Basic Tip Calculator screen: Every thing valid, shows output.
Notice that the form fields don't lose their values when the page
is submitted: this is not the default behaviour, you have to code that
in yourself.