In the previous lesson on CSS Syntax
you learned the basics of CSS and how it works, but
the real power of CSS comes in the "cascading" part of CSS.
Learning how to use CSS and use the cascade to your
advantage allows to create modular, reusable, and efficient
CSS code that can be used on many projects.
Pre-Requisites
Make sure that you've worked through the previous
tutorial, CSS Syntax
before proceeding through this lesson.
Using CSS
Once you have learned the basics of how to code CSS,
how do you actually use it in a real web project?
There are three ways you can implement CSS into your
web pages:
External CSS Files
Internal CSS
In-Line CSS
External Stylesheets
External stylesheets are the most common
way to use CSS. Using this technique, the CSS code is stored
in one or more .css files (usually in a /css directory off
the web root). A <link> element is used to link the
stylesheet to the web document:
<link rel="stylesheet" href="css/main.css">
Note that several years ago it was considered important
to include the type="text/css" attribute, but this is no
longer required. But you might still encounter it in
older examples:
External stylesheets
allow you to apply consistent styles to multiple documents. You can define
all of your styles in one .css file and link that file to every page
on your web site. When a change in the styles need to be made, all the
developer needs to do is change the stylesheet code, and all of the
pages are updated automatically.
Historically, we used to keep the styling information inside the
HTML page along with the page content. This was cumbersome: when you wanted
to change the colour scheme, for example, you had to edit the colour
information coded into every page in the web site. When a site has several
pages, this was cumbersome. External stylesheets eliminate this problem,
making web development more productive.
Internal Stylesheets
Internal Stylesheets can be used when you want to change the
styles for just one specific page on the web site. Internal stylesheets
are coded inside a <style></style> element in the HEAD
section of your document:
<!doctype html>
<html>
  <head>
    <meta charset="utf-8">
    <title>A Web Page</title>
    <!-- the external stylesheet for this page -->
    <link rel="stylesheet" type="text/css" href="css/main.css">

    <!-- these styles override anything defined in the external stylesheet -->
    <style>
      h1 {
        color: navy;
        font-size: 1.7em;
        font-weight: bold;
      }
     </style>
  </head>

  <body>

    <h1>A Web Page</h1>
  </body>

</html>
In the example above, we've defined a style for the web page
that makes level-1 headings navy coloured, a font size that's 1.7
times the page's default font size, and bold. This style applies
to all level-1 headings in this document, but ONLY in this
document. It won't affect level-1 headings in other web pages
in the same directory/project. If there is a styling rule for
level-1 headings in the external stylesheet, those rules will
be overridden by the one defined in the <style> element of this
document's HEAD section. **see notes on The Cascade below
Advantages of Internal Stylesheets
Internal stylesheets
allow you to override the styles defined in an external stylesheet
for a specific page.
Disadvantages of Internal Stylesheets
Internal stylesheets
require more work to update, especially if you are using internal
styles in several different documents: you have to update every
document's internal styles as needed. Also, internal styles only
apply to the web document in which they're defined. If you want
to use the same styles in other documents, you should remove the
styles and put them in an external stylesheet to avoid cumbersome
updates.
Inline Styles
Inline Styles are styles that are defined in the HTML
content of the page, right in the elements you want to style.
To add an inline style, you use the style="" attribute of the
element you wish to style:
<section style="margin: 3px">
  <h3 style="color: navy; font-size: 1.2em;">Inline Styling</h3>
  <p style="color: red; font-weight: bold;">This is a paragraph that is red and bold.</p>
  <p>This is a plain paragraph.</p>
</section>
In the above example, the style attribute defines the styling
properties to set for each of the elements: The <section>
element is styled with a 3 pixel margin; the level-3 heading is
styled with navy colour and a font size 1.2 times the page's default
font size; the paragraph is styled with bold, red text.
The styling only applies to those elements - only the section defined
with the style attribute will have a 3 pixel margin, and only the paragraph
with the style attribute will have bold, red text. The
second paragraph has no styling, so it will have no special styling
applied to it, except for any that's defined internally or in an
external stylesheet.
Inline styles override any other styles: they override any internal
styles and any external styles.
Advantages of Inline Styles
They allow you to style one
specific element on the page, overriding any internal or external
styles that may have been defined.
Disadvantages of Inline Styles
This makes styling part of the
content of the page, which violates the whole reason we use CSS in
the first place. When styles need to be changed, you'll need to search
for all of the style="" attributes in the document and update each
one manually. For these reasons, we avoid using inline styles; we
only use them when it's absolutely necessary.
Inheritance
In HTML, an element is often nested inside another element. Recall
from our lesson on the DOM that the nested element is called the
child and the containing element is called the parent.
In CSS, a child element inherits the properties of its parent/container.
For example:
div {
  color: green;
}
<div>This is a DIV with some text.
  <p>This paragraph inherits the green colour from the parent DIV.</p>
</div>
If you try this code, you'll see that all of the text is green: the
child paragraph inherits the CSS colour property set for the parent DIV.
This is important: you will often have several nested elements, and
you need to remember that nested elements will inherit the CSS properties
of the parent elements. This will become especially important when
you start getting into relative measurements, as you'll see below!
The Cascade and Specificity
CSS allows you to define multiple styles for elements. When an element
has multiple styles assigned to it, it will always appear with the styling
that has the highest specificity, or priority. This is referred
to as the cascade.
Specificity
can be defined as the policy that helps us
figure out what styles should be applied to an element,
when there are multiple rules that assign different
values to the same property.
When 2 or more rules apply to a specific element,
specificity determines which declarations will be
applied to that element.
For example, you might have an element defined in
your HTML as
<nav class="menu"></nav>.
If your CSS has the following rule-set:
Specificity will determine which border is
applied to the <nav> element.
Specificity Score
Specificity can be
calculated as a score, where rules with a higher score will
override rules with a lower score:
1000 points: Inline styling, using the style="" attribute inside an element's
opening tag.
100 points: using the #id selector.
10 points: using a class (e.g. .highlight), pseudo-selector (e.g.
:first-child or ::first-line), and attribute selectors
(e.g. input[type=text] or img[alt])
1 point: using an element selector.
For example, you can calculate the specificity of the following
selectors as:
The selector with the highest specificity score will override
rules. This means if you have an element that
fits into two different rules, the rule with the highest specificity
score is applied.
In our <nav> example, we would calculate the
specificity scores as follows:
nav = 1 point
.menu = 10 points
Using the class selector .menu has a higher specificity
score, therefore the <nav> element's border will be
.2em dashed blue.
Another example: say you have the following
style rules defined in an external CSS file:
Both CSS rules will be applied. The DIV will have
the margin that is .5 of the base font size and the padding
that is .4 of the base font size on top/bottom and
.7 of the font size on the sides.
But what will the background colour be?
The specificity score for the first div rule is 1 (just an
element selector) and the score for the second div rule is
11 (element selector + class selector = 1 + 10 = 11). Therefore,
since the second rule has a higher score, it has higher priority
and the DIV's background will be yellow.
Note that even though the div.highlight
rule overrides the div rule, the margin and
padding declarations in the div rule still
applies to the <div class="highlight"> element:
Any styles that are are already set are not deleted when
one rule overrides another! The second and subsequent rules
"add to" the existing styles. The only styles that might
change are those that have declarations for the same property
in more than one rule (such as background-color, in our example).
This cascade behaviour
also means that if you style an element in an external
or internal stylesheet, you can override those styles with an
in-line style. For example:
In the above CodePen, the last paragraph has a purple background, overriding
the green background defined in the external/internal stylesheet, because
in-line styles yield a higher specificity score.
(In Codepen, we use the CSS tab: to do this on your own computer,
try copying the contents of the CSS tab into an external
stylesheet, or as internal styles in the <style> element in
the <head>)
Furthermore, what if you have mutliple stylesheets, and/or internal styles
defined in the HEAD section, and inline styles? Which has the higher
specificity?
Priority, from highest to lowest:
Inline styles
Internal styles defined after an external stylesheet
External styles
Internal styles defined before an external stylesheet
Browser's built-in styles (user agent stylesheet)
For multiple external stylesheets, the one defined the latest
has the higher specificity. The same is true of selectors used
in the same file (or STYLE tag, or whatever). For example:
In this CodePen, the first rule styles H1 elements to have purple text.
The second rule styles all H1 and H2 elements to have green text, and a
bottom border. The third rule defines H1 elements to have "initial"
colour text (the default colour).
Here, the second rule that styles both H1 and H2 elements overrides
the first "h1" style rule. The third rule that styles H2 elements overrides
the second rule that styles both H1 and H2. This kind of behaviour can
actually help you make better CSS rules: if you have a lot of styling to
apply to several elements, you can put them all in one rule (just as we
styled both H1 and H2 elements with a few different things). Then you
can "turn off" or change a few properties here and there with additional
rules (as we did with the third rule, changing the H2 element's colour
back to the default). For example, we can take the following CSS:
Internal and External styles override depending on which one is defined
first:
<!doctype html>
<html>
  <head>
    <title>A Web Page</title>
    <meta charset="utf-8">

    <!-- these styles have the lowest priority -->
    <style>
      h1 {
        color: orange;
        font-size: 1.7em;
        font-weight: bold;
      }
    </style>

    <!-- the external stylesheet for this page overrides the styles defined up above-->
    <link rel="stylesheet" type="text/css" href="css/main.css">

    <!-- these styles override anything defined up above -->
    <style>
      h1 {
        color: navy;
      }
    </style>
  </head>
  <body>

    <h1>A Web Page</h1>

  </body>
</html>
It's also important to note that only properties defined
more than once will be overridden. In the example above,
the first internal <style> element defines level-1 headings as being
orange with text that's bold and 1.7 times the page's default
font size. The second internal <style> element changes the
heading's colour to navy, however it will still be bold and 1.7
times the font size.
Specificity is part of
the cascade: The various styling rules you define in different
ways all cascade into a single virtual stylesheet that is applied
to the page.
Virtual Stylesheets
When a document is loaded, all of the CSS rules are processed and
their specificity is determined. Then a virtual stylesheet
is created after computing all of the styles for each element on the
page. This virtual stylesheet contains the final version of all of the
styling. In the previous example, the virtual stylesheet would indicate
that level-1 headings are navy, bold, and have a font size of 1.7em.
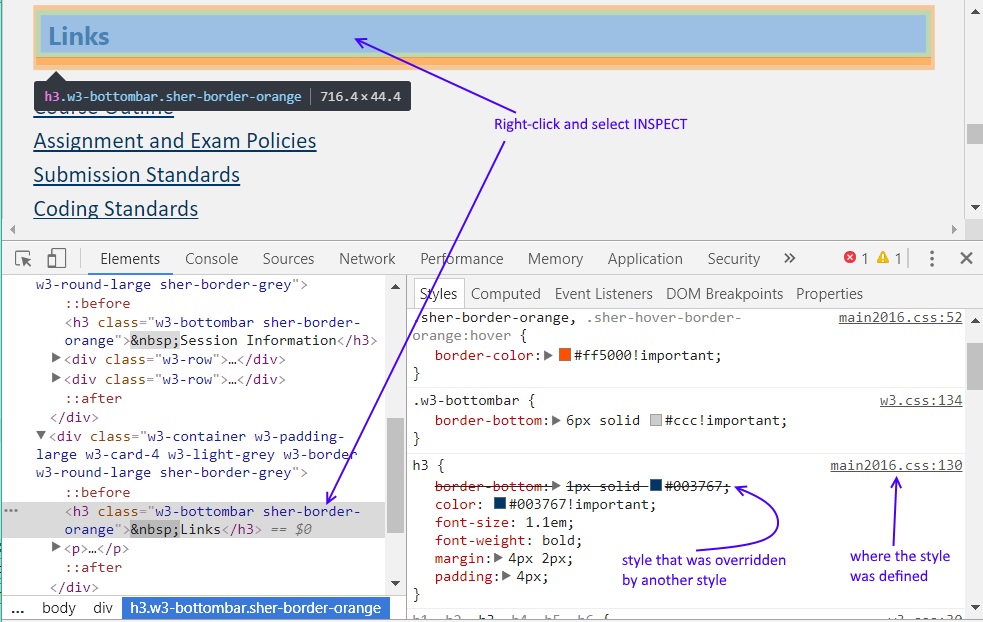
You can view the virtual styling information for a web page in Chrome
when you Inspect an element on the page (right-click the page element
and select Inspect, or use Ctrl-Shift-I). You might have to adjust
the height/width of the various parts of the window, but you should
be able to see the styles that you've assigned. You can check/uncheck
various style properties on the right side to see the effect.
The right side of the window shows you the various
styles applied to the element and where they came from (e.g.
an external stylesheet, the browser, etc.)
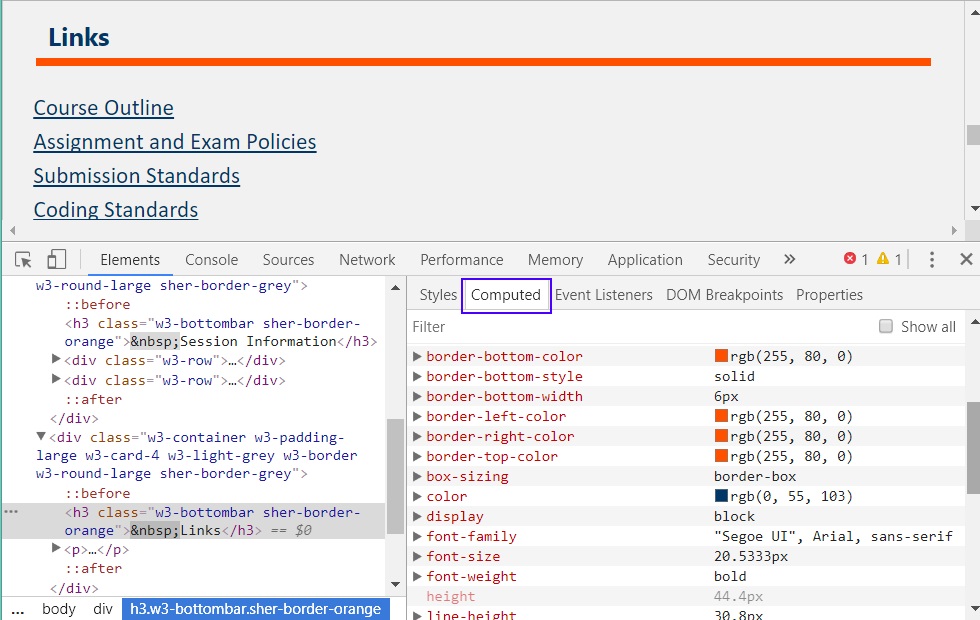
If you click on the "Computed" tab in the styles part of the window,
you can see a list of all the style properties in the virtual stylesheet,
as they have been computed by the browser.
The COMPUTED tab shows you a list of all the styles
that have been computed by the browser: this is your page's
virtual stylesheet.
Efficiency
It's also important to make sure you write the
most efficient styling rules possible. In addition to specificity,
you must also consider efficiency. For example,
what if you have multiple <nav> elements on a page (
e.g. one in the header that's a menu, one in the footer
with help/contact links, and one in
each article that contains internal links to other regions
of the page) - is it better to assign an id="" to
each <nav> element or use combinators or other
types of selectors to style your navigation elements?
What if you want the header and footer navigation
styled the same, and the article navigation styled
differently?
<!-- Should you use this? -->
<header>
  ...
  <nav id="hdr-nav">...</nav>
</header>
...
<footer>
  ...
  <nav id="ftr-nav">...</nav>
</footer>

<header>
  ...
  <nav class="menu">...</nav>
</header>
...
<footer>
  ...
  <nav class="menu">...</nav>
</footer>
/* Which is more efficient? */
#hdr-nav, #ftr-nav { ... }  /* this? */
nav.menu { ... } /* or this? */
header > nav, footer > nav { ... }  /* or this? */
Or what if you wanted the header navigation styled
differently from the footer navigation? Are the declarations
completely different or are any the same (e.g. can you
combine some into a single rule?)
To answer these questions, it's important to understand
how the browser parses CSS selectors.
How the Browser Parses CSS Selectors
CSS selectors are actually read from right
to left, not left to right as most developers
might think. The right-most
part of a rule with several selectors is called the
key selector. For example, if a rule is defined
with a selector such as
div.highlight a { ... }
The key selector is the a
selector. When the browser reads this rule's selector, the
first thing it does is go through your whole document and
pick out all of the elements that match the key selector
(in our example, it will pick out all of the <a> elements
in the document).
Next, the browser will look for the selector to the left of
the key selector: in our example, it's the class "highlight".
Now it picks out all the <a> elements it found that are
descendants of a container with class="highlight".
Lastly, it filters out only those <a> elements in a "highlight"
container where that container is a <div> element.
That's a lot of work! Clearly this shows us that a rule
that has a complex selector takes a lot longer
to process.
Are Some Selectors More Efficient?
In the industry, it is generally accepted (through various
benchmark tests done over the years) that some selector
types are more efficient
than others. The list below, from most efficient to least
efficient, is the one developers generally follow. Note,
however, that the difference between some items is
very small.
Adjacent sibling selector
(there doesn't seem to be any information about the General sibling
selector; you'll learn about these in the
lesson on Combinators and Psuedo Classes/Elements)
Child selector
(you'll learn about these in the
lesson on Combinators and Psuedo Classes/Elements)
Descendant selector
(you'll learn more about these in the
lesson on Combinators and Psuedo Classes/Elements
Universal selector (the * symbol, which means "all elements")
Pseudo classes
and Pseudo elements
(you'll learn about these in the
lesson on Combinators and Psuedo Classes/Elements)
So then, now we can answer our question from earlier:
/* Which is more efficient? */
#hdr-nav, #ftr-nav { ... }  /* this? */
nav.menu { ... } /* or this? */
header > nav, footer > nav { ... }  /* or this? */
The first rule has 2 selectors that use IDs, so this
rule would be very efficient.
The second rule has one single selector that uses
an element selector with a class selector. There
is a very small difference between the efficiency of
the ID selectors vs. class and type selectors. But the
first rule has 2 selectors, the second rule has only
one selector. So which is better? The difference would
be very slight; you would have to run benchmark tests
to determine if the difference was significant.
In this situation, you would choose the option that
produces HTML/CSS that is more readable and easier to
maintain. It is generally harder to manage HTML and
CSS that uses ID selectors, so we would prefer using the
single element/class selector.
The third example uses combinators for two selectors
(the > symbol is the child combinator: these selectors
will select any nav that's a child of a header, and
any nav that's a child of a footer). Selectors that use
child combinators are much less efficient than using
class or id selectors. However, adding IDs or classes
to elements in your HTML makes it more difficult to maintain
your HTML/CSS in the future.
So you are probably getting the idea at this point
that there is no black and white answer, no "do exactly this"
practice for creating CSS selectors. It's a delicate balance
between efficiency, functionality, specificity, readability,
and maintainability. In general, we prefer to have code that
is eaiser to read and maintain while having the appearance
and functionality that the client wants, while trying to
have the most efficient code possible. There might be more
than one way to do something: and some ways might be
"better" than others, where "better" might mean easier to
maintain, but to others it might be "more efficient".
Always be prepared to justify your decisions and choices
when creating rules with complex CSS selectors.
The following resources might also be of assistance
in specific situations you might encounter: