Refresh
this page because I am probably still making changes
to it.
Databases allow you to not only store data, but to
organize it. You can create relationships between tables,
which helps to keep data organized and assists with
data integrity.
Resources for this Lesson
Bookmark the The H2 Database Engine page in case you need to look up
any specific syntax details about any of the SQL you'll be using.
To start the module on database access, we'll be working with in-memory
databases. This means the entire database is kept in RAM or
memory, which therefor means the database volatile:
when the application shuts down or terminates,
the in-memory database and all the data disappears. This means that the database
doesn't consume resources running when no one is using the application.
In-memory databases are also much faster than using a database server, making
them a good choice for POC (proof of concept) when you just want to quickly show
how the database-driven part of the application will work. In-memory databases
are also an excellent choice for performing unit tests,
for data storage used in interactive gaming applications and online shopping carts,
and other network applications that require temporary storage of relational data.
For example, if you are writing an application for an online store, a good use
of an in-memory database would be the online shopping cart: the list of items
in the user's cart is temporary: the list of items is removed as soon as the
user checks out and they don't need the cart anymore.
If your solution requires more persistent data, such as the user's order history,
then you would go with a database server such as MySQL to persistently store
the data. We'll learn how to do this later in the course.
For now, we'll learn how to work with databases in a Spring application by
using H2.
JDBC
JDBC
stands for Java Database Connectivity. This is
the technology we use to connect Java applications
(including Java web applications) to a database.
This allows you to store persistent or temporary data for use
in your applications.
H2
The H2 Database Engine
is an open source RDBMS
that is written in Java, so it was made to be embedded in Java applications.
H2 can run on client-server model and doesn't use a lot of resources, which
is a huge advantage. It's already part of Spring Boot and ready to go,
so no extra installation is required to use it,
you just need to add the dependency to your project and configure
it with a few properties in your application properties file.
H2 also comes with a browser-based console, which is handy when you need
to check your tables and make sure that your database access code is
actually working.
Creating an Application with H2
Creating an application that uses an in-memory database is simple,
so let's try it.
Go ahead and create a new application project and add dependencies for
Spring Web, DevTools, Lombok, Thymeleaf, and add two new dependencies:
H2 Database - the database engine
Spring Data JDBC -
a JDBC module that makes
it easy to perform database management tasks and read/write operations on
your chosen database engine
It's necessary to configure your application so that it knows where to
find the database and how to access it. Open the application.properties
file and add the following statement (recall that this file is in the /resources
directory):
Line 1 enables the browser-based console so we can access it while we develop
and debug our application. When you deploy an application, you would set
this to false.
Line 2 defines the database URL that the application should use to access the
database. The format of the dabase URL is:
protocol:subProtocol:server:databaseName
protocol
is the database progocol you're using for your database connections.
For us, this will always be "jdbc".
subProtocol
is the type of database we're using. If you were using MySQL, then
you'd put "mysql". We're using H2, so this should just be "h2".
server
is the name of the database server, or just "mem" if you're using an
in-memory database. If you were using MySQL, you'd put something like //localhost:3306/.
databaseName
is the name of the database you'd like to use. In our example, we're
going to use a database named "testdb". If you want to change the name of your
database, just change "testdb" to something else.
Line 3 identifies the fully-qualified name of the driver class you're using.
A database driver is responsible for translating your Java code that accesses the
database into commands that the database software/server can understand.
In our case, we're using org.h2.Driver
(the Driver class in the org.h2 package)
This driver allows your application code to communicate with the
JDBC H2 database.
Each kind of database has its own Driver.
This means that you can use any database with your Java application:
If you wanted to use a Microsoft Access database,
you would use the UCanAccess driver.
If you were using Postgres, you would use the PostgreSQL driver.
Your Java code doesn't have to change when you change databases, as long as
you have a JDBC driver for that database.
Line 4 and 5 sets the user name and password for the account that is going
to be doing the database access.
We're going to use the default account
called "sa" that has no password.
In "real life", you would have several
accounts with different permissions and would have to choose the one that
is most appropriate for the tasks your application needs to perform.
Once you've saved your changes, run your application. Don't worry that
you don't have any html pages or a controller, yet.
Go to your browser and type the address
localhost:8080/h2-console
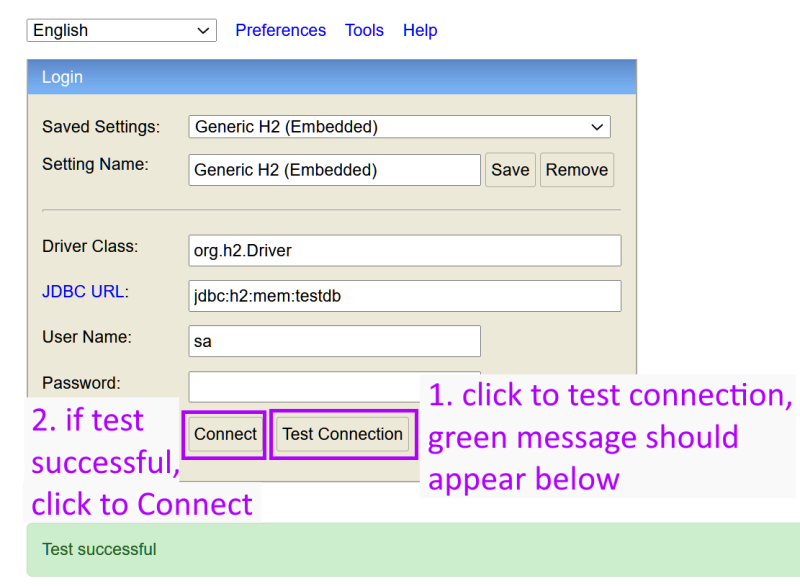
Test your connection. When successful, click Connect button.
Double check that the driver class and JDBC URL are correct, and that the
user name says "sa" and the password is blank.
Click the Test Connection button to test your connection. If you see
the message in green at the bottom of the screen, everything is working fine.
If you see anything else or the message doesn't appear, something isn't
working: double-check that you typed all the values correctly in your
application.properties file and in this dialog box.
Once you connect, you'll see an interface that looks a lot like PHPMyAdmin!
In the top-left you can see the name of your database.
The node called "INFORMATION_SCHEMA" contains various tables that are part of
H2. Don't touch them! H2 needs these in order to work and changing them might
break many things.
The "Users" node is self-explanatory. If you know how to add users, feel free
to do so!
Your database is currently empty. You could go in and add tables and data
using the web console, but it's actually better to do this when your
application starts up. If a developer had to change any of the schema of
your database, you only need to edit the SQL code in your project instead
of manually editing everything in the console.
Adding Tables and Data
When using an in-memory database, the best practice is to have any schemas
and data added at program startup. To do this in a Spring application,
you simply add 2 files to your src/main/resources directory:
schema.sql
- the SQL code that creates any tables and columns your database needs
data.sql
- the SQL code that adds any default data to those tables
When your application starts up, it will look for those 2 files and, if it finds
either one of them, it will execute the code within them on whatever database
you've configured in your application.properties file!
Adding a Table
Start by adding a schema file:
Right click src/main/resources and select New > Other
In the filter box type sql
or browse to the category "SQL Development"
Select "SQL File" and click Next.
You must name the file schema.sql.
In the editor window for the schema.sql file type the following query
to create the "teams" table (in a previous exercise we used an array
and an enumeration to store the names and cities of hockey teams):
CREATE TABLE teams (
	id VARCHAR(3) NOT NULL PRIMARY KEY,
	city VARCHAR(255),
	name VARCHAR(255)
);
Here we are creating a new table called "teams" with 3 columns:
id
is our primary key field and it will contain a 3-letter unique
abbreviation for one of our sports teams e.g. "MTL" for Montreal Canadiens
city
is the city our sports team belongs to e.g. "Montreal" for Montreal Canadiens
name is the name of the team e.g.
"Canadiens" for Montreal Canadiens
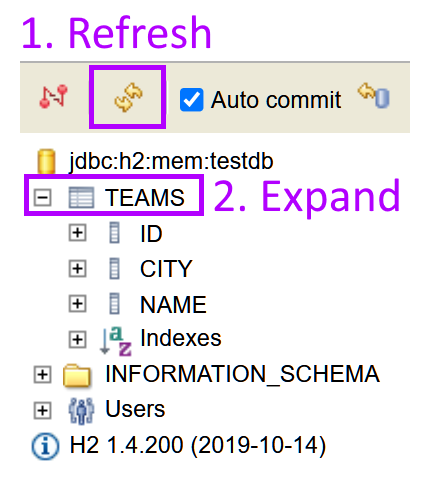
Did it work? Go back to your browser and click on the REFRESH button in the top button bar
(it's the 2nd button with 2 little arrows, right above the name of your database
in the top-left)
Click the Refresh button and then expand teams
You might be prompted to reconnect, that's fine: just click the Connect button again.
You should now see the TEAMS table in the top-left, under your database name!
Expand the node for TEAMS and you'll see your three columns for id, city, and name.
Adding Rows to a Table
If you want to populate your teams table with teams, you can create the SQL
statements in a data.sql file.
Add a new SQL file to src/main/resources and add the INSERT statements to add teams
to your teams table. Note that your text/string values must use single-quotes,
not double-quotes.
INSERT INTO teams (id, city, name) VALUES ('CGY', 'Calgary', 'Flames');
INSERT INTO teams (id, city, name) VALUES ('EDM', 'Edmonton', 'Oilers');
INSERT INTO teams (id, city, name) VALUES ('MTL', 'Montreal', 'Canadians');
INSERT INTO teams (id, city, name) VALUES ('OTT', 'Ottawa', 'Senators');
INSERT INTO teams (id, city, name) VALUES ('TOR', 'Toronto', 'Maple Leafs');
INSERT INTO teams (id, city, name) VALUES ('VAN', 'Vancouver', 'Canucks');
INSERT INTO teams (id, city, name) VALUES ('WPG', 'Winnipeg', 'Jets');
Note that if there are any errors in your SQL syntax, you'll see them in the console
output window every time you save a file in your project.
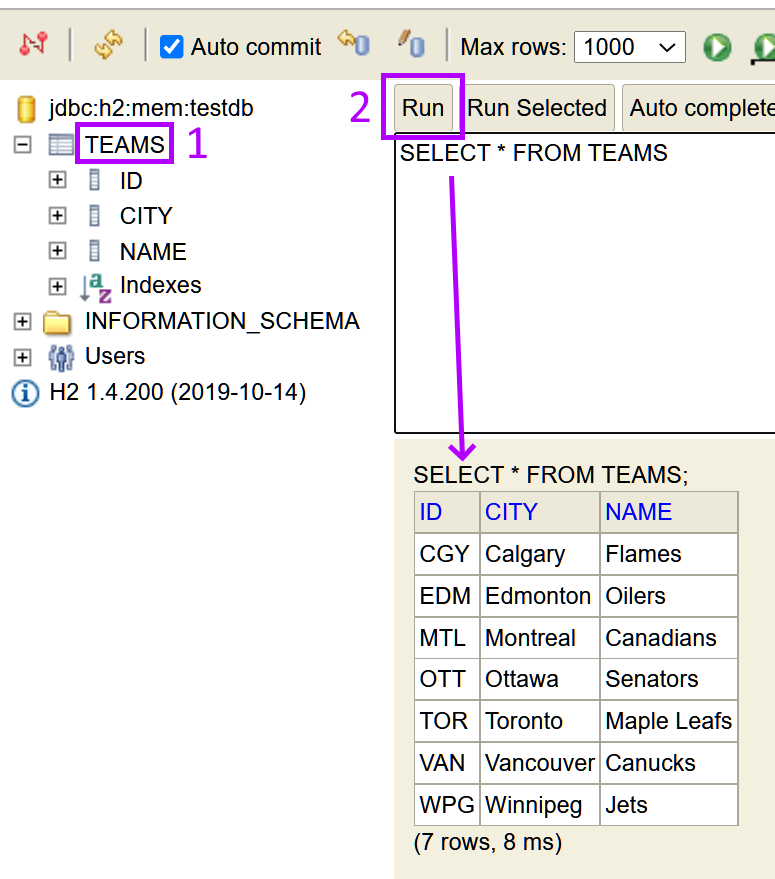
Once you've saved your changes, go back to the console and take a look:
Click on the TEAMS node, and you'll see the SQL statement
"SELECT * FROM teams;" appear.
Click the RUN button to execute the SELECT query.
If you don't see your data, click the REFRESH button and try again.
Click the Table name, then Run the query.
Exercises
1. Add the necessary SQL to your schema.sql file to create a
Books table and Genres in your database. Your tables should have the
following schemas:
Table Name: books
Column Name
Type
Notes
isbn
bigint
Primary Key, required
title
varchar(255)
required
author
varchar(255)
price
decimal(6,2)
genre
int
required
Table Name: genres
Column Name
Type
Notes
id
int
Primary Key, auto incremented
genre
varchar(255)
required
Check your database using the H2 Console and make sure
everything is correct.
2. a. Add the necessary code to your data.sql file to
add the following genres to your genres table:
Arts
Biography
History
Media
Psychology
Sociology
Technology
Feel free to edit the genres or add extra genres, but
you'll need at least 7.
Check your database using the H2 Console and make sure
all your genres have been added.
2. b. Add the necessary code to your data.sql file to
add at least 3 books to the books table.
Check your database using the H2 Console and make sure
all your books have been added.