Refresh
this page because I am probably still making changes
to it.
In the previous lesson we reviewed what you've learned about
databases and talked about in-memory databases like H2.
You also wrote a very basic application that connected
to the H2 database engine and allowed you to use the
H2-Console to browse your database. You also added a
schema.sql and data.sql file to your project to create
tables and populate those tables with default data.
In this lesson, we'll write code that performs database
queries on your database and then in the next couple of
lessons we'll talk about CRUD operations.
When adding the classes necessary to perform database operations,
you generally use a .database or .databases package.
Some developers might use a .repositories package, since
databases to model a kind of data repository, however
we prefer to save .respositories for classes that model
collections of data (such as lists or enumerations).
Your database classes model the objects that manage
the database connection and perform database queries.
We use a couple of different classes to work with databases:
Contains methods that perform database queries and retrieve
the results of those queries.
We keep these 2 classes separate to comply with SOLID principles:
They perform different tasks and should therefore be 2 different classes.
You can easily change the database configuration (e.g. to use a different kind of database)
without having to change the database query methods in the data access class.
If we decided to switch to MySQL or flat files, we just swap out the database config class
for something else; we would just replace Database Config with a different class and we
don't have to modify the Database Access class
when attached to a method, it means this method will return an object that
should be registered as a bean in the Inversion of Control container when the application
starts up
this means we'll be able to @Autowire these beans in other classes
this annotation is only used on methods that return a bean
indicates that this is a class that models the persistence layer,
a class that is a database repository
indicates that this class is used for encapsulating storage, retrieval,
and search functionalities of stored data
indicates that this class is a data access object
Let's start up a new project so that we can see how to write
these classes and how they work together:
Start a new project and add the
Spring Web, DevTools, Thymeleaf, Lombok, H2 Database, and
Spring Data JDBC dependencies.
Copy over your schema.sql file from the previous lesson's
project to this new project: we only need the code that
creates the Teams table.
Add the SQL code to schema.sql that creates a Players
table according to the following specs:
Table Name: players
Column Name
Type
Notes
id
int
Primary Key, required, auto-increment
firstName
varchar(255)
required
lastName
varchar(255)
required
number
int
team
varchar(3)
The team column will contain a string value that corresponds
to the 3-character primary key in the teams table (this is
a foreign key but you have not have
learned about those in your database class, yet).
Copy the Player bean over to your new project, but we're
going to modify Player yet again: this time, set the
team member to a String value.
private String team;
Copy the data.sql file over from the previous project to this
new project: you only need the code that populates the
teams table with rows.
Edit the project's application.properties file to configure
your database (you can just copy the code over from the
previous project in the previous lesson).
Database Configuration Class
The Database Configuration class is annotated with @Configuration
because it's a configuration component: it's job is to configure
one or more @Bean objects that we want to inject inside
other clasess/methods. Specifically, the database config
class will create beans that we will use to perform database
operations.
Recall that we use dependency injection in order to decrease
the level of coupling between classes. For example,
if we only had one class to perform all the database setup
and operations, we'd have to rewrite this class when we
decide to change the database storage engine. If we decided
to switch from H2 to MySQL, we wouldn't be able to use the
same class because it would have code and objects that
worked specifically with the H2 database engine and its
drivers, so we'd have to waste time writing a whole new
one for MySQL
By using dependency injection and keeping database config
as a separate class, we can change from H2 to MySQL
simply by creating a new database config class, and leave our
database access class alone. This saves us lots of time,
because the database access class is generally the class
with the most code in it.
In a more complex program, or in older versions of Spring Boot,
your database config class will be a lot more complicated
than the one you're about to see, but that's one of the
nice things about using Spring Boot today: a lot of the
work we would have had to code in the past is now done
automatically:
import javax.sql.DataSource;

import org.springframework.context.annotation.Bean;
import org.springframework.context.annotation.Configuration;
import org.springframework.jdbc.core.namedparam.NamedParameterJdbcTemplate;

@Configuration
public class DatabaseConfig {

    @Bean
    public NamedParameterJdbcTemplate namedParameterJdbcTemplate(DataSource dataSource) {
        return new NamedParameterJdbcTemplate(dataSource);
    }
}
Notice that we have several new classes:
NamedParameterJdbcTemplate contains basic jdbc operations that allow
you to use named parameters. For example, it contains methods that perform queries,
updates, etc. NamedParameterJdbcTemplate is in the
org.springframework.jdbc.core.namedparam
package.
DataSource is a type of driver manager
in the javax.sql package:
It manages the database drivers: when the application
makes a request to connect to a database, the driver manager
finds the appropriate driver and passes the driver the request
so that the driver can communicate with the database in the
appropriate language.
A DataSource object is already injected and contains all the connection
information for your database (it uses the configuration you added
to your application.properties file).
The method namedParameterJdbcTemplate()
has to have this name. If you give it any other name,
it won't work.
What's really cool is that when your application starts up,
Spring will find the @Bean in your DataBaseConfig
and it will go ahead and execute that method for you.
The DataSource parameter is injected automatically, and it
already contains the database configuration information from
your application.properties file. It takes that DataSource
and uses it to create the new NamedParameterJdbcTemplate object.
The method returns that object, and it is stored in the
Inversion of Control container, ready and waiting for
the moment your code calls upon it.
JDBC Templates
A JDBC Template is a class that contains the most common
tasks you would need to perform on a database using Java.
For example, it includes methods to create and destroy
a database connection (you must have an open connection
in order to perform other operations), perform SQL
queries and retrieve the results of those queries.
JDBC template classes also handle any database errors or
exceptions that might occur; they also wrap those exceptions into Java
exceptions so you can handle them. For example, if
a query is incorrect or an SQL statement's result
would violate your database's integrity rules, an error
would typically occur. The template class will wrap those
errors into exceptions, such as DataAccessException.
JDBC Templates are thread-safe, so it's safe to use in
applications where more than one user could be trying
to access the same data at the same time.
NamedParameterJdbcTemplate is a specific kind of JDBC Template
that allows you to perform parameterized queries
with named parameters.
We'll study those in the next lesson.
Add a new database configuration class to your project:
Create a new .database package in your project and add the DatabaseConfig
class to it.
Make sure you add the @Configuration annotation to your
class
Add a @Bean method that returns a new NamedParameterJdbcTemplate
for a specific DataSource.
You can use the code example up above if you need a reference
for writing your own database configuration class.
Database Access Class
A typical Data Access class must be annotated with @Repository
and it contains methods that perform SQL queries such as
SELECT, INSERT, UPDATE, and DELETE queries. The class needs
some way to access the Database Configuration class so that
it has access to the connection/template on which to
perform these operations.
@Repository
public class DatabaseAccess {

    @Autowired
    protected NamedParameterJdbcTemplate jdbc;  // the jdbc template connected to the db

    public void insertPlayer(Player player) throws Exception {
        // inserts this player as a new row to the players table using the jdbc template
    }

    public List<Player> getPlayerList() {
        // select all players from the players table and return it
        // all the rows as a List of Player objects
    }

}
Notice in this class we have @Autowired the NamedParameterJdbcTemplate.
The template was injected from the Database Configuration
class when the application started up. So now we have access
to it and can use it to perform database operations in our
database access class.
The methods inside this class will depend on what you're
doing with your database. For example, here we have
a method to add a new player to players table, and a method
that retrieves all the players from the players table.
Each method uses the JDBC template by calling a method
to perform a query, for example:
String sql = "DELETE * FROM players;";
jdbc.update(sql);
Add a new class DatabaseAccess to your .database package.
Add the @Repository annotation to your class.
Autowire the JDBC template from the config class
as a protected data member.
Add a void method with no parameters called
addPlayer()
Your addPlayer() method should define a String that
contains an SQL query to add a new player to your
players table.
The next statement should invoke the update()
method of the JDBC template object.
The update method performs any kind of DML
query (INSERT, DELETE, UPDATE). It accepts
2 arguments:
A string containing the DML SQL query to execute
A map of parameters to use for the query. We will
cover this in the next lesson, so for now we'll
just pass it an empty HashMap(), which is fine
because we don't have any parameters right now,
anyway.
The method returns an int representing the
"number of rows affected" but we're not worried
about that right now, either, so just ignore it
today.
So now you should have a method like this one:
public void addPlayer() {

    String sql = "INSERT INTO players (firstName, lastName, number, team)"
            + " VALUES ('Carey', 'Price', 31, 'MTL');";

    jdbc.update(sql, new HashMap());
}
Now obviously we'd rather pass a Player object into
the method and then build the query using the
player's data e.g. player.getFirstName() etc.
This would require a parameterized query, and
we won't cover those until the next lesson.
So this hard-coded query is fine for now.
Running the Application
There's one last thing we need to do: we need
a handler method in the controller to use
the data access class to run our query!
Add a controller to your project:
Autowire the database access class in a private
data member
Add a handler method mapped to "/dbtest"
that invokes the database access object's
addPlayer() method and then displays
an html page. Any page is fine, just add a
page to the templates directory and stick
something on it, we don't care what.
@Controller
public class MainController {

    @Autowired
    private DatabaseAccess da;

    @GetMapping("/dbtest")
    public String test() {
        da.addPlayer();
        return "index.html";
    }
}
Now run your project, and then browse to localhost:8080/dbtest
(if you changed the mapping in your handler method, use
that instead).
You'll see the HTML page you quickly added, which is great,
but tells us only that things appear to have worked.
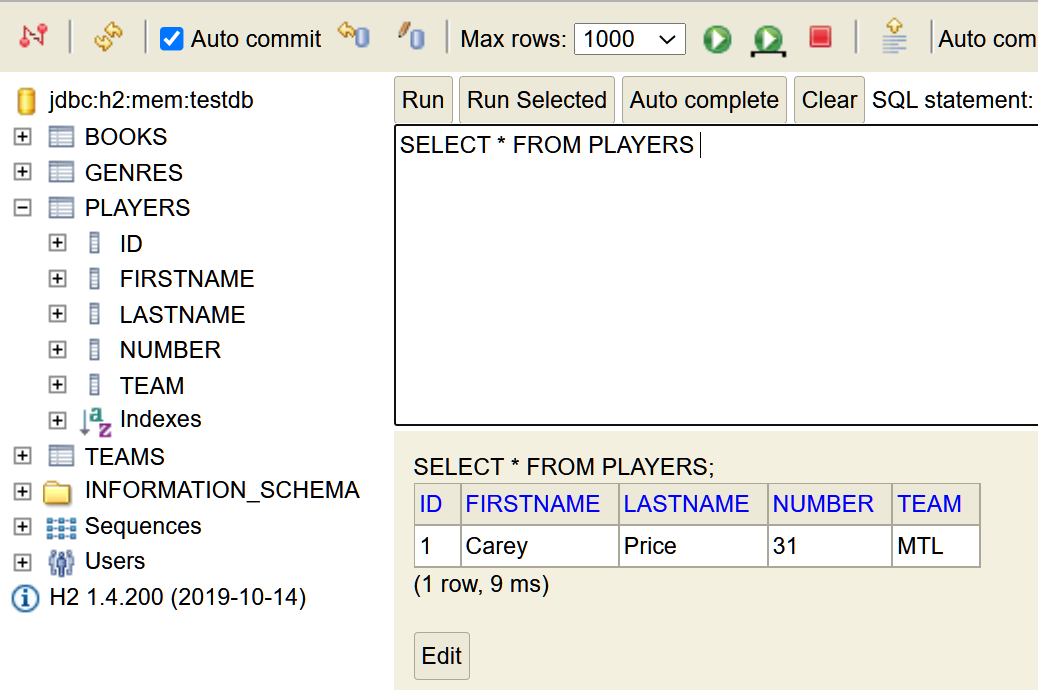
Now go to the H2-Console and check out your database:
you should see the players table with your new
player row added to it!
Expand your Players table to see the columns, click it
to view the record you added.
Now that you've got the basics, we can begin to write
real MVC applications that perform
CRUD operations.
CRUD stands for "Create, Read, Update, Delete" and
refers to the standard operations we might perform
on the data in our database.
For example, we can use our new player form to enter
new player data, have the controller call upon our
database access class to add that new player to
the players table in our database, and then have it
call a different database access method to retrieve
an updated list of Player records, which we
can then view on a Thymeleaf template.
We'll be able to do this in the next lesson!
Exercises
This exercise is really just for practice and so you can get
used to working with the database configuration and database
access classes.
Create a new project and copy over the Book bean into it.
Add everything you need to add a single record to your book
class. Don't forget to include schema.sql (to create
both the books table and the genres table) and data.sql
to populate the genres table with rows).
Your project should follow the same structure and logic
as the demonstration we did with the players/teams tables.