Refresh
this page because I am probably still making changes
to it.
In this quick and simple lesson, you'll learn the basics of sending
an email from your Spring Boot application. Note that you will need
at an email account you can use to to send emails
from your application. This should not be a primary account that
you rely on, in case it accidentally gets blocked for sending what might
look like spam. Additionally, you'll need a second account to receive the
emails that you're not too attached to and that isn't linked to any
secret or personal information, because you'll be temporarily disabling
a very important security feature during the demonstration. I highly
recommend just setting up a brand new email account on a service like
GMail for both your receiver email, although if you have the time and
inclination, setting up two temporary accounts for sender and receiver
is not a bad idea, either. You can just disable these accounts afterwards.
This lesson is really just a demonstration of how you
would use your application to send emails. Why would
you want this functionality in your program?
Your application can send a new user a message confirming their registration.
You can email your users news and announcements regarding new
features/products, server downtime, etc.
You can create "forgot my password" functionality that users can use
when they forget their passwords: have the user click a link that
generates a random password and emails it to the user, or you can email
the user with instructions to reset their account/password.
You can probably think of other uses, too!
How does email work? Users send and receive
emails using an email client. Recall that a "client"
can refer to the machine on the client-side, but also
it can refer to software on the client side (such as
a browser, FTP program, or the software that allows
you to play a networked game on your computer).
Thunderbird and Outlook are examples of email clients you
can install on your computer, but there are also web-based
clients such as GMail and Yahoo Mail.
When a user sends an email, the following occurs:
The email client connects to an outgoing mail server
that uses SMTP (this is often also called an
SMTP server).
SMTP stands for Simple Mail Transfer Protocol: it's the protocol the internet
uses to transfer email messages from server to server.
The outgoing SMTP server looks at the message's recipient email
address and converts it to an IP address.
The server locates a mail exchange server (or MTA, Mail Transfer Agent)
for the domain that the email is going to.
The outgoing server sends the message to the mail exchange server.
The exchange server stores the email and sends the recipient a
new email notification. The email sits in the recipient's mail
box until it is fetched by the recipient's client.
So there are at least two mail servers involved in the
sending of an email message: the outgoing SMTP
server and the Message Transfer Agent on the
receiving end. These servers do all of the hard
work: they worry about security and verification of
the sender, they deal with all the processing of the
message, etc. This is nice because you, as the developer,
don't have to worry about any of that, you only need
to write the code that composes the message and then
sends it to an outgoing SMTP server.
In "real life" you would either have paid access to an
outgoing mail server and MTA (for example, Sheridan has a
Outlook and Microsoft Exchange Server for sending and
receiving of emails) or the organisation you work for might
even have their own. For testing purposes, it's pretty easy
to use a free service like GMail or Yahoo Mail or Hotmail,
or whatever): if you're
careful, you can use their SMTP server for sending messages,
and you can create an account on GMail, Yahoo Mail, or Hotmail
account for receiving messages.
If you're going to be doing today's demo, I highly
recommend you set up a temporary email account
on GMail, Yahoo Mail, or whatever (but not a site like
ProtonMail, as you can proably imagine). Governments
are cracking down on SPAM emails and pretty much every
server has checks in place to block potential SPAM emails.
If you are working on today's demonstration, it's very likely
that the process of debugging your application could get
you flagged as SPAM, and most servers will simply block
your account permanently.
Your temporary account will be your SENDER. This is the
account from which your Spring Boot application will
send messages.
You will need a second account to RECEIVE the messages. Don't
use your Sheridan account, and perhaps it's best not to
use your primary email account, either. Use an email
account that probably won't mind receiving multiple
messages that might be considered spam by the mail server.
I'm going to use a Yahoo email account that I only use
for testing things.
If you don't have an alternate account to act as the
receiver, you can use the same temporary account that
is the sender: this means that you'll be sending and
receiving messages on the same account, and that's fine.
I'll say it once again in case you weren't paying
attention: today's exercise could get your email
account blocked FOREVER if you're sending too
many messages or the server thinks your messages
are SPAM. Be careful! Use
a temporary email account just for this lesson, or
use an old account you're not attached to anymore!
Note that when you set up your temporary account, you'll
probably need to disable certain security settings like
2-factor authentication, the ability to send email from
other applications, etc. This won't be an issue in
"real life": your application will be sending messages using
an outgoing server that is already familiar with your
organisation and/or application and won't consider outgoing
messages to be spam.
For this demo I'm going to use a temporary GMail account, and
I'll be sending messages to an old Yahoo mail account that
I don't use anymore except for testing stuff like this!
Demonstration
Start up a new project and add the following dependencies:
Spring Web
Dev Tools
Thymeleaf
Java Mail Sender
- this new dependency gives you access to some of Spring's built-in functionality
and ensures that certain classes pertaining to email are instantiated and
stored in the Inversion of Control container for you.
Once you have a new project, open up the application.properties
file and add the following properties (these are specifically
for GMail, see below where to find settings for other servers):
For spring.mail.username,
assign the email address for the temporary account you will
be sending your messages from. THIS SHOULD NOT BE ANY OF
YOUR PRIMARY EMAIL ACCOUNTS! Typically this would be
the email address of the entity sending the emails. For
example, if you created a web application for Sydney's
Custom Cat Trees shop, then perhaps that compnay has
an email they use for sending out offers and announcements, like
"info at sydney.com"
For spring.mail.password,
enter the password for your temporary email account.
It's ok to use plain text for today. In a more sophisticated
application, you would probably store this as an encrypted
value in a database table and then read it back right before
you construct the email message. Regardless, the password
is needed because your application is the sender: it will
have to "log in" to your GMail/Yahoo Mail/Hotmail/whatever
account in order to send the message.
If I missed any you need, just google "server-name smtp server"
and replace "server-name" with the email service
you want to use.
Some of the properties you set above will depend on the
outgoing mail server you're using:
spring.mail.host defines
name of the outgoing SMTP server that you want
to connect to, the server you want to use to send
your message.
spring.mail.port defines
the port number on the outgoing mail server that you
want to connect to. This value will depend on which
mail server you're using.
spring.mail.properties.mail.smtp.auth=true indicates
that you want to authenticate the email account you're
sending from.
spring.mail.properties.mail.smtp.connectiontimeout=5000,
spring.mail.properties.mail.smtp.timeout=3000, and
spring.mail.properties.mail.smtp.writetimeout=5000 defines
define the number of milliseconds after which the socket
connections should time out. These are normally set to infinite,
which can cause problems when we're testing because if something
fails, we'll never know. By setting all the timeouts to 5000
milliseconds, we'll know pretty quickly if something failed.
spring.mail.properties.mail.smtp.starttls.enable=true indicates
indicates that we want to enable a TLS-protected connection
when we communicate with the mail server.
Save your application.properties file.
Add a new class to the .services package called Email. Add the @Service
annotation. This service is going to handle the connection to the
SMTP server (by using the properties we've just defined) and the sending of
the email message to the SMTP server.
@Service
public class Email {
}
First, we want to autowire in a
JavaMailSender variable.
The JavaMailSender interface is in the
org.springframework.mail.javamail
package. It supports the sending of email messages with standard MIME types.
If you want to get a bit more advanced with email messages, check
out the documentation, including the
JavaMailSenderImpl class, which is a
concrete class that implements the JavaMailSender interface.
@Service
public class Email {

    @Autowired
    private JavaMailSender javaMailSender;
}
The JavaMailSender interface has a send() method: this method
accepts a MailMessage instance. MailMessage is
an interface that is implemented by classes that model different kinds
of email messages, such as
SimpleMailMessage, which is in the
org.springframework.mail.
In our very basic Email service, we'll construct a
SimpleMailMessage object and then
pass it to the javaMailSender.send()
method. Let's add a sendEmail() method to our Email class
that does this:
The method should accept strings for the to-field, subject
field, and the actual message text.
The method should print to the console something like
"Sending message..." so we can tell whether or not everything
is working (this is for demonstration only, you wouldn't
do this in a real application).
Construct a new SimpleMailMessage() and set the to-field,
subject, and message text.
Invoke the send() method on the javaMailSender, and pass it
the simple mail message we just constructed. This code will
need to go inside a try-catch with a stack trace printed:
send() throws unchecked exceptions but we want to just let
them happen so we can see if there are any errors.
Print "Done!" to the console after the try-catch so we
can see if our method is working or not (again, this is only
for demonstration purposes).
All together, you'd have:
@Service
public class Email {

    @Autowired
    private JavaMailSender javaMailSender;

    public void sendEmail(String to, String subject, String text) {

        System.out.println("Sending message...");

        SimpleMailMessage msg = new SimpleMailMessage();
        msg.setTo(to);
        msg.setSubject(subject);
        msg.setText(text);

        try {
            javaMailSender.send(msg);
        } catch (Exception ex) {
            ex.printStackTrace();
        }

        System.out.println("Done");
    }
}
Add a basic index page to your project with a simple
bit of text on it, such as:
<h1>Sending a Message</h1>

<p>If you made it here, it probably worked!
Go check your email!</p>
Add a controller and autowire in your Email service:
@Controller
public class MainController {

    @Autowired
    private Email email;
}
Add a handler method that loads your index page. The
method should invoke the email object's sendEmail()
method that you just wrote. Pass sendMail() the values
for the to-field, subject, and message text:
@GetMapping("/sendMessage")
public String send() {

    // TODO: change the email message
    String message = "Make up a fun an interesting message here.";

    // feel free to change the message subject (the 2nd argument)
    email.sendEmail("put the sender address here", "Week 13 Lesson", message);

    return "index.html";
}
Be sure you replace "put the sender address here" with the
actual email address where you want to send the message.
Don't send the message to your Sheridan account!
Send it to a secondary email address, or just send
it to the temporary account you created for this lesson
(you'll be sending it and receiving it in the same
account, but that's fine).
If you have the time and inclination, you could
even modify this to get the to/subject/message
inputs from an HTML form!
Save everything and then run your project. In the browser,
browse to the URL that's mapped to the index page:
This should invoke the sendEmail() method and load your
index page.
Go back to Eclipse and check the console: if you only see
the "Sending message..." and "Done" output, it worked!
Go to your email client that you sent the message to and check
your email!
If you see error output, examine the stack trace. If your
email server is really good about spam messages and verification
of sender identification, it might have blocked the message
and shown this output (or something similar):
Sending message...
org.springframework.mail.MailAuthenticationException: Authentication failed;
nested exception is javax.mail.AuthenticationFailedException: 535-5.7.8 Username and Password not accepted.
Learn more at
535 5.7.8  https://support.google.com/mail/?p=BadCredentials a8sm2588361qkn.63 - gsmtp
This is likely not because of incorrect credentials, it's
because GMail (in this case) thinks it's suspicious that an
email is being sent from this account using an application
instead of the GMail client. This is typical, and it's a good
thing, because this protects you from someone hijacking
your email account. However, it doesn't help us with this
demonstration, so we'll add a custom password that will allow
our application to send messages using GMail's SMTP server.
If you check the email of the temporary account you're using
to send, you will probably see a warning message letting you know
that a third party application tried to log into this account: it's
referring to the Spring Boot application we just wrote - it attempted
to authenticate with GMail (or whatever mail service you're using)
so it could send an email.
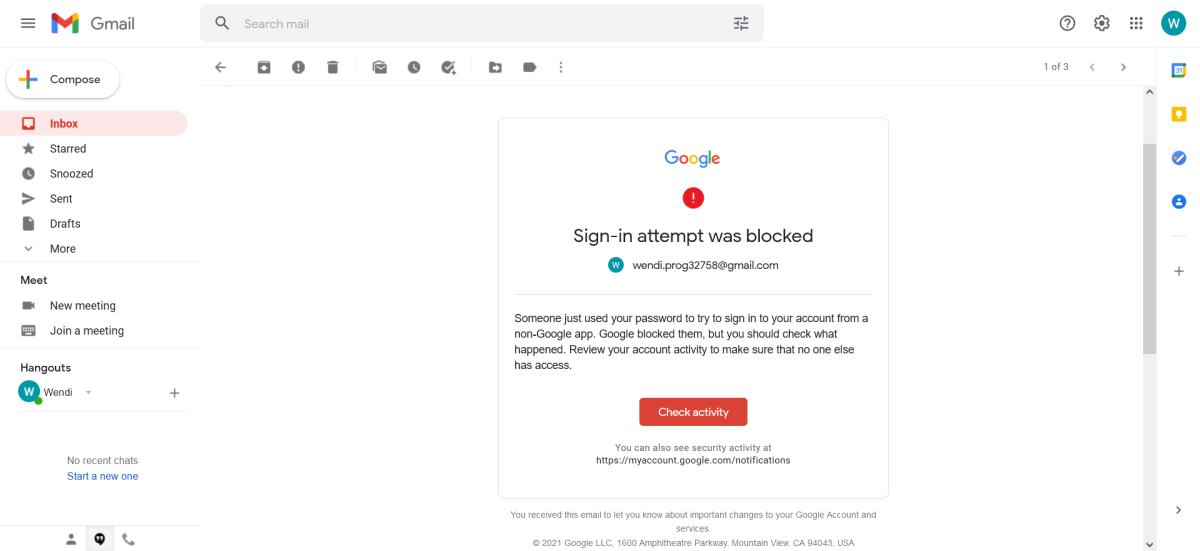
Possible warning about a suspicious sign-in attempt from
your application.
This wouldn't be a problem in "real life":
you would be paying to use an SMTP server and the entity that
owns/manages it would verify you and your application to make sure
everything is authentic. Therefore your application would be
allowed to send messages without any problems.
You can fix the problem inside your temporary sender email
account by changing the account settings. I used GMail, so
here's how to do it in GMail. I'm sure other services have
similar settings:
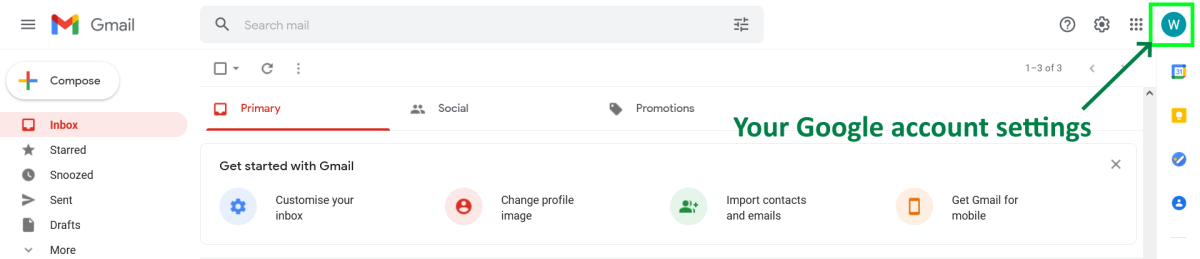
In the top right, click your Account icon.
Click Account icon
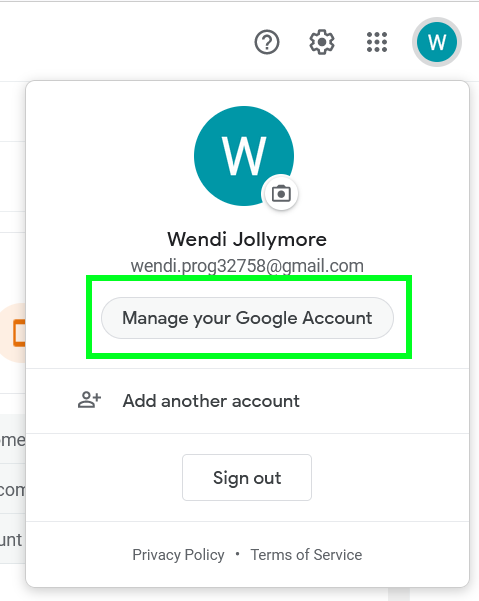
Select "Manage Your Google Account".
Select Manage Your Google Account
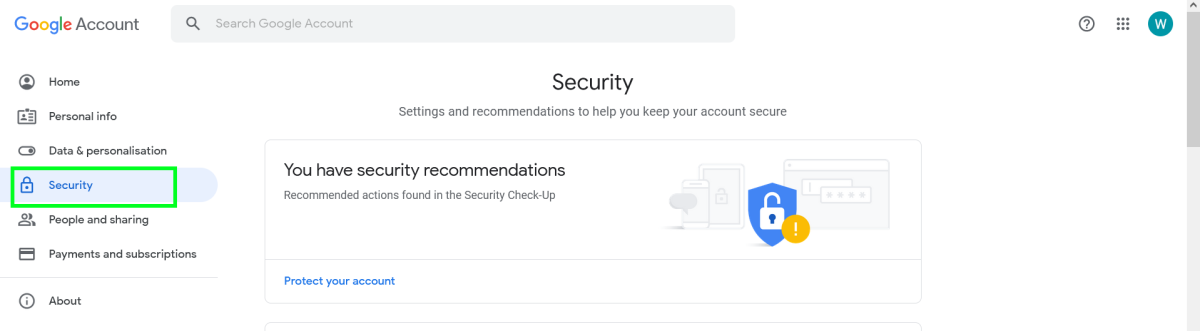
In the list on the left, select "Security".
Select Security settings
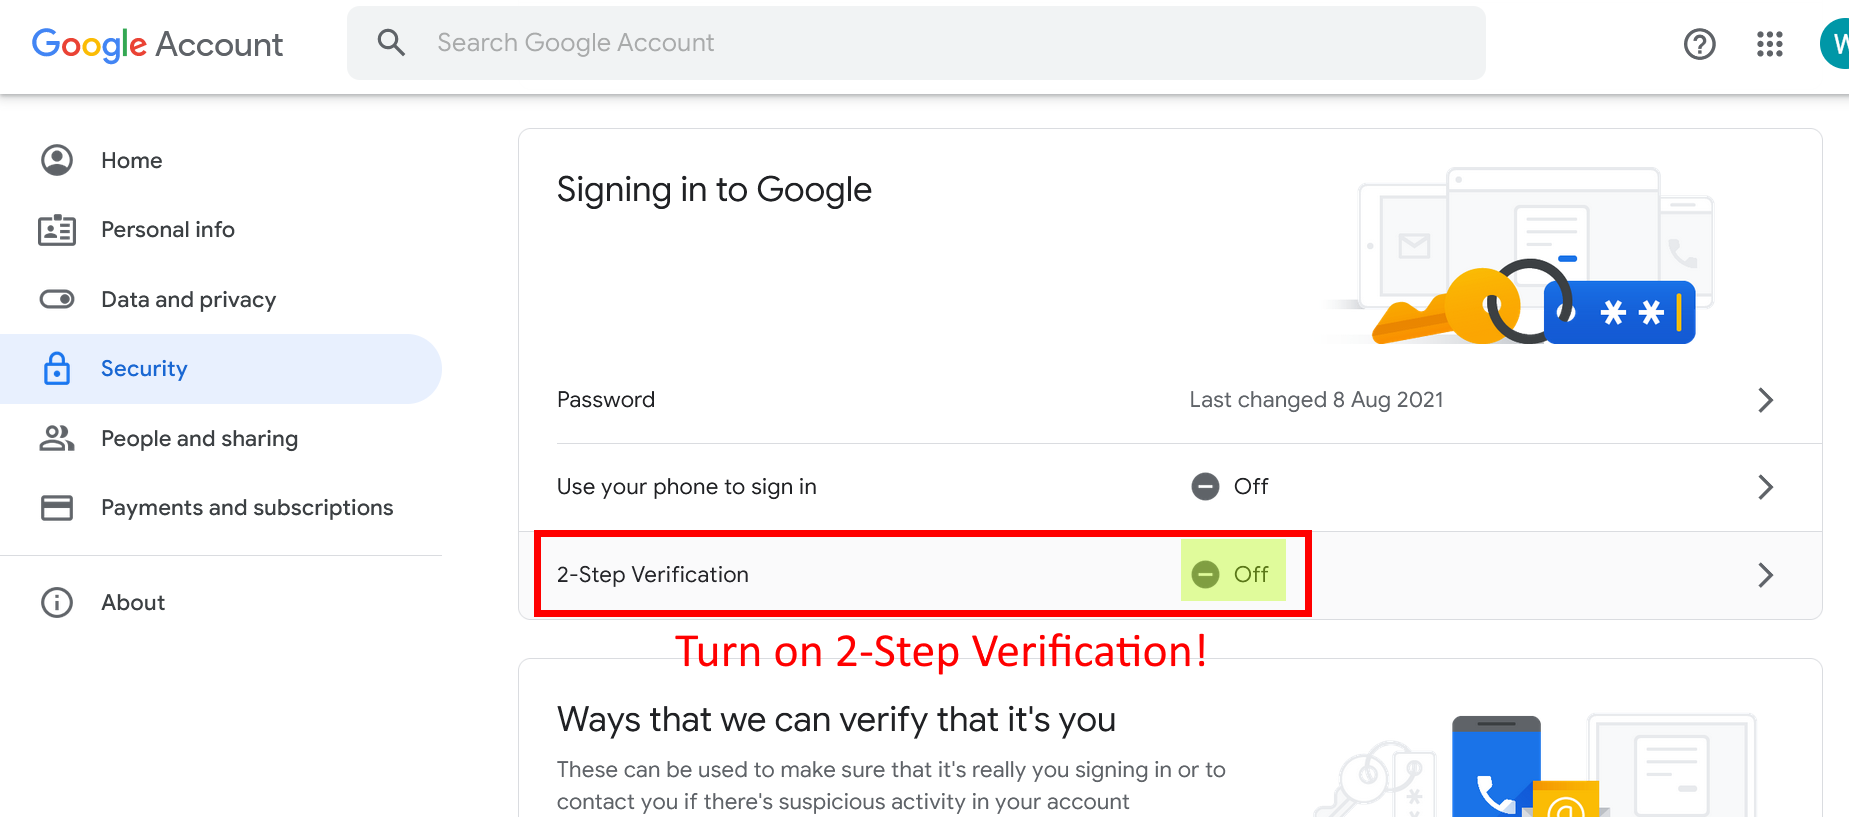
In the main part of the window, scroll down until you see
the heading "Signing in to Google" and locate "2-Step
Verification". Scroll down to the Two-Step Verification Setting
and turn it on, if it's not already on.
Set up 2-step verfication for your account using whatever
method you wish.
Once you've got 2-step verification set up and turned on, go back to the
Security settings of your account.
Back under "Signing in to Google", select "App Passwords".
Now select "Other (Custom Name)" for the app you want to set a password for.
In the custom name field enter "Spring Boot Email" Select "Other (Custom Name)" for the type of app you want
to set the password for.
Click the GENERATE button.
Enter the custom name and then press GENERATE.
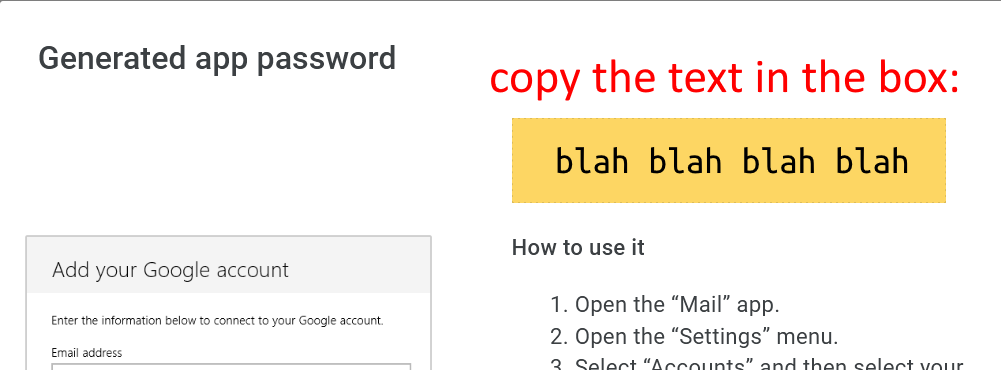
An app password will be generated and appear in a yellow box: copy this
password. Copy the generated password.
Now go to your properties file in your Eclipse project and replace the
value for spring.mail.password with your custom
application password.
Now save your changes and restart your application if it
isn't already running/refreshed. Try reloading your application's
send email page so that the handler method that sends the email
is triggered again.
Check the console and make sure you don't have any more errors, only
the "Sending Message.." and "Done!" output from your service
class.
If everything looks good, go to the email account that is the
receiver of your message and check: you should see the email there!
If you don't see it, check the spam/junk folder: when I test with Yahoo
or GMail as my receiver, I always find the emails in the junk/spam
That's how you send email in a Spring Boot application! We won't
be using this at all in this course for assignments or exams, but
it's still good to know how emails from an application works,
because it's definitely something you'll encounter in not just
Java applications, but with other technologies, also.