Refresh
this page because I am probably still making changes
to it.
You've learned that one of the controller's jobs in an MVC application is to
facilitate communication between the view and the model. For example,
when the user updates the inventory quantity
on an HTML form, the controller needs to make sure the
model (the inventory object) gets updated as well so that
the inventory object's quantity reflects the changes made
on the view.
This can be achieved in a Spring Boot application by binding,
or connecting, the form to the Inventory object.
Selection Expressions
To learn about form binding, we need to learn about a couple
of new bits of Thymeleaf syntax.
So far in Thymeleaf we've learned variable expressions
${ }, for evaluating expressions,
and URL expressions @{ }, for referencing
files and URLs.
There are also selection expressions *{ }
A selection expression evaluates a specific expression on a
selected object. Selection expressions are used in conjunction with the
th:object attribute.
The th:object Attribute
The th:object attribute selects an object
that can then be referred to elsewhere in the element. For example,
assuming the object variable inv has been
saved as a model attribute (e.g. model.addAttribute("inv", inventoryObject);)
that contains an Inventory object:
In this example, the DIV element contains the th:object attribute which
"selects" the inv object. Inside
the DIV, the SPAN tags are displaying data members of that
inv object using selection expressions. For example,
*{itemId} refers to the currently
selected object's itemId member and *{itemName}
refers to the currently selected object's itemName member.
Since the currently selected object is ${inv},
both of these SPAN elements are equivalent to:
At first this may not seem very impressive: what's the big deal if it's
just different syntax? But the power in using th:object along with
a selection expression *{ } comes with form binding.
Form Binding
Form binding allows you to bind or connect an object to a form.
This not only makes it easy to access the object's properties
on the form, but makes it super easy to work with: when the user
fills in the object's details on the form, the object's properties
are automatically populated with the form inputs! So when the
form is submitted to the server, it comes with an object already
instantiated and populated with your form's input data!
Let's do an example: I've created a quick Player bean
that uses Lombok. Add a Player class to your .beans package
and copy my Player bean code
over to yours. The Player class models a player in a sports league. Mine is
for Canadian hockey teams in the NHL but you can use whatever
sports league you want for yours, you can even make one up
if you want!
Notice that the Player class contains a constant array of
the Canadian NHL teams. Feel free to modify the team names
and cities to whatever you like, football/soccer, cricket,
basketball, baseball, Quidditch,
underwater basket weaving, anything!
When we assign a player to a specific team, we'll store the index
of that team's name to the team integer data member.
For example, if my player is on the Montreal Canadiens, then that
player's team member is set to the value 2.
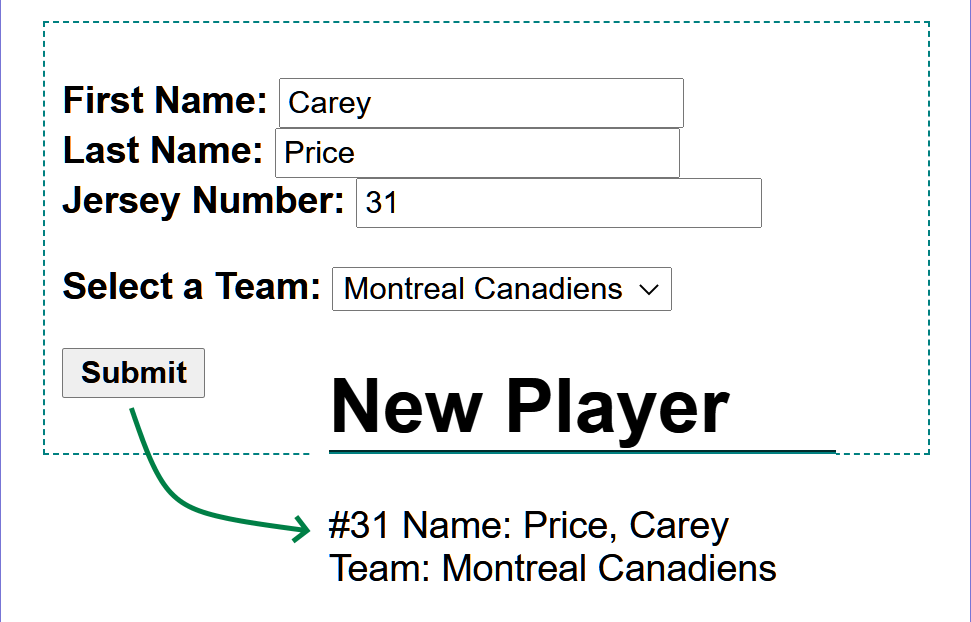
Now create a form so that a user can add a player to a sports
team in the league.
Start off with adding fields for the first name, last name, and
the jersey number.
For the team input, we want to allow the user to select a team
by name from a drop-down list:
<select name="teamName"> ... </select>
Load TEAMS array into SELECT list. A selected item
will use the array index as the value.
If you're short on time or doing this during a live class, you can
copy and paste this incomplete form:
We could easily just go ahead and type an <option> element for each
team, but sometimes the teams change. For example, the Winnipeg
Jets became the Atlanta Thrashers in 1997 and then became the
Winnipeg Jets again in 2011. So if we change a team name,
remove a team, or add a team, we'll have to remember to do it
in both the Player class AND in this form, and that's not good
design.
For now, we'll leave the array with the Player class (but later we'll
try it with an enumeration, and eventually
this will be a table in a database).
But how do we access the TEAM array from our Player class
in our HTML code? Easy!!
If we stored an instance of Player in as a Model attribute,
we could access it here in our form. For example, if we had this
in our model:
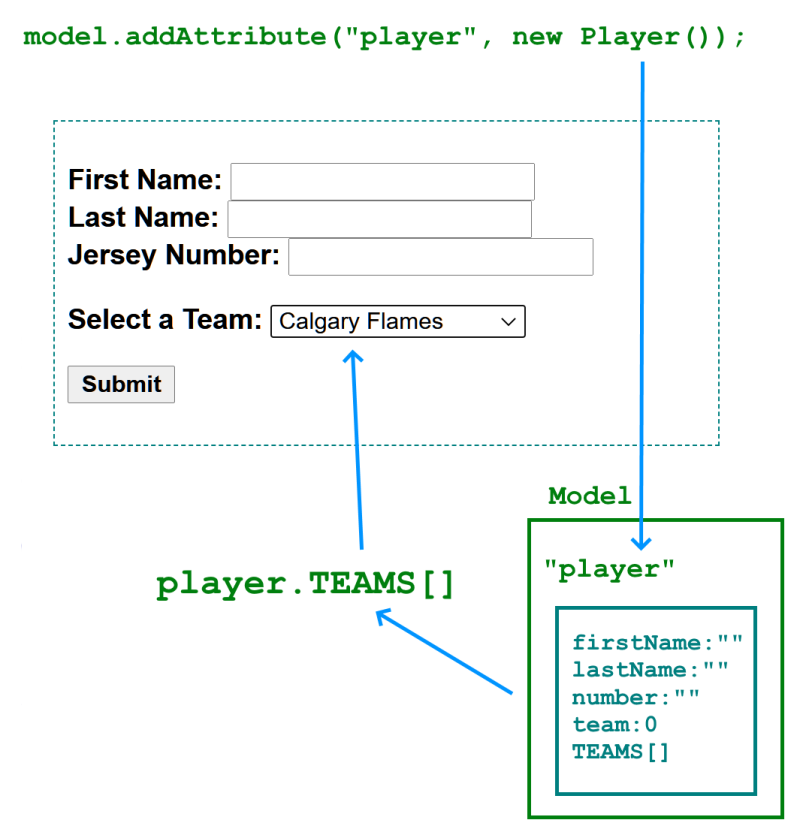
model.addAttribute("player", new Player());
We could then access the Player object's TEAMS array in our
HTML.
We need to bind the player object in the model
to the form so we can populate the SELECT element.
Go to your controller and add a handler method that loads the
main form page. Add a Model parameter. Then, in the method
body, construct a new default player object and add it as
a model attribute "player". Then return the name of the
form page.
@GetMapping("/")
public String index(Model model) {
  model.addAttribute("player", new Player());
  return "index.html";
}
In this code, we're creating an empty Player object and adding it
to the model so that we can access it on the form.
This is going to allow us to use that player object's TEAMS array
to populate our drop down list.
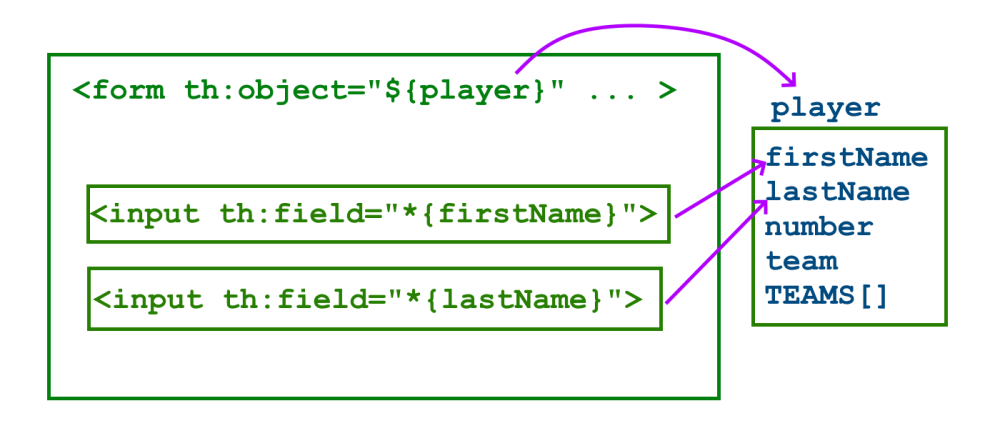
First, we have to tell our form what object it should work with.
We'll tell it to work with the player object we have stored as
a model attribute:
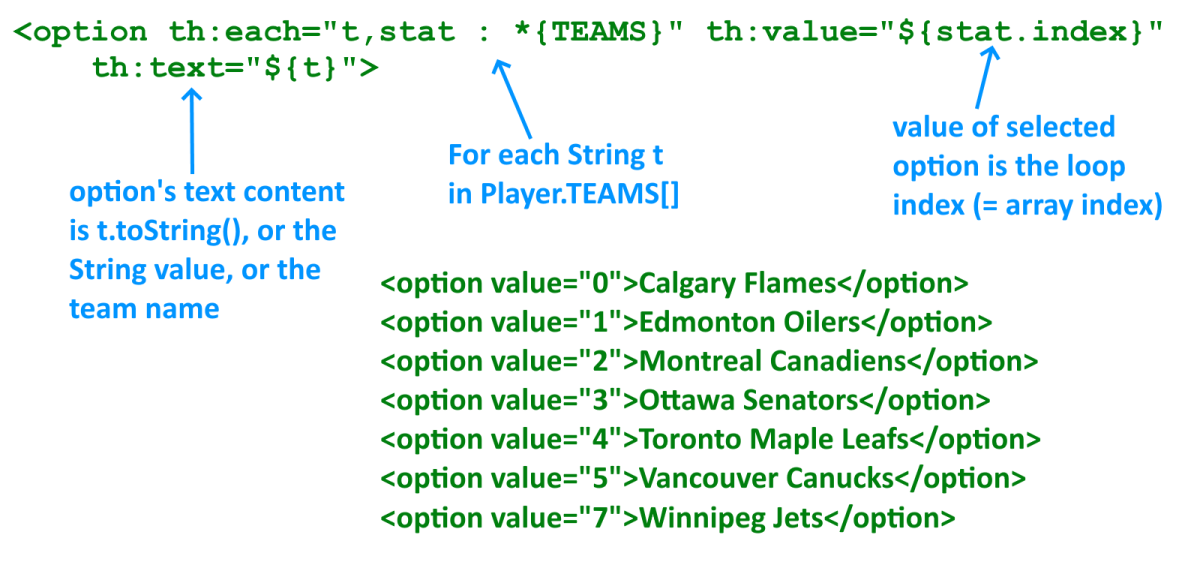
Now we create our SELECT list, and create an OPTION element for
each item in our array using the th:each.
We want to iterate through the TEAMS array in player, which is part of the player
object we selected in the form's th:object attribute:
<option th:each="t : *{TEAMS}"></option>
This says, "iterate through the TEAMS member of the selected
object (which is player) and each element of the TEAMS member
is referred to as t".
For our OPTION elements, we want the value to be set to the array
index of TEAMS, because Player.team is an integer:
We have to add the stat loop status variable so that we can access
the loop index. We used index instead
of count because index is 0-based,
so it matches perfectly with the array indexes.
We set the th:value property to the value of
stat.index.
So the first option element will have a value of 0, the second option
element a value of 1, etc. Matching the array perfectly.
Lastly, we need some text to appear in this option element.
Let's set it to the actual array element value!
Basically what we've done so far is we bound our form to an object
stored in the model attribute. You should be wondering, if we
can set up a model attribute in our controller and send it to
a form, could we not also take the object that is bound to a form
and send it to the controller?
For example, if we were to edit the inputs on the form, could
we not tell Spring to automatically use those inputs to update
our player object? If we could, it would make things easier.
Previously, in the Inventory example, we did this:
@PostMapping("/output")
public String output(Model model, @RequestParam long itemId,
    @RequestParam String itemName, @RequestParam int quantity) {

    Inventory inv = new Inventory(id, itemName, quantity);
    model.addAttribute("invItem", inv);

    return "output.html";
}
With form binding, we can cut down on some of this code.
We've already bound the object to the form, but we now need to
bind each field to one of the object's data members.
For example, we want to bind the player first name text input field
to player.first name, and the player last name input
field to player.last name, etc.
We do this using the th:field attribute on each input element.
The th:field attribute binds the input field
on the form with a member of the same name in the selected object
e.g. th:object="${theObject}"
So for example, if your form has th:object="${inv}"
then th:field="*{itemName}"
refers to ${inv.itemName}.
Each input field can be bound to a specific data member
belonging to the form's bound object.
In the handler method that processes the form, we want to be able
to now load the output page, and display the newly added player
on that page. How can we access the player object that is bound to the form,
can we access it from the model as an attribute?
@GetMapping("/")
public String index(Model model) {

    // set up an empty player object in the model
    // so we can use it on the form
    model.addAttribute("player", new Player());

    return "index.html";
}

@PostMapping("/player")
public String player(Model model) {

    // test: what's in here? nothing
    System.out.println(model.getAttribute("player"));
    return "player.html";
}
This code will display "null" for the player attribute and, if you've already
coded your player.html output page with Thymeleaf, show several
Thymeleaf errors.
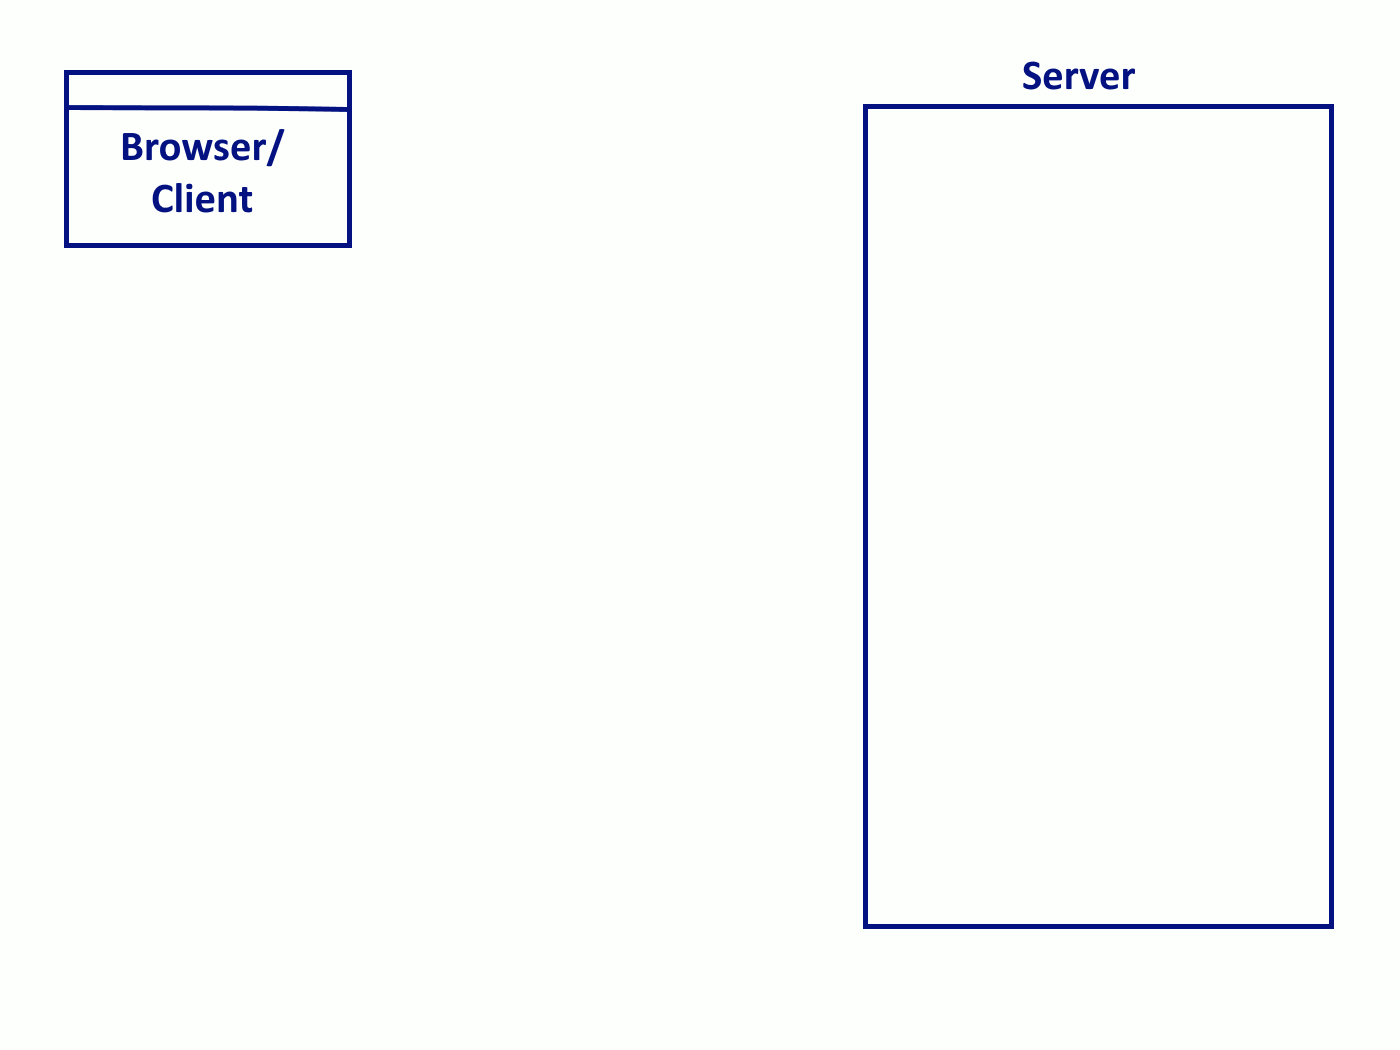
Why? The Model attributes are at what we call "request level" attributes:
they are only alive or accessible during the current request-response cycle.
What's happening is:
We go to the index page: this begins a request to load
index.html.
The controller handler method index() executes and adds a
new Player object to the Model.
That Player object is bound to the form: the form is linked to the Player object
and the form input fields are linked to the Player data members.
So the server builds the index.html file using the Player's data.
The server sends back the response of the index.html source so that
it can be rendered in the browser.
At this point, the server is done with the Model data for this request, so
that model data is deleted.
Next, we enter form data and click the Submit button: a new request is
made to the URL http://localhost:8080/player.
The query string in the request consists of all the form input data.
HTTP is stateless, so the server has no memory of the model attributes from the
previous request - it deleted the previous model attributes after the previous
response was sent back to the client. Therefore, there is no Player object
in the model.
How a single request/response cycle works
So the "player" model attribute was only alive during the first request. All model
attributes are cleared from the model at the end of the previous
request.
But this is easy to fix.
In the controller's handler method that processes the form, you can
access the updated model attribute easily using a
@ModelAttribute annotation on a parameter:
@PostMapping("/player")
    public String player(Model model, @ModelAttribute Player player) {
}
@ModelAttribute retrieves an object
from the request source and stores it in the parameter.
The parameter variable name should be the same as the model
attribute, but if you don't want to do this, you can set
the model attribute key name just like you do with
@RequestParam:
@ModelAttribute(name="player") Player newPlayer
or
@ModelAttribute("player") Player newPlayer
In our example, the @ModelAttribute annotation, when attached to
the handler method parameter Player player,
retrieves the player object that is bound to the form with
th:object. So this grabs the player object we bound our form to, with all
the input data updated!
If you add that parameter, you should now be able to see your
newly added player:
@PostMapping("/player")
public String player(Model model, @ModelAttribute Player player) {

    // test: what's in here? the player from the form!
    System.out.println(player);

    return "player.html";
}
What's cool about @ModelAttribute is that if there is no Player
object hanging around, it will just instantiate a brand new,
default Player!
We use th:object on the DIV element to
indicate that we'd like to use the stored player object called "player".
For each SPAN, we use a selection expression to select each data member from
the stored player object.
It would be nicer if we could display the team name instead of the
team index. That's possible, just access *{TEAMS[team]}
This uses the Player.team integer value as an index to the TEAMS array:
An even better solution to the teams list problem is to use an
Enumeration. Add a new .repositories
package to your project and add the
Teams enumeration. You can copy
my code that I've already created.
You will also need this new version of the Player
class: this one
uses the Teams enum for the team data member, instead of an integer,
and there is no longer a need for the array member.
Let's modify our drop-down list to use the enumeration instead of an
array in the Player class.
In our SELECT element, we don't need to change th:field because
the data member for the team has the same name, only the type of
data is different, but that doesn't matter to th:field: it's only
concerned with the name of the member that this select should
be bound to.
For each option, we're now iterating through an enumeration.
The enumeration is now in a separate class, the team data is not inside the
Player class, so we can't access it using the player object.
Instead, we can use the T operator.
The T operator is actually part of Spring Expression language,
and it allows you to access a class directly. You specify
the fully qualified name of the class after the T
operator:
(make sure you use the package name for your project)
This segment refers to the class Teams, as opposed to an instance
or object. This comes in handy when you need to access the
static method of a class: as you recall, you invoke a static
method on the name of the class, not on an instance.
Recall also that you can access the array of enum constants inside an
enum by using the values() method. For example, Teams.values() returns an
array of Team enum constants. So to iterate through the Teams enum, we use
the array expression
Now, because Player.team is a Team enum, the value of a selected option
must be an enum. We can use the Team enum constant name as the value,
and Spring will automatically convert that string into an actual Team
enum using the enum's built-in valueOf() method:
th:value="${t.name()}"
The option's text value can remain the same:
th:text="${t}"
Since t is the current item in a th:each, and we're iterating Team
enum constants, then t represents each enum in Teams.
You'll notice the toString() in the Team enums returns the city name
followed by a space, followed by the team name, which is exactly
what we want to display in our list.
${t} will automatically invoke the toString() and display the return
value in the OPTION element's inner HTML.
Save and load your HTML page to make sure it still works.
Examine the page source for the select element and make sure it's set
up correctly:
We don't need to change anything in our controller.
Now the output page: we need to change our output so that the
team name from the enum is being displayed for this player's
team:
Team: <span th:text="*{team}">team name</span>
That's it! Because *{team}
references the player's team member, and that
team member is of the enum type Team, that will automatically invoke
the toString(), which as we just said earlier, returns the city
name followed by the team name.
Add a new player and make sure it shows up correctly on the screen.
Exercises
1. Create your Dream Team!
Many serious sports fans like to create dream teams made up of
players from different teams. Modify your players program:
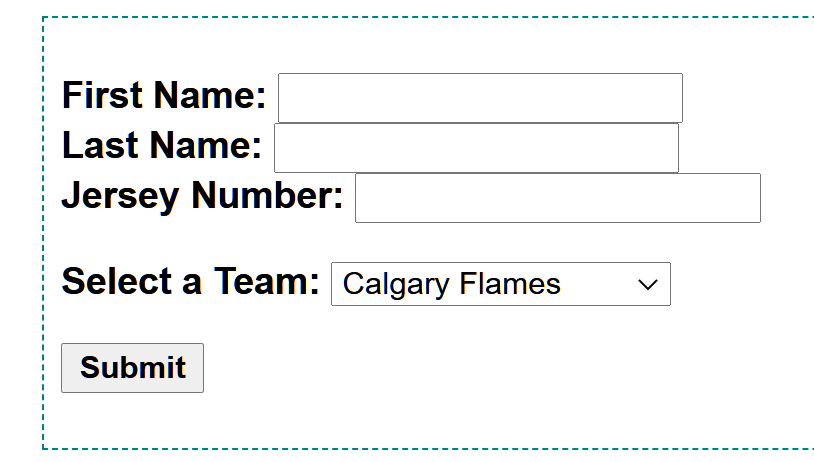
Add a new form page for adding players: copy over the form from the
previous exercises (enum version or non-enum version, your choice).
Make sure you change the action attribute to a different mapping.
The same input form to add a player
In your controller, add a new private data member that will contain
your dream team:
private List<Player> dreamTeam = new CopyOnWriteArrayList<Player>();
Add a handler method that maps to your new form page. In that method, add the following:
Add a new, empty Player to the model so we can bind that to the form.
Add your dreamTeam to the model, so
that we can also access that on the form page.
Load the new form page.
Now add a new handler method that processes your new form:
Include a @ModelAttribute for the player object from the input form.
Add the player to the dreamTeam.
Replace the old dream team model attribute with the updated one
(you just added a new player to your team, so the model
attribute needs to be updated).
Load the same new form page (the same page you loaded in the previous
handler method: when a new player is added, we're going back to the same
page!)
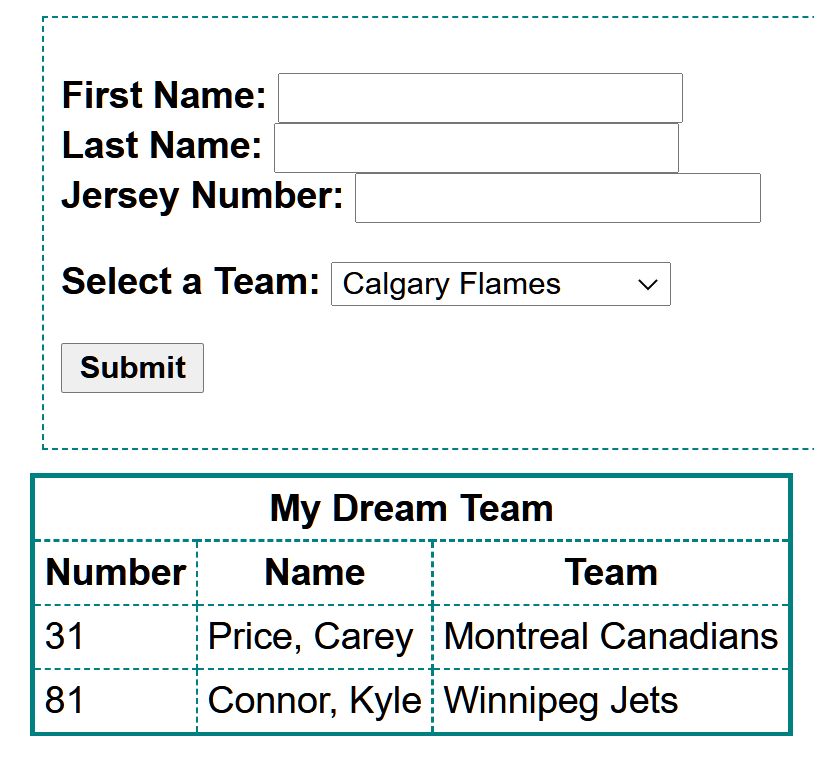
Now go back to the new form page and add the code BELOW the form element
to display each player in dreamTeam in a table so that the output
appears like the one below:
Below the form, show a list of new players that have been added.
Try your program. Add a new player and submit it.
You should see your player in the table, but your player data is also
still populating the form fields. If we wanted to edit the player,
this would be great, but we don't! We want to add a new player, so it
would be better if the form fields were cleared (or reset to the player
default values, where appropriate).
Why does the information appear in the form fields? Think about
the answer to that question.
Add one line of code to your handler method (the one that processes
the form) to fix this, so that the fields are cleared/reset.
Now restart/relaunch the project (this will clear your dream team list
so you can start over with a new list).
Add a new player: you should now see the player in the
table, and the fields are cleared and ready for you to add a new
one. Add a few more players and watch them appear in your table!
Below the form, show a list of new players that have been added.
2. Generate a List of Books Start a new project and copy over
your latest Book bean.
Add a Genre enumeration to a .repositories package of your project:
You can use the ordinals/indexes as the Genre ID, so you
don't need a field for that.
Add a field for the display name or display value. For example,
the display value of the TECHNOLOGY enum should be "Technology".
Create an enum called Genre to contain the different genres of books.
Make sure you include a field for the "display name" so the user doesn't have to
see the genre names in upper-case letters. Adjust your bean's genre data
member so that it stores a Genre enum value.
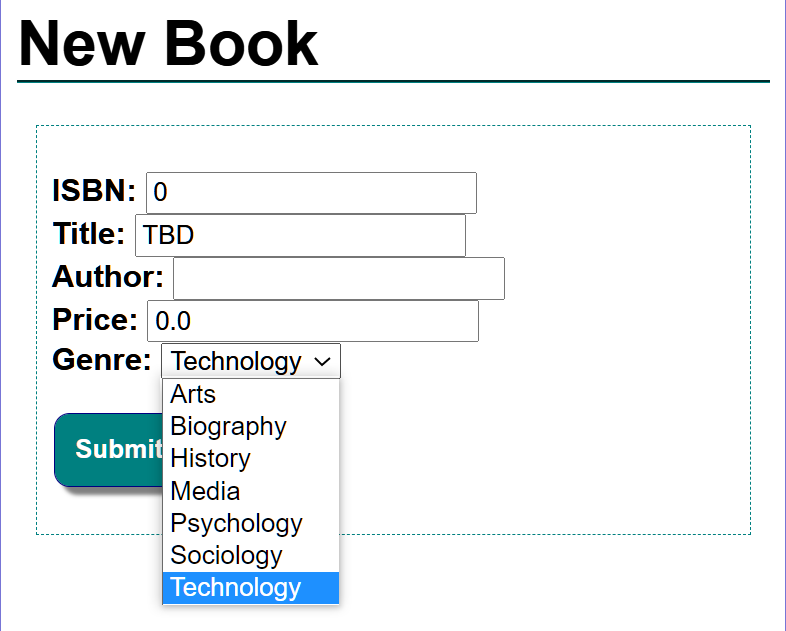
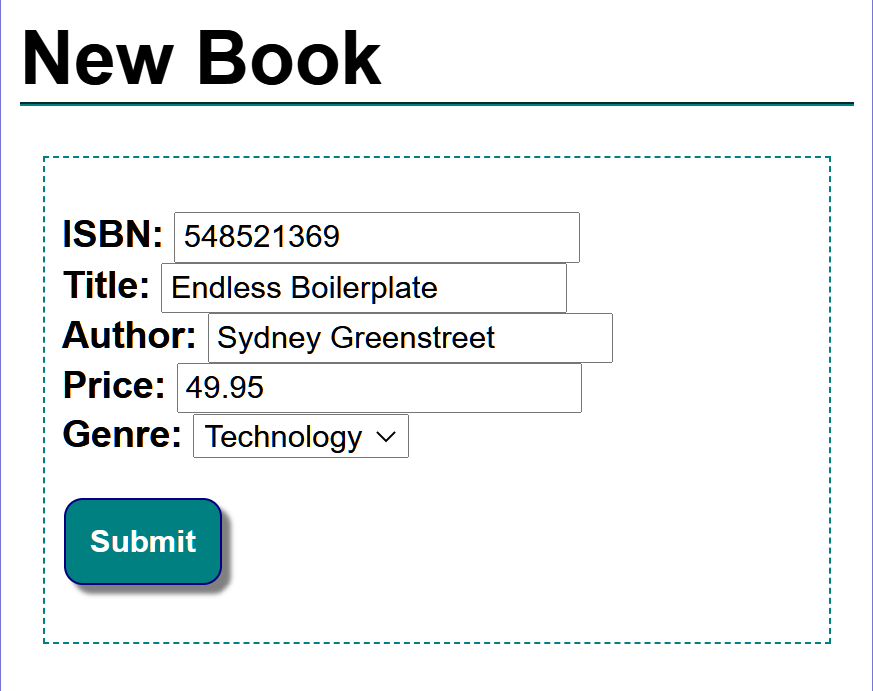
Create a form newBook.html that contains fields that allows
a user to add an instance of the
Book bean. Genre can be selected in a drop-down list.
Form for adding a new Book, the drop-down list
uses the Genre enumeration Form for adding a new Book
Add controller methods (3) to:
Load the form page newBook.html.
Process the form data:
Add the new book to a list of books.
Load the view books.html that shows a list of all the books added.
Clear the list of books:
Empty the list.
Load the view books.html output page.
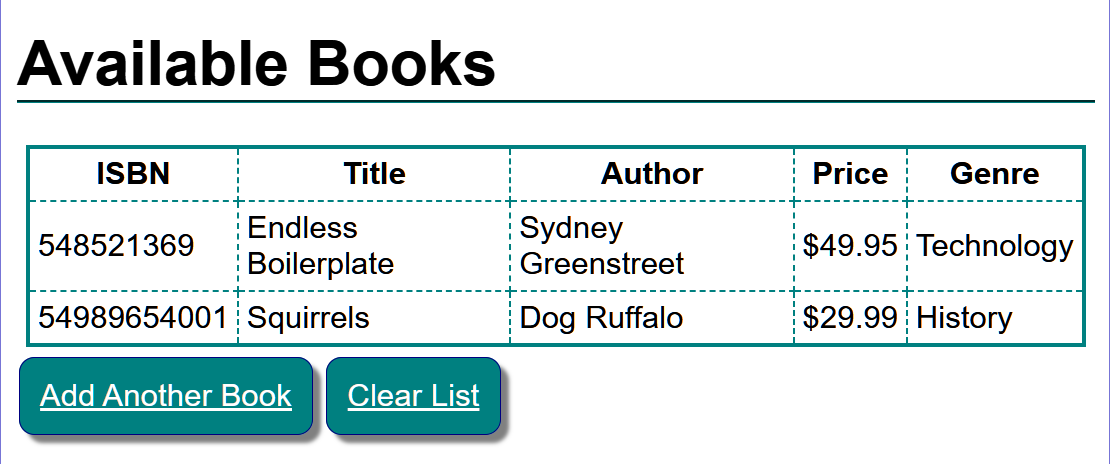
Create the books.html file to show the output.
The list of books should appear in a table.
The Book's price member should be formatted as a currency value. Hint: #numbers
If the Book's author member is empty, display "not specified". Hint: #strings
The table should only appear if there are books in the list to display.
If the list is empty, display the message "No Books to Display!" Hint: th:if with #lists
in 2 places.
Below the list/message there should be 2 links:
Add Another Book goes back to the input form,
where the fields should be empty and awaiting new inputs
(it's totally normal that your book's default values would automatically appear)
Clear List empties the list
List of books in an HTML table on the output page
In my screen shots, you'll see that my Submit button and my 2 links are
both styled to look like buttons. Feel free to copy and edit the
CSS: