Refresh
this page because I am probably still making changes
to it.
In this lesson we'll learn about what web services are and where
you might use them. We'll test out some examples and then start
writing our own web services in a Spring Boot application.
We'll also use PostMan to test our web services.
I have to assume that this is the question that is
most prominent in your thoughts right now (unless you're
like me and often musing about what you're going
to eat next) - What is a Web Service? The question
has a complicated answer. Deciding what you're going to
have for lunch is much easier, by far.
To try and put it in the simplest terms: A web service is
a method that lives on the web and is available to be
used in any application. The creator of the service
"exposes" it or publishes it, so that others can call upon it,
or consume it,
using an HTTP request. You can request or call the
web service just like you request any URL, but instead of a page,
the response contains data.
Here are some important characteristics of web services:
A web service can accept inputs, and it generally returns
something back to the client (e.g. data)
A web service has no gui or front end because they're used
as parts of an application's code/logic.
For example: there might be a web service method
called validateCreditCard() that accepts a set of data
about a credit card and returns a boolean true or false if
that card is valid or invalid.
Another example: a web service method named getProductImage()
that accepts a product ID and returns an array of image files
that display that product. You could use this web service
method when you are selling something on amazon and you want
to show the images of your product on facebook or on a web page.
Web services are standardized by W3C. That means that they can be used by
any language!
Web service methods return their data in plain text format,
usually XML although ReST services can also return
JSON (JavaScript Object Notation),
CSV (comma-delimited text), or just plain
unformatted text.
There are some good benefits to using web services:
A web service can be used by different programs, even if
those programs are all coded in different languages, and even if
they're coded in a language different from the language the
web service was coded in!
This makes them a great choice for communication
between two otherwise incompatible programs.
You could use the same web service in an Android application,
in an application that runs on a Mac computer, or in
a Smart TV application.
The web service has already been written: it's there, ready
to use. You can use it instead of writing your own code.
Because a web service has no GUI or front end, you'll need
some kind of application or interface to test them out. Many
services on the web have web forms you can use, but for your own,
you'll need some kind of tool. We'll be using a program called
PostMan (I did not choose the name, so I don't know why it's not
called PostPerson :P )
If web services have no GUI and they sit on the web, how do we
know what they are, where to find them, and how they work?
When we find one, how do we know what arguments it needs and
what kind of data it returns?
Web services use WSDL
(Web Service Definition (or Description, depends on who you ask)
Language). WSDL (some people pronounce it "Wizz-Dull" but don't even
get me started on my annoyance over turning acronyms into words :P )
is written in XML and it describes a web service: what the service
does, what arguments it needs and what their data types are, if
any of those arguments are optional,
what kind of data it returns, how to call it and pass it the arguments,
etc.
SOAP (Simple Object Access Protocol) is the standard used for transferring
objects in a request or response on top of HTTP. This is also XML-based
and it wraps a request/response to/from a web service with an
Envelope, Body, Head, etc.
Examples of Web Services
To get a better idea about web services and how they work,
try out these free ones!
Notice that the data returned by the web service is
in JSON format. You might not even know JSON yet,
but you can probably figure it out just by looking at
it: it's very simple.
Discographpy
AudioDB is a ReSTful service that
gives you
information about music artists and their albums.
Try https://theaudiodb.com/api/v1/json/2/search.php?s=[artist]
and replace [artist] with any music artist (use + for spaces) e.g.
https://theaudiodb.com/api/v1/json/2/search.php?s=big+sugar
to get information about the artist.
Use the discography.php file to get a discography of a specific artist,
e.g. https://theaudiodb.com/api/v1/json/2/discography.php?s=big+sugar.
Convert Number to Words
Number
Conversion Service converts a specific
number into words (e.g. if you give it 25, it will return "twenty five").
Try NumberToWords: enter any numeric value and it will return
a String containing the words for that number.
This is a neat example because you can see the SOAP request
and response format.
ReST / ReSTful Services
In this course, the web services we create are called ReST
services (you can spell it Rest or REST, if you prefer).
ReST
is an acronym that stands for Representational State Transfer.
ReST is a newer architecture for defining and transmitting web
service data. Many say that it's replacing SOAP and WSDL, but
really it's just newer and different: instead of using SOAP
to define and transmit requests and responses, it
uses the standard HTTP verbs (GET, POST, PUT, DELETE, etc.)
so they're great for CRUD operations.
When a service is described as ReSTful, that
means that it's ReST-compliant, that it follows the rules and
protocols of ReST.
ReST is an architectural style for accessing hyper-media on the internet,
rather than a protocol or set of
protocols. Imagine it's like house designs: you might design a
house in the European style or Modern style, but there are also
protocols or rules for building houses. For example, you must have
certain supports to maintain the integrity of the structure and you have
to follow certain rules for electrical wiring. ReST is a style of
defining and transmitting data, whereas HTTP and SOAP are rules or protocols
for data transmission.
A ReST service is stateless - it separates the things the client and
server are interested in. When a client requests a ReSTful web service, it
returns a value back to the client and then "forgets" about the request:
it is not concerned with how the client used the data, nor does it care
if the client has requested the service before or will again in the
future. This creates an advantage: it means the client application
and server application can be constructed individually and independently,
and neither needs to know or care about the other. This makes things more
modular and allows you to extend or change the client or the server without
affecting any functionality. The only things each side needs to worry about
are the rules and for transmitting messages to each other and what kind of
data those messages need to contain. This also means that different clients can call
upon the same web service, regardless of the language or technologies they
are written in: As long as they know how to make the request and what data
comes back, any client can use the same web service.
Another great advantage of ReSTful services is the return value doesn't
have to be in XML. A ReSTful service can also output in CSV, JSON, RSS, plain
text, etc. Again, this means that it's really easy for disparate clients
to use the same web service, regardless of what language they are
written in.
If these descriptions sound familiar, it's because the Internet is
ReSTful! Standard HTTP requests and responses follow the architectural
guidelines of ReST.
In order to achieve stateless communication between disparate
applications, ReST uses a standard set of nouns and verbs. The
nouns are the objects/data/resources that are being requested or
stored, and the verbs identify the method or type of request being made.
A standard ReST request is made from the client to the server, as a request
to store, retrieve, modify, or create data. A request consists of:
A standard HTTP verb such as GET (retrieve),
POST (create), PUT (update),
or DELETE (remove) (there are others, but we will
focus on these four)
A header containing information about the request.
A path to the resource (the resource being retrieved/created/updated/removed)
An optional message body that can contain data needed for the request (e.g.
for a POST, the object to create; for a DELETE, the id of the item to
be removed).
1. HTTP Verbs
The verbs we will cover in this course are pretty standard and do what
you would expect, although most of them operate differently on an entire
collection of items as opposed to a single item.
HTTP Verbs and Operations
Collection Operation
Single Item Operation
GET
retrieve entire collection
retrieve one item in collection
POST
create a new item in a collection and return its ID
not used
PUT
replace an entire collection
modify a single item in a collection
DELETE
remove all items in a collection
remove one item in a collection
2. The Header
The request headers define information about the request. One important
piece of information is the Accept header, which defines
the type of content that it will receive from the server. This is really
defining "this is the type of data I will accept, and I won't accept
anything else". This ensures that the server doesn't send any data that the
client can't understand or handle. The Accept header is given one or more
MIME
types. A MIME type consists of a type followed by a
slash, followed by a subtype. Common examples you might have already seen
before include text/html, audio/mpeg, image/png, or application/zip
For example, if a client wants to request an order with the id number
2839 in the /orders directory, and they want the order details to be
returned in XML format, the request might appear as:
GET /orders/2839
Accept: text/xml, application/xml
The Accept
header field in this case is saying that the client
will accept the content in text/xml or application/xml.
3. The Path
The request must include the path to the resource being accessed.
Paths should be designed to make it clear to anyone what's going
on or what's being stored there. It should be hierarchical
and descriptive, and should contain all the information needed to
locate the resource. For example:
GET /customer/14/orders/2839
Host: www.sydneycattrees.ca
Accept: text/xml, application/xml
In the above example, it's obvious what's happening, it's clear what this
path points to. Even if you're unfamiliar with this application, you can
still accurately guess what is happening, because the path is hierarchical
and descriptive. We can see that we are accessing the order with id 2839
for the customer with id 14.
4. Optional Request Body
Some requests will require information/data. For example, a DELETE
request needs to include data that identifies the item to be deleted,
and a PUT request needs data that identifies what item or items need
to be updated/replaced.
A request body's data type is defined using the header
Content-type. This header takes a MIME
type, just like the Accept header.
ReST Web Service Responses
Once a request is made, the server can process it and then send
back a response. A ReST response also has headers
and an optional body, just like a request. The body of the response contains
the payload or the data/results of the request,
if there was any. The Content-Type
header defines the MIME type of the response body contents,
if there are any. If there is no payload, then the
Content-Type is not required.
For example, the response for the order request from the
earlier example might look like this:
Notice that the response includes a response code or status
code. You are probably already familiar with many of these.
For example 200 (OK) means the request was successful and that 404
(NOT FOUND) means that the resource could not be located.
Successful response codes also depend on the request method:
When a request fails, the status code returned depends on the cause of the
failure (I put a link to a list of codes above the table). Some examples
could be:
If you attempt a GET request for a resource and the server
found the resource but it's not in a format that's listed by
the client as acceptable (according to the request's Accept
header) then a 406 (NOT ACCEPTABLE) status code is returned. For example,
if you request a specific order in XML format, but the server
is unable to provide it in XML and can only provide JSON,
then it would return 406.
If you attempt a DELETE request on a collection of items
but the server can't find the collection, it would return a
404 (NOT FOUND).
A 409 (CONFLICT) response is often returned with a failed PUT
request. For example, if you attempt to update an item
but your item is older than the one on the server (perhaps
another user updated the same item before you had a chance
to execute your PUT request) then a conflict will occur.
Generally, I only mention status codes out of interest (isn't it
fascinating, or am I just really nerdy?) and for those of you that
are probably going to want to explore more of what you can
do with web services.
Demonstration with Postman
We're going to do a demonstration of ReSTful web services,
which is going to involve creating a Spring Boot project in like
we usually would, but you'll also need a tool to test your
web services. We're going to use Postman.
Download and Start Postman
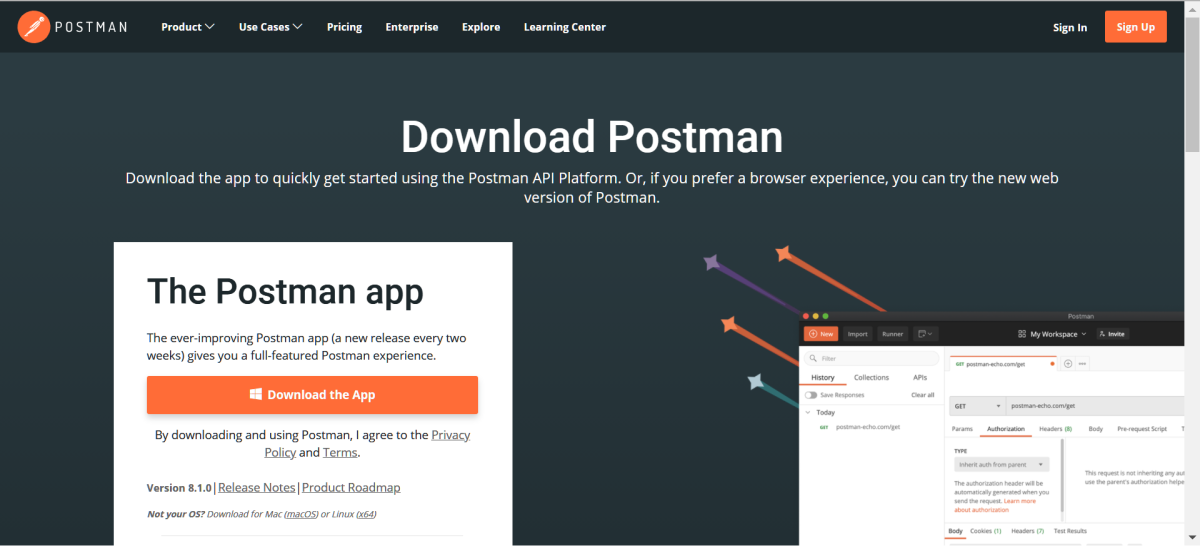
Download Postman by going to Download
Postman
and click on the DOWNLOAD button.
Click the DOWNLOAD button on the Postman download page.
Save the file to your computer, and then run it to install
Postman. Accept any default options during the installation.
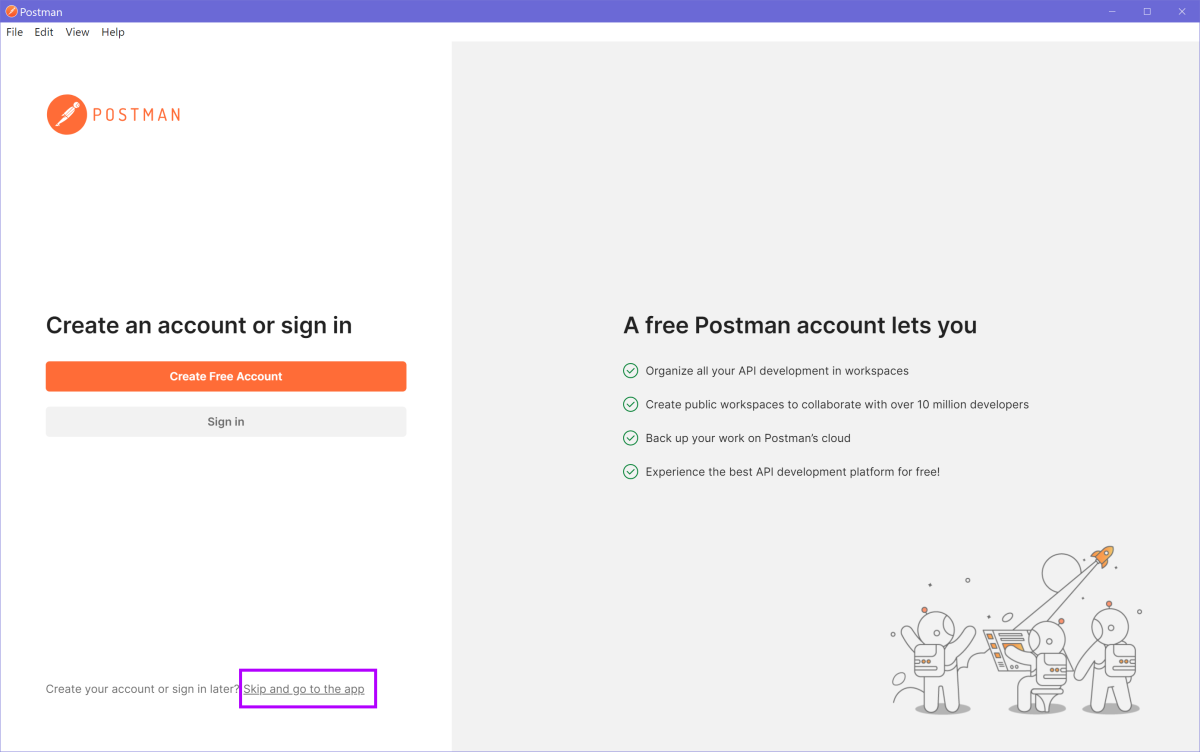
When you run Postman, you'll be encouraged to create a free
account, but you don't have to. Look down near the
bottom-left of the screen and you'll a "Skip and go to the app"
link. Click that to work in Postman without creating an account
(you'll be working in a "scratch space" and that's fine, you
would only need an account if you wanted to save your stuff
to the cloud).
Click the "Skip and go to the app" link if you don't
wish to create an account.
I have found that when I wanted to run Postman at a later date,
I had trouble finding the startup application (e.g. when I searched
for Postman to run it, Windows could only find the installer)
so while it's open now, you might want to "pin it" to your task
bar or Windows menu!
Create a Spring Project
Now we need a Spring project so we can create some
web service methods to test (and in the next lesson, we'll
add code to "consume" or use these methods):
Start a new Spring project.
Add dependencies for Spring Web, Dev Tools, H2 and Spring
Data JDBC, Lombok, and Thymeleaf.
DO NOT add a controller, yet!!
In a previous lesson you used the
Container bean: add this
to your project's .beans package.
Add the database config and database access classes to the
.database package.
Add the following schema.sql to your project:
CREATE TABLE containers (
id INT PRIMARY KEY AUTO_INCREMENT,
name VARCHAR(50) NOT NULL UNIQUE,
volume DECIMAL(6,2) NOT NULL
);
Add the following data.sql to your project (feel free to
modify the values I've provided):
INSERT INTO containers (name, volume) VALUES ('small box', 10.0);
INSERT INTO containers (name, volume) VALUES ('medium box', 25.0);
INSERT INTO containers (name, volume) VALUES ('large box', 50.0);
INSERT INTO containers (name, volume) VALUES ('small crate', 100.0);
INSERT INTO containers (name, volume) VALUES ('large crate', 500.0);
Add the necessary project properties in application.properties
to set up database access using H2.
Create a ReST Controller
ReSTful web service methods go inside a special kind of controller
called a @RestController. The @RestController annotation
defines a specific type of @Controller that allows us to
convert the methods' return data into XML or JSON (or whatever)
instead of sending the return data to a Thymeleaf page
or other View. A regular @Controller always expects handler
methods to load a view (either by returning the view name as a string or by
manually editing the response body, both of which we've done in the past),
but a @RestController allows you to return data that can then be "consumed"
or used by other applications.
We'll start off with an example that's simple and kind of silly:
Add a new Controller to your .controllers package called
CatServiceController, but use the
@RestController annotation on your class instead of @Controller.
We will add a regular @Controller in the next lesson (so we can
consume or use our web services).
Additionally, we're going to map this controller to a URL pattern
using the @RequestMapping annotation.
@RequestMapping is a more general mapping method (e.g. @GetMapping
is specifically for GET requests and @PostMapping is specifically
for POST requests) that you can use to map a method or
an entire controller to a specific URL. For example,
if you use @RequestMapping("/foo") on the controller
class header, that controller will be used when the URL includes
the /foo path segment.
Add @RequestMapping("/cat") to your Rest Controller class:
@RestController @RequestMapping("/cat")
public class CatServiceController {

}
When a web service method is requested with http://localhost:8080/cat,
one of this controller's methods will be chosen to run.
This Rest Controller is going to contain web service methods
that generate random information about a cat, such as name
and breed. This means it will need data, so add these three
arrays:
@RestController @RequestMapping("/cat")
public class CatServiceController {

    private final String[] names = {"Muffin", "Fluffy", "Dumpling", "Spot",
        "Whiskers", "Shadow", "Felix", "Tigger", "Smudge", "Simba", "Misty",
        "Sasha", "Milo", "Luna", "Molly", "Tom", "Morris", "Fritz", "Coco",
        "Cleo", "Puss", "Smokey", "Oscar", "Ginger", "Tibby", "Charlie", "Pedro",
        "Daisy", "Jasper", "Sooty", "Alfie", "Millie", "Bella", "Patches",
        "Pumpkin", "Maggie", "Oreo", "Sam", "Max", "Oliver", "Minka", "Maru",
        "Moritz", "Eva", "Lucy", "Sisko", "Lulu"};

    private final String[] breeds = {"Grey Tabby", "Void Kitty", "Orange Tabby",
        "Russian Blue", "Tawny Tabby", "Snowshoe", "Siamese", "Persian",
        "Manx", "British Shorthair", "Maine Coon", "American Shorthair",
        "Ragdoll", "Bengal", "White Domestic Shorthair", "Calico", "Abyssinian",
        "Scottish Fold", "Birman", "Burmese", "Japanese Bobtail", "Bombay",
        "Egyptian Mau", "Balinese", "Munchkin", "Savannah", "Ocicat",
        "Cornish Rex", "Chartreux"};

    private final String[] locns = {"on your shoe", "in your shoe", "in front of you",
        "in your bed", "on the folded laundry", "in your lap", "on the bath mat",
        "under your desk", "on your keyboard", "on your snack",
        "in your cup", "on your mouse", "on your desk", "under the table",
        "by the front door", "in front of your bedroom door", "in your closet",
        "on your favourite jeans", "in your sock drawer", "on your homework",
        "in the litter box", "in their dish", "on the TV remote", "on your chair",
        "in your slipper", "on the floor", "on your pillow", "in the bath tub",
        "on your open textbook", "in your hand"};

}
GET Requests
Let's start with a simple GET request. We are already very familiar
with GET requests so this will allow you to see and understand
how a web service works. We're going to create a web service
method that returns a random cat name and breed.
Add a method with @GetMapping (no URL pattern needed) that
returns a formatted string containing a random name and a random breed
in the form:
This method will be invoked when the URL is
http://localhost:8080/cat (at least,
in our environment - in "real life" if your services were
on the internet somewhere, then it would be the context
path of your application e.g http://mystuff.ca/ws/cat)
Once you've added the code for the web service method,
run your application.
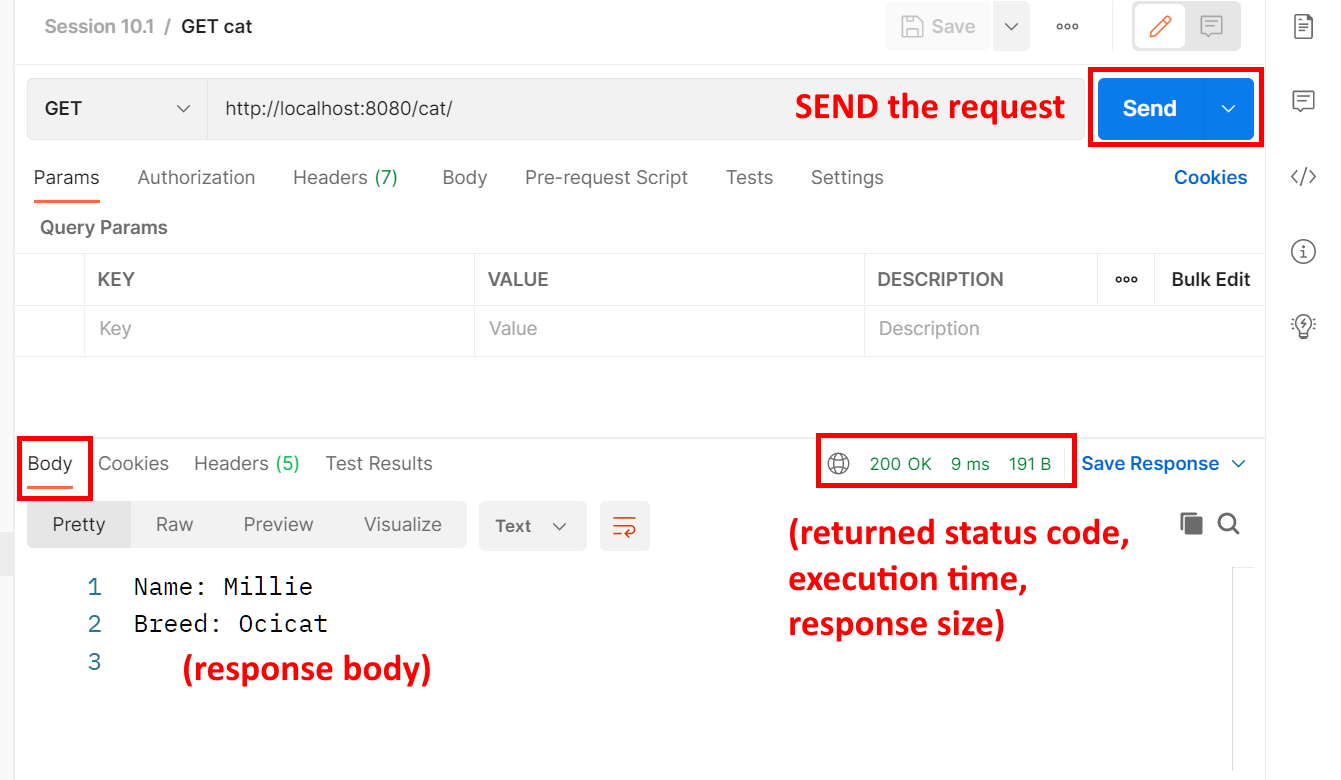
To test our method, we use Postman. In the next lesson
we'll learn how to consume/use it but for today we will test
our methods first. Since web service methods don't have a
GUI or front-end, we have to use a tool like Postman. Go
to Postman (make sure it's running) and we'll test our
cat() service method.
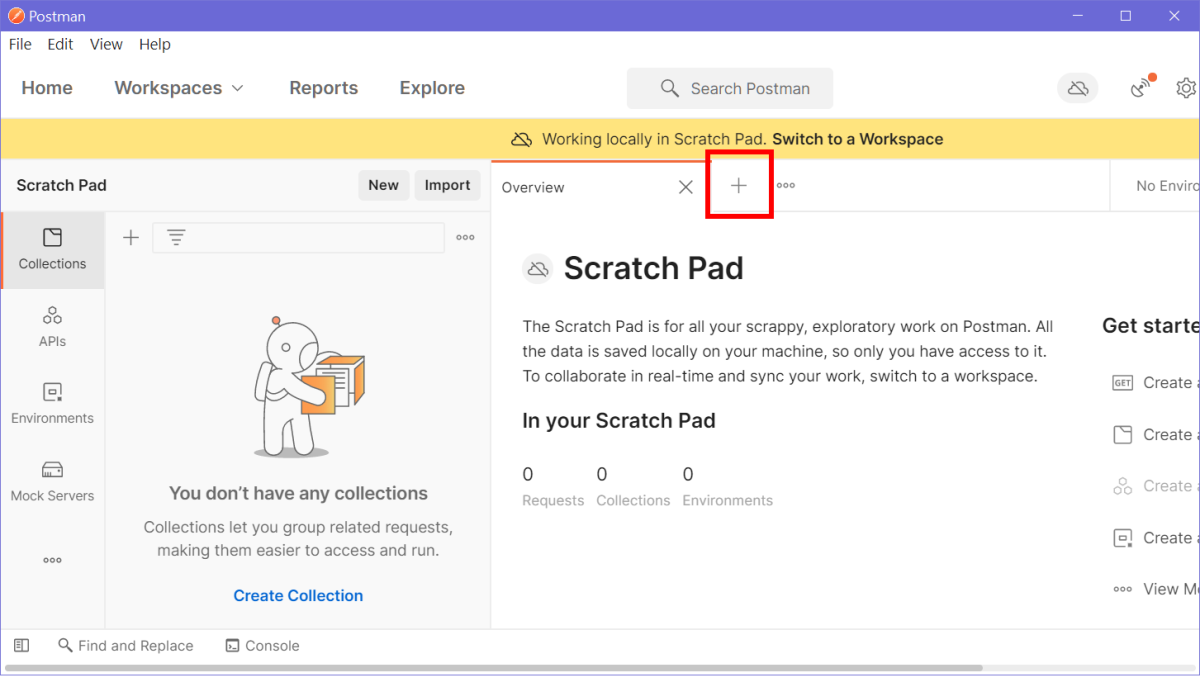
We first have to create a new Request and then give that request
all the necessary information. To create a new Request, click
the "new request" button - it's a + (plus) sign beside the "Overview"
tab (or your Overview tab might say something else). Alternatively,
you can go to the File menu and select "New" and then click on
"HTTP Request".
Click the New Request button to create a new HTTP
Request (or File > New > HTTP Request)
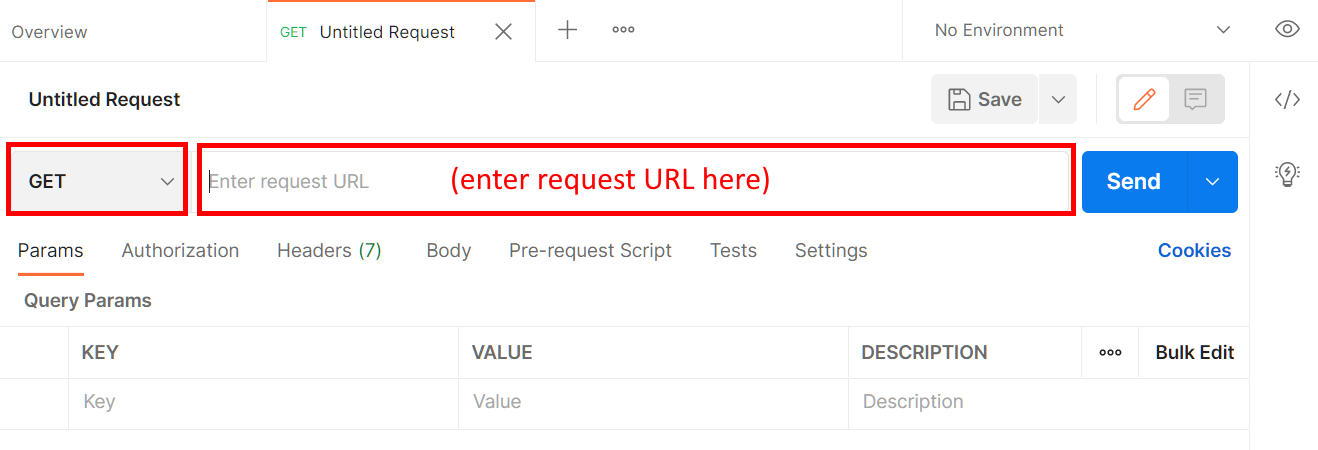
Now we need to enter the request we'd like to make in the Request
field: this field is to the left of the SEND button and it should
be showing placeholder text "Enter request URL". Also, to the left
of that field, make sure "GET" is selected in the drop-down box.
In the field, type the request URL
http://localhost:8080/cat.
GET request: Type your request URL in the field
To execute the request, click the SEND button! This will send the
request to your @RestController (because the last path segment
is /cat and that's the request mapping for the controller) and it
will invoke the cat() method.
SEND the request, response appears in the bottom
Clicking SEND sends your GET-Request to the Rest Controller. The method
executes and sends back a response. The response is visible in the
bottom of the Postman window. By default, it should be showing the
"pretty" version of the response body.
You can also see the status code returned (in this case, 200 OK), the
response time (in my screen shot it took 67 milliseconds but yours
might be more or less) and the number of bytes in the response.
If you hover over each of those 3 things you can see more detailed
information about each. It's interesting!
If you wish, you can save each request you create in case you want
to come back and test it again later or just to have a look at it.
If you get a free account, you can save groups of requests in different
collections, but that's not a requirement for this course.
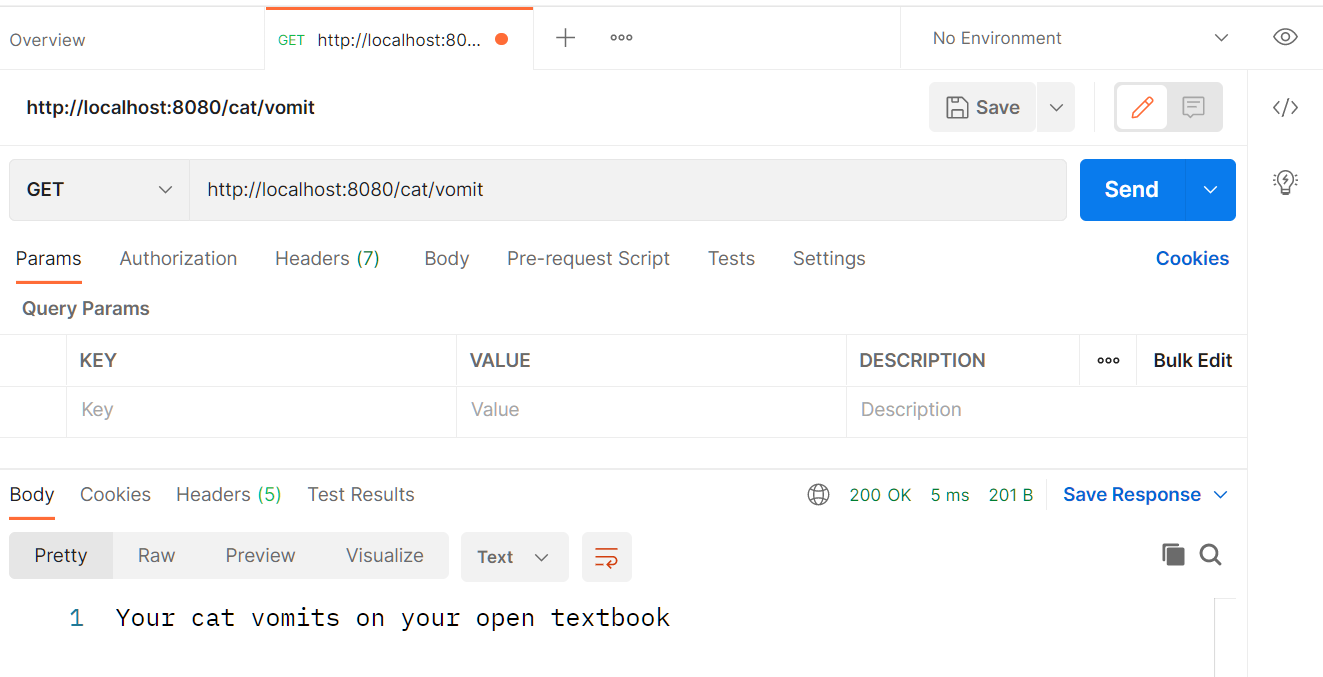
Let's add some more cat web services! Go back to your Eclipse project
and edit your CatServiceController. Add these methods (in addition
to the one you already have, don't delete/replace cat()):
Notice that each of these 3 methods has a different URL
pattern. This means that in addition to your request URL
including /cat (which is the pattern mapped to this controller),
you can add /name to invoke
randomCatName(), or you can add
/breed to invoke randomCatBreed(). For example, the
request URL http://localhost:8080/cat/name
will return a response containing a random cat name.
Go to Postman and add a new request that calls upon one of the
three methods (I have to say that catPuke() is the funniest
one).
Try requesting one of the other service methods
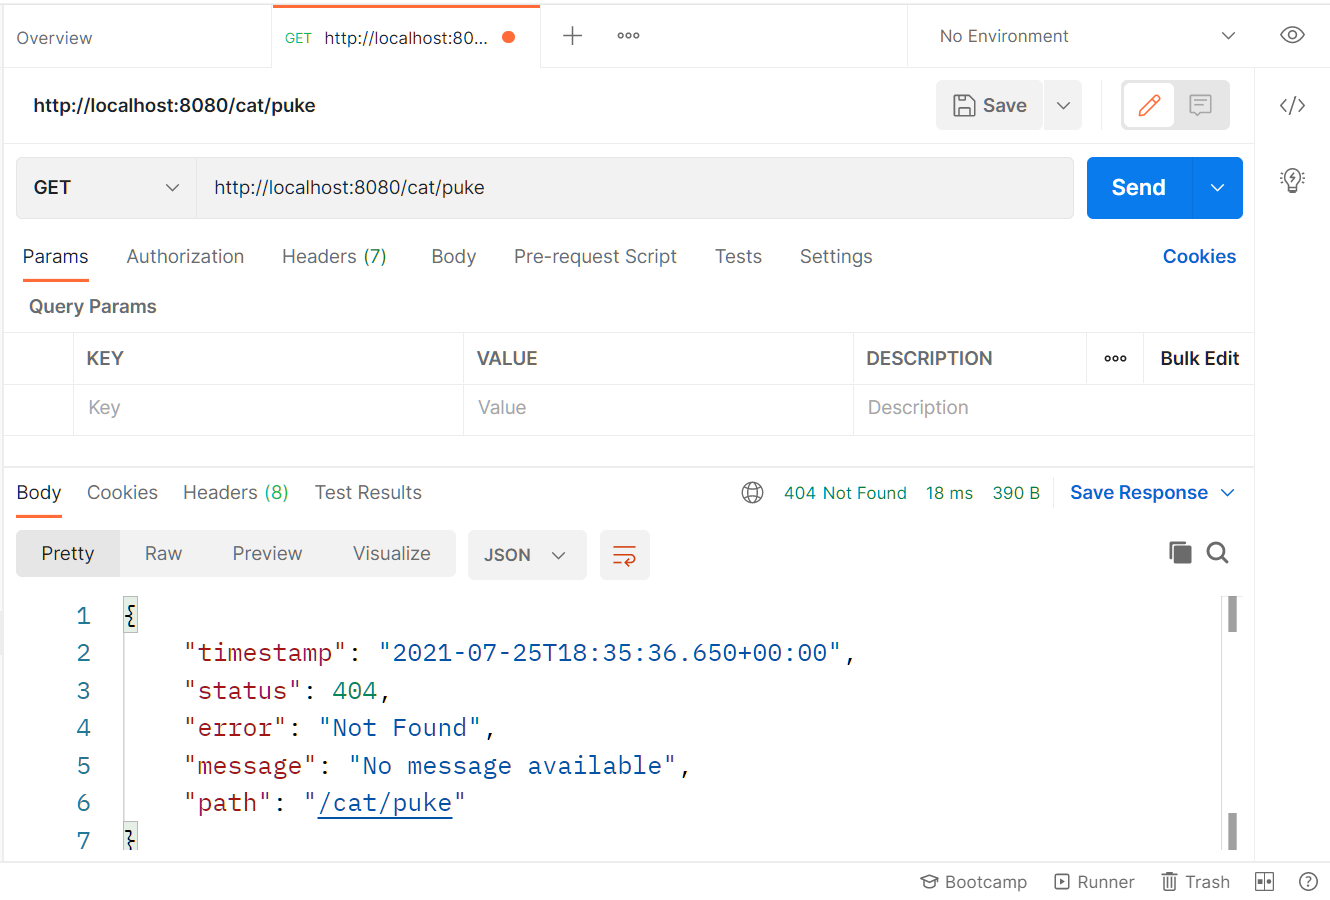
If there is an error with your request, you'll see the error
information in the response area, including the status code
and the error information. For example, if my request is for
an invalid URL, it will return a 404 NOT FOUND error.
A 404 Not Found Error
Exercise
Create requests to test each one of the service methods in the
CatServiceController
More Practical Examples
Ok let's try some more serious and practical examples. We're going
to do some standard GET requests on our Containers
table data.
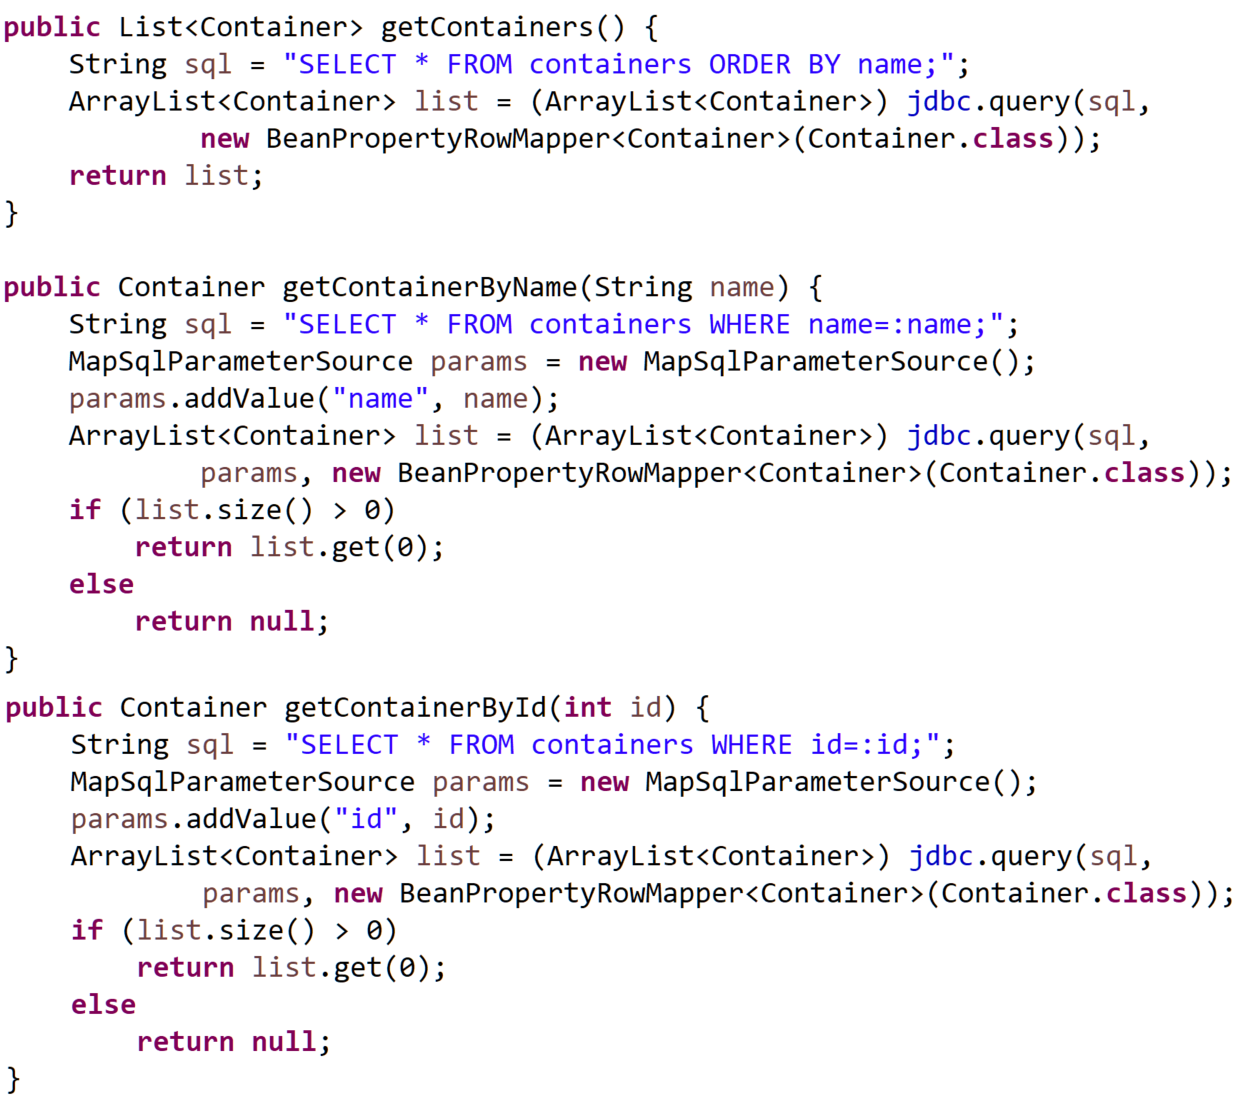
Add the following methods to your database access class:
getContainers() returns a
List<Container> that contains
all of the records in the containers table as a list of
Container objects.
getContainerByName(String name) that searches for and returns
a single Container by the container's name.
getContainerById(int id) that searches for and returns a
single Container by the container's record ID.
Database access methods getContainers(), getContainerByName(),
and getContainerById()
Now we'll add a new Rest Controller to our project for the
Container web service methods: add a new class to the .controllers
package, annotate it with @RestController
and @RequestMapping("/container").
@Autowire in your database access class.
@RestController
@RequestMapping("/container")
public class ContainerServiceController {

    @Autowired
    private DatabaseAccess da;

}
Let's do a GET request for a collection: add a web service method
(no URL pattern required, this will execute as the default when
/container is requested) that returns the List<Container> of
container objects by invoking the database access method:
@GetMapping
public List<Container> getContainerCollection() {
  return da.getContainers();
}
Now go to Postman and add a new GET request to
http://localhost:8080/container.
Then send the request and check the response that is returned.
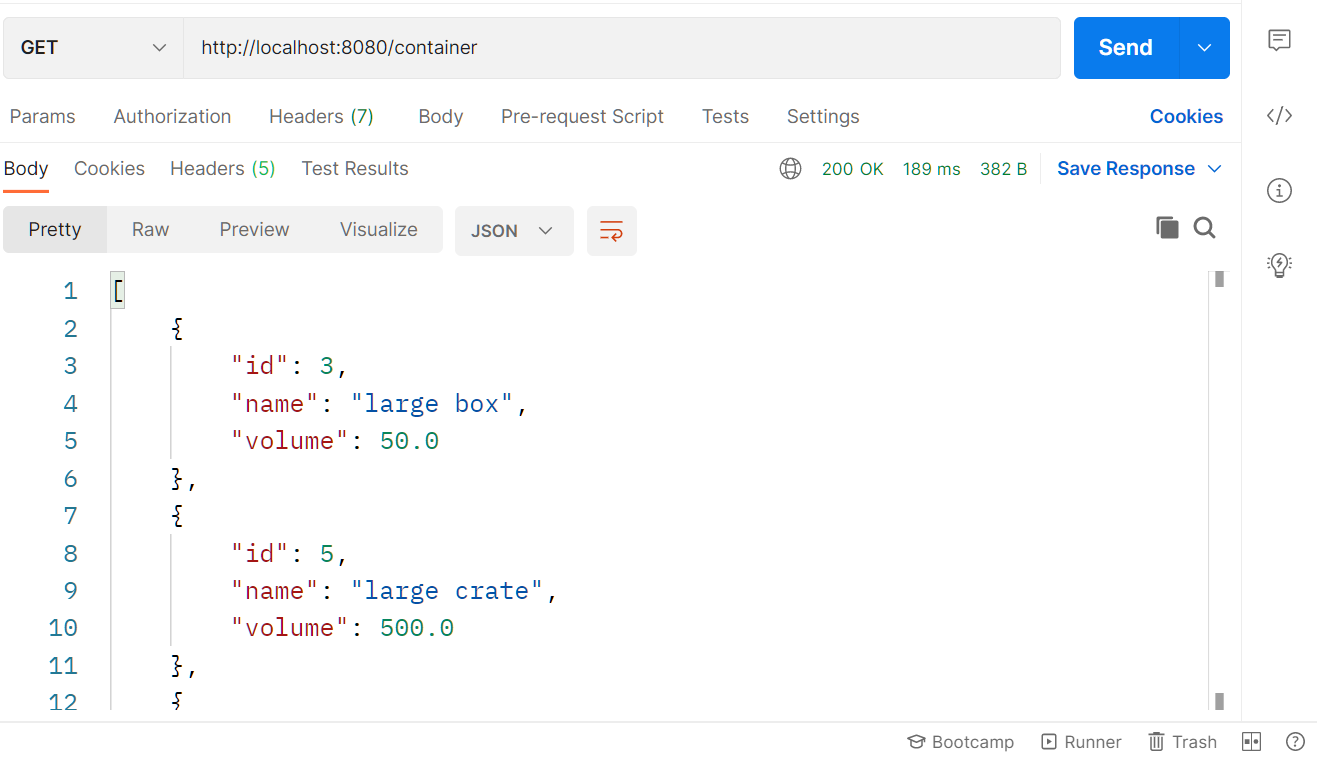
Sending the GET request /container and the response
When you get the response to the request, you'll notice that all of the
container table data appears in the response body. The format you're
viewing it in is JSON format. You probably haven't learned JSON yet (unless
you've learned it on your own) but it should still make sense: JSON
is easy to read. A collection is enclosed inside square brackets [ ]
and each object is enclosed inside a set of curly braces { }. If there is more
than one object, each object is separated by a comma.
Each object consists of one or more key-value pairs as "key" : value
(where value will be "value" if it's a string), and each pair is
separated by a comma.
The entire response body should appear as follows:
So the following represents one container row/record/object with
an ID of 3, a name of "large box", and a volume of 50.0:
{
"id": 3,
"name": "large box",
"volume": 50.0
}
By now you can probably understand how you can use combinations
of @RequestMapping and @Get/PostMapping with different controllers, but
here's a summary.
@RequestMapping(pattern)
on the controller class header defines the URL pattern for this controller.
So @RequestMapping("/foo")
will match any URL that starts with http://localhost:8080/foo
Adding @RequestMapping(pattern),
@GetMapping, @PostMapping, etc. to any
handler method inside the controller will target that specific handler
method when a pattern matches. For example, if the controller has
@RequestMapping("/foo") and a method
called bar() has @GetMapping("/bar"), then the URL
http://localhost:8080/foo/bar
will cause the bar() method to execute.
A method with no pattern mapping will execute with the default assigned
to the controller. For example, if the controller has
@RequestMapping("/foo") and a method
called index() is mapped with @PostMapping (no URL pattern specified), then
index() will execute when the request URL for a POST request is
http://localhost:8080/foo
Additionally, @RequestMapping has some useful attributes:
@RequestMapping(value="/foo") is equivalent
to @RequestMapping("/foo") and
@RequestMapping(path="/foo"). It should be used
whenever you need to specify additional attributes
@RequestMapping(consumes="")
defines the media types that can be consumed by this handler method. In other words,
it defines the format of data this method receives. This is used on web service
methods that need inputs. Ideally, this will contain a MIME type that corresponds
to the Content-Type header of the request. A typical use might be
@RequestMapping(value="/bar", consumes="application/json")
to define a handler method that is expecting to receive input in
JSON format.
@RequestMapping(produces="")
defines the media types that are produced by this
handler method; the media types allowed in the response are limited to those
listed in the produces="" attribute.
This will hopefully correspond to the request's Accept
header. A typical example might be:
@RequestMapping(value="/bar", produces="application/json")
to define a handler that sends a response whose body contains data in JSON format.
Let's now try a GET request for a single container. Add a web service method
to your Container Rest Controller that retrieves a single Container
by name:
@GetMapping
public Container getContainer() {
    return da.getContainerByName(name);
}
There is a problem, though: we now have two methods mapped
to the default /container and that's not permitted: Spring won't
know which method to execute when we request http://localhost:8080/container.
Additionally, how does the method know which container we
want to retrieve? We can use a @PathVariable, and this will
solve both issues:
@GetMapping(value="/{name}")
public Container getContainer(@PathVariable String name) {
    return da.getContainerByName(name);
}
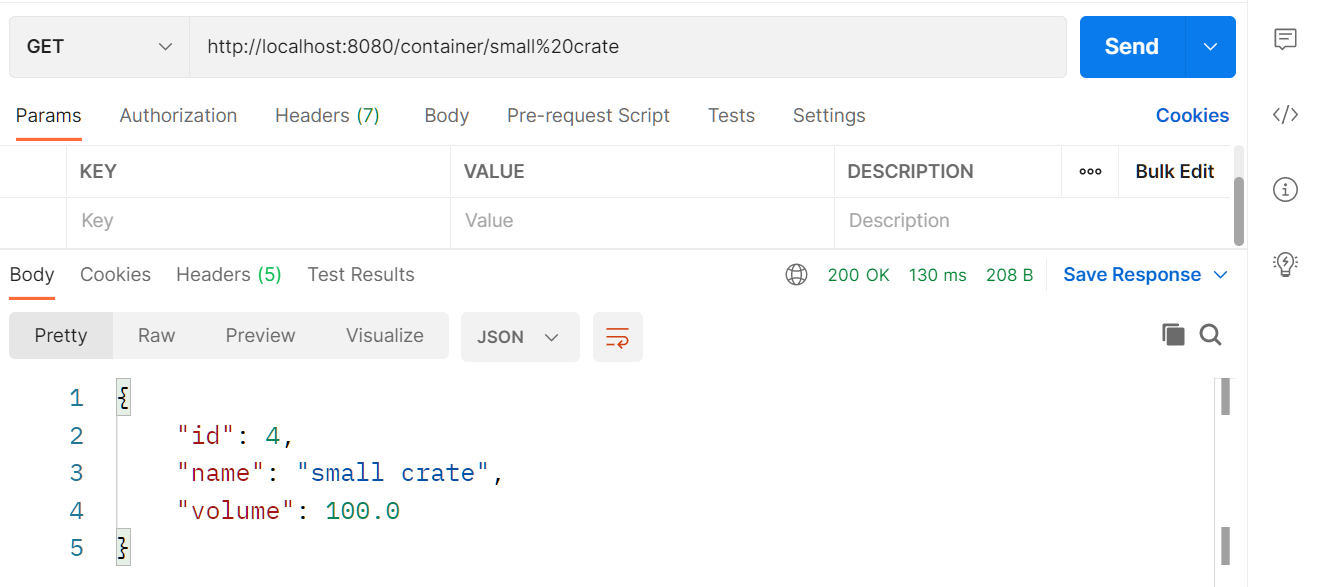
Now let's test this method by creating a request for it
in Postman: For the request URL, we need to include
a path variable value in the URL. For example, let's
search for "small crate". This value has a space in it,
though: spaces aren't allowed in a URL so we need to use
the standard encoding for the
space character:
http://localhost:8080/container/small%20crate
GET request for a single item, with response
POST Requests
We can also perform POST (create) requests with Postman. Recall
from earlier that we typically only POST for single items
in a collection
and don't use POST to create an entire collection. POST on a single item
should insert the item into the collection and return the
unique ID of the item that was added. Also, a POST request
should return the unique ID of the item that was created.
So let's do a POST request on our Container collection.
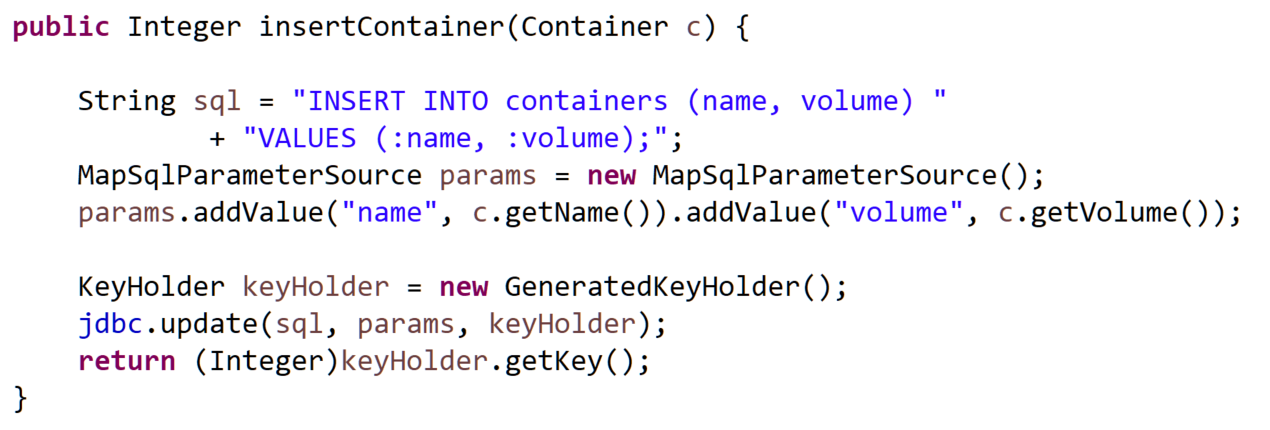
Add a method to your database access class called insertContainer().
It should have a Container parameter for the container to insert
and return an Integer (int wrapped into an object). The returned
Integer will be the unique record ID for the Container that
was just inserted (the auto-incremented primary key.
Add the code that creates the insert query, adds the parameters to
the query, and executes the query.
To retrieve the record ID of the container that was just inserted
into the containers table, we can use a KeyHolder:
KeyHolder keyHolder = new GeneratedKeyHolder();
jdbc.update(sql, params, keyHolder);
return (Integer)keyHolder.getKey();
The KeyHolder interface is used to retrieve auto generated keys returned by
JDBCTemplate
insert statements. The GeneratedKeyHolder class is a concrete implementation of KeyHolder.
It includes a getKey() method that retrieves the generated key/number
for the primary key field of a record after it is inserted.
The jdbc.update(sql, params, keyHolder) method performs any kind of DML query (update, delete, insert)
with a specific set of parameters and key holder. After the query has been completed, the
key holder will contain any auto-generated ids/keys.
Note that here I'm using Integer for the key because the Container bean's ID member
is defined as int. If your bean's ID member was defined as a long, you'd use Long
instead of Integer here.
Database access method insertContainer()
Now we can add the web service method. This method is going to
require input (the container object we want to add). We'll give
it this input data in JSON format (it's easier for now), so we
need to specify that:
@PostMapping(consumes="application/json")
public Integer postContainer() {

}
Note that the return type is Integer, because the database access
method insertContainer() returns an integer.
To call the insertContainer() method, we need to pass it a
container. But where does the container come from? It will
be part of the requestion body (we've already specified that
the request body will be using the application/json MIME
type). To give this method access to the request's body, we
have to add a @RequestBody annotation.
@RequestBody is a bit like @RequestParam, except
that we're defining a parameter whose value comes
from the request body instead of a form input parameter.
We can then pass that request body parameter to our
insertContainer() method:
@PostMapping(consumes="application/json")
public Integer postContainer(@RequestBody Container c) {
    return da.insertContainer(c);
}
Notice I didn't include a URL pattern here.
I'm using this as the default POST request, so if someone requests
http://localhost:8080/container using POST, this is the method
that will execute. You can add a URL pattern if you want, though:
We can now go to Postman and create a POST request to
test this web service method:
Create a new request.
Select POST from the drop-down list.
For the Request URL, enter http://localhost:8080/container.
If you added a URL pattern, make sure you include that in your request URL
(e.g. http://localhost:8080/container/insert).
Under the request field, click the "Body" tab. This is where we can
add the request body:
Under the row of tabs, select how we're going to pass the data in:
select "raw" (we're going to type it manually).
Then, at the end of that row of radio buttons is a drop-down list.
Select "JSON".
In the response area, you should see the value "6"
(assuming you're using the same default data as I am)
because that's the record ID of the record it just inserted into
the containers table.
PUT Requests
The PUT method updates an item or collection. It may or may
not return content in the response body, but if it does, it's usually
the number of items updated or the updated item itself. Let's do a
PUT example: We'll update an entire collection of containers by deleting
the old collection and inserting a new collection.
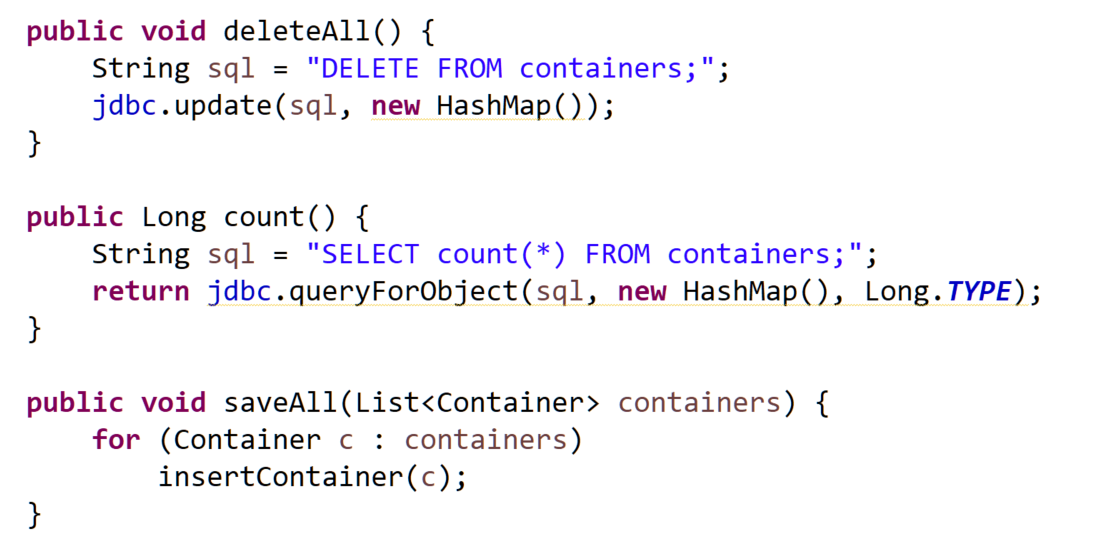
We'll need 3 database access methods to achieve this:
public void deleteAll() simply
runs the query "DELETE FROM containers;".
public Long count()
will count the number of records in the containers table
and return that number as a long integer.
Use the query "SELECT count(*) FROM containers;". To execute
this query, you have to use the jdbc.queryForObject() method:
pass it the SQL query, an empty map, and Long.TYPE.
This tells the method to execute the sql query with the specified params
and retrieve the result as a Long object.
public void saveAll(List<Container> containers)
takes a List<Container> of container objects and writes each container object
to the database table. You can just iterate your list of containers and invoke
the insertContainer() method you already wrote earlier.
Database access methods deleteAll(), count(), and
saveAll()
Now we add the web service method putContainers()
in the Rest Controller. This method is mapped with
@PutMapping, and it will accept a List of containers and replace
the current containers in the containers table with this new
list of containers. The method will return the new number of
containers in the table, after the old ones are replaced
with the new ones (for example, if we start out with 5 containers and
replace that with 3 containers, the count should be 3).
Because the method will need to know the list of containers
to replace the old ones with, this method requires "application/json"
input in the request body for the a List<Container>.
So you'll need the consumes="" attribute in @PutMethod
and you'll need a @RequestBody parameter.
Inside the method, write the following code:
Invoke the deleteAll() method to empty the dontainers database table.
Invoke the saveAll() method to add the request body list
to the containers database table.
Invoke the count() method so we can find out how many items
are now in the containers table.
The method should return the new number of records
in the containers table as a long integer value.
Go ahead and try to write the web service method. You can
check your answer below when you're done.
The PUT web service method to replace all containers
Now add a request. Make sure you select PUT
for the request type, and the request URL should be
http://localhost:8080/container.
Again, we didn't include a URL pattern for the @PutMapping.
You can add one if you want. But without one, it means that
when a PUT request is made to the /container URL, it will
invoke this method automatically. If you had more than one
PUT method, need to add a URL pattern, but it depends, as you'll
see in one of your exercises later.
You'll need to add some containers to the response body in JSON
format. Make sure you select "raw" > JSON as the type of
request body. You can type in some container data if you're
comfortable coding JSON, or copy the ones I used below:
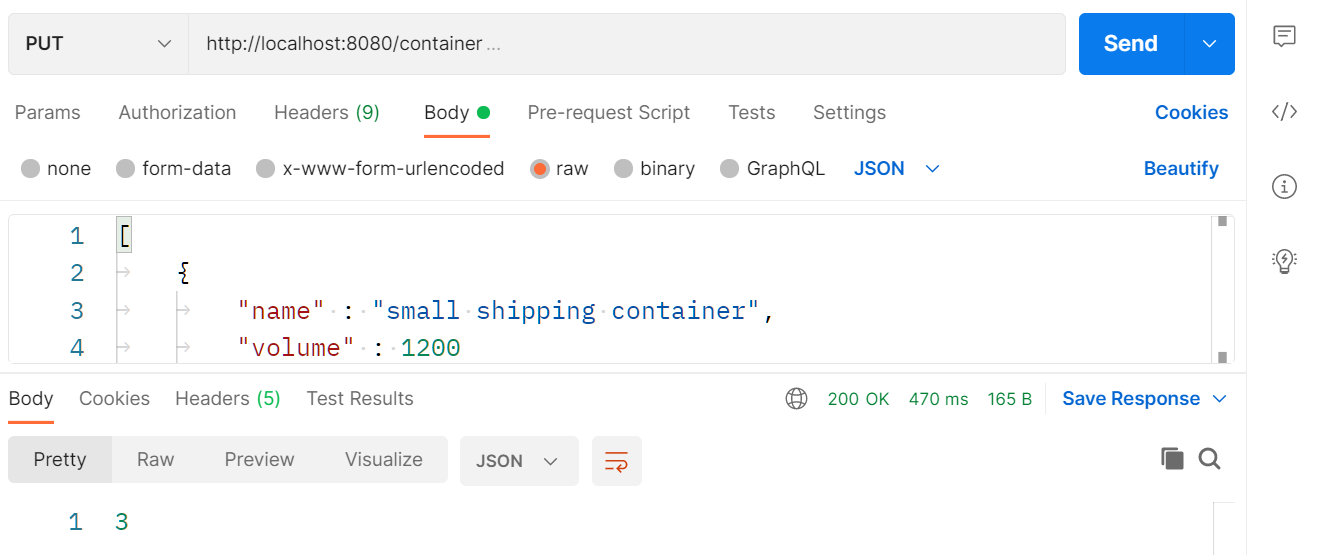
Go ahead and SEND the request when you're ready:
you should see the response body contains
"3", which is the number of records we replaced the old
records with, if you used the sample data above.
Since you've just deleted all your records and replaced them with
different ones, you might want to restart your project in Eclipse
before you proceed with the exercises in this lesson.
The PUT request that replaces all containers
If you wanted to add more than one PUT request (or
more than one POST, or whatever is appropriate) you
have to ensure that the pattern the request is
mapped to is unique. For example, if you wanted to add
a PUT request to update a single item, you might think
of adding a web service method such as:
@PutMapping(consumes="application/json")
public int putContainer(@RequestBody Container container) {

}
This would not be valid, assuming you're adding this
to the methods we've already created. That's because
there's now 2 PUT-methods with the same signature:
// replace all containers
@PutMapping(consumes="application/json")
public long putContainers(@RequestBody List<Container> containerList) {

}

// replace one container
@PutMapping(consumes="application/json")
public int putContainer(@RequestBody Container container) {

}
When a PUT request is made to http://localhost:8080/container,
the controller won't know which method you want to execute:
putContainers() or putContainer()?
One way to fix it is to give one a different URL pattern:
// replace all containers (default PUT = http://localhost:8080/container)
@PutMapping(consumes="application/json")
public long putContainers(@RequestBody List<Container> containerList) {

}

// replace one container (http://localhost:8080/container/putOne)
@PutMapping(consumes="application/json", value="/putOne")
public int putContainer(@RequestBody Container container) {

}
Or give both a different URL pattern:
// replace all containers (http://localhost:8080/container/putAll)
@PutMapping(consumes="application/json", value="/putAll")
public long putContainers(@RequestBody List<Container> containerList) {

}

// replace one container (http://localhost:8080/container/putOne)
@PutMapping(consumes="application/json", value="/putOne")
public int putContainer(@RequestBody Container container) {

}
A third option would be if one of them had a path
variable, which would be the same as giving one of them
a different URL pattern:
// replace all containers (default PUT = http://localhost:8080/container)
@PutMapping(consumes="application/json")
public long putContainers(@RequestBody List<Container> containerList) {

}

// replace one container (http://localhost:8080/container/23)
@PutMapping(consumes="application/json", value="/{id}")
public int putContainer(@RequestBody Container container, @PathVariable int id) {

}
In this version, the putContainer() is invoked
when the last path segment of the request URL is
an ID value.
So we've learned about web service methods that are
invoked with GET, POST, and PUT requests. We haven't
done DELETE requests yet: you'll do those in the Exercises
section!
In the next lesson, we'll learn how to use a Spring application
to consume (or use) your web services!
Exercises
Create the appropriate database access methods and web service
methods for each of the following operations. Make sure you test
your web services with Postman.
PUT a single item: Add a web service that replaces a container
with a new version of the container (e.g. a different name and/or volume):
Add a database access method that performs an update query:
Update a specific container record (by its ID) with a
container object that is passed into the method.
The method should return the number of rows affected/updated.
Add a web service method that performs a PUT request
to update a specific container.
The request body contains a container object in JSON format.
This is the container you are going to replace with.
For easy reference, I'll call this "container #2".
The request URL will include the container's ID as a path
variable e.g. http://localhost:8080/container/3 to update/replace
the container with an ID of 3. For easy reference, I'll refer to
this container as "container #1".
The method should use the database access getContainerById() method
you wrote earlier to retrieve the container #1 object by its ID.
Then the method should take the container #1 object and replace
its name and volume with the name and volume of container #2.
Lastly, update this modified container #1 to the containers
table.
The web service method returns the value returned by the update
(# of rows affected).
DELETE all items: add a web service that deletes all the containers in
the containers table (warning - after you execute this request in
Postman, you'll have to restart the Eclipse project so you can put
all your default data back!)
Note that you already have a database access method that deletes all
the containers in the table!
Add a web service method that uses a DELETE request
to delete all the records in the containers table. The method
should not return anything (which is standard for DELETE
responses that succeed).
DELETE one item: add a web service that deletes a single container
by its unique ID:
Add a database access method that accepts an integer ID
and performs a delete query to delete that container record
from the containers table. The method returns nothing.
Add a web service method that uses a DELETE request
to delete a single container:
The method will need to know the ID of the
container record to delete.
The method will invoke the database access method
you wrote in a)