Forms are special web page elements that contain various input controls or elements
and command buttons. Users can fill in the inputs and click buttons to trigger
form processing (learning how to process form inputs is a separate topic and
requires knowledge of a server-side programming language such as
PHP or Enterprise Java).
Forms are useful for gathering information from your user.
When you create an HTML form, you not only need to include the
necessary elements to gather all the data you need, but you also
need to validate that input data.
In these next couple of tutorials we'll focus on creating forms, and in a later tutorial
we'll talk about validating form data on the client-side.
You can learn more about the server-side validation of form input data
and processing of that input data when you learn a server-side language
such as PHP or
Enterprise Java.
You should also have a look through
Accessible
HTML Form at the Web Standards Project.
The Form Element
The form itself is defined by the <form> and
</form> tags.
As with other HTML tags, the <form> tag has a number of attributes.
Most of these attributes are related to server side form validation
and processing. For example, you can learn
how to write a PHP script that processes form inputs.
The FORM element is the container for all of the other form
input elements. You sometimes see form input elements outside of a <form>
element but in this course we'll focus on complete forms.
The name Attribute
We often attach a name to a form so we can access it and it's elements
inside a client-side or server-side script. For example:
<form name="frmQuiz">
    <!-- other form elements -->
</form>
You can have more than one form inside a single page, just make
sure you give them each a unique name:
<form name="frmLogin">
    <!-- other form elements -->
  </form>

  <h1>Java  Quiz</h1>

  <form name="frmQuiz">
    <!-- other form elements -->
  </form>
The name attribute comes in handy when you want to refer to
your form using JavaScript or PHP code, but you probably won't use the
actual name value in HTML. Adding a name to your form is a good
habit to get into so that you're used to adding it when you
decide to learn JavaScript, PHP, or some other language to
process and work with forms.
The action Attribute
The <form> element's action attribute indicates
the name of the script or program that will process your form's input
data. If your form is processed on the server, then the action
attribute will contain the name of a file on the server. When the user submits
the completed form, your browser will make a new HTTP Request to the
file named in the action attribute. For example:
<form name="quiz" action="php/checkAnswers.php">
    <!-- other form input elements -->
</form>
Assuming this form is located at http://terminallearning.com/html/examples/form.html,
then when this form is submitted, the browser will make a new Http Request
to http://terminallearning.com/html/examples/php/checkAnswers.php.
The request will include all the form input data.
If you leave out the action attribute, then the form will
be processed by the "current page", or the page in which the form is
defined. The same will be true if you use action="#".
Note that using action="" is now considered invalid HTML,
although it used to also indicate that a form should be processed by
the current page.
The method Attribute
The method attribute defines the
request method, or the type of request,
that your browser should make when the user submits the form to the server.
Typically for forms, the browser can make GET requests or POST requests,
although there are other types of requests that you might learn when
learning to use other technologies.
The difference between a GET request and a POST request is beyond
the scope of this course, but a POST rest is generally used when your
form input data contains something sensitive (such as a username/password
or credit card information), when you're performing database operations,
when you are allowing a user to include large amounts of data in the
inputs, or when you're allowing the user to upload a file. The rest of
the time, you should use a GET request because GET requests are faster and
more efficient. For this course, it really doesn't matter which one you use.
If you're using my PHP script mentioned earlier, you can use either one, as
the script is able to handle both GET and POST requests.
<form name="quiz" method="GET" action="php/checkAnswers.php">
    <!-- other form input elements -->
</form>
Note that the words "GET" and "POST" can also be written as "get" and "post",
but most developers use upper-case to make the code more readable.
Now that you know how to create a form container, let's look at how
to create the basic input elements so you can create some input fields.
Common Attributes
Before looking at the form input elements, let's take a look
at the common attributes that all form input elements use.
That way we don't have to re-explain them every time we learn
a new input element.
The name And id Attributes
As you'll learn the different form elements, you'll notice there
are some attributes they all have in common. Two important attributes
are the name and id attributes.
The name Attribute
The name attribute is the same attribute we saw
earlier with the <form> element. It is used to provide an
identifier or name to a form input element. When form data is sent to the
server, it's sent as a series of "key-value" pairs where the "key" is
the name of the input field and the value is whatever value the
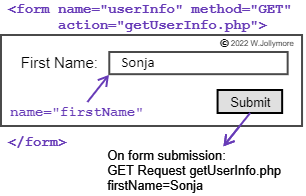
user typed into that field. For example, you might have a field where
the user enters their first name, so you might use name="firstName"
on this input element. If the user enters the value "Sonja" intr
the first name field, the data is set to the server as
firstName=Sonja. In your server-side program that processes
the form, you then are able to retrieve the first name "Sonja" by using the
"firstName" key.
Input values are sent to the server as key-value pairs.
It's vital that every single form element
have a name attached to it, otherwise you can't access the form inputs
in your server-side program that processes the form.
There are certain situations in which you might have more than
one form input element with the same name. The most common example
is when a single input field requires multiple elements, such as
a set of radio buttons. For example, you might have a set of
radio buttons that allows the user to input a choice of pizza size:
In this example, pizza size is a single input field: it should
only have one value (Extra-Large, Large, Medium, or Small). We
use four radio buttons to present the user with the four choices,
and they can only choose one. Therefore, the selected choice's
value is sent to the server; none of the unselected choices are
sent. If we decide that the name of this field is "pizzaSize",
then every radio button needs to have the name="pizzaSize"
attribute to identify that they are all a single input, and that only
the selected button's value is sent to the server as the value for
"pizzaSize". For example, if the user selects Large, the form
might send pizzaSize=Large to the server.
You'll learn more about the details of how this works when you learn
to create radio buttons.
The id Attribute
The id attribute
seems similar to the name attribute: the id attribute identifies
a unique ID for an element. This attribute is used for client-side scripting,
CSS styling, and for the for attribute in accessible labels,
as you'll see later.
The id attribute value must be unique over the entire HTML
page; an ID value can't be re-used for multiple elements. In the pizza size
example, you could not give each radio button the same ID, you would have
to give them all a unique id value. In the pizza example, this is mostly to
ensure that the labels are accessible, and you'll learn the details of this later.
To summarize the differences between name and id:
name vs. id
name attribute
id attribute
Purpose
Name of a control for client-side or server-side scripts; the
ONLY way to access a control on the server.
Name of a control for client-side scripts.
Unique?
Doesn't have to be unique in certain situations e.g
several radio buttons share the same name to be in
a "group"
Must always be unique within a single HTML page.
Usage
Is only used on <form> elements and form input elements.
Can be used on any HTML element.
CSS?
No "name selector", select elements using attribute
selector e.g. form[name=calculator] { ... }
Can be used for CSS styling to style that specific element
via an id selector.
Accessible Labels
Not Applicable
Is used in conjunction with the for attribute
to link a <label> to an input element.
All of your input elements will have a name attribute. You'll only
need an id attribute for elements that need to be linked to a
prompt label (and as I keep saying, we'll learn about this later).
Element name/id values need to be self-documenting.
This means that another programmer should be able to accurately guess
what the name means or what it's for. For example, earlier we used
"firstName" and "pizzaSize": these are self-documenting names.
Avoid ambiguous names that mean nothing (such as "a" or "foo") or names
that have multiple meantins (such as "stat" - status? statutory holiday?
statistic? state?). Note that sometimes we use such names in examples/demonstrations
that aren't for any specific piece of data to avoid confusion.
Some developers often prefix the name with some lower-case letters to
help identify the type of form input element. For example, we often
prefix the form name with "frm", text input fields with "txt",
and check boxes with "chk". Generally, the prefixes follow the rules
above in that they're easy to figure out and have a single meaning.
title and placeholder
Another helpful attribute is the title
attribute, which is actually a global
attribute (you can use it with any HTML element).
The title attribute can serve several different
purposes. It's primary use is to provide extra information to
assistive devices, so that information can be conveyed to
users with various disabilities. You've also seen it
used on the <abbr> element, where it is used to provide
the full phrase or name that the abbreviation stands for
(see also Elements for Text-Level Semantics).
title can also be added to an element to provide extra
information about the content inside the element. When a user
hovers over the element, the title appears as a tool tip.
Also, when a user with a screen reader encounters
the element, the text inside the title attribute is read aloud.
The title attribute shouldn't be used
as a substute for a <label> element attached to a form input
field but it can be used as an input's accessible name
(see WCAG Technique H56 (opens in ref tab/window). The
title element is not handled consistently in all browsers:
visually it appears as a tool tip when the user hovers their mouse
over the element; some screen readers will read it out and some won't.
Additionally, if a user uses only keyboard navigation, the title
does not appear since the user doesn't have any means to hover over
an element. Lastly, some touch screens don't support "hover" or
if they do, it often requires fine dexterity that users with
mobility issues don't have.
With forms, you could use title to provide information about
the expected input to a form field:
The field above was created with the following code:
<label for="txtFullName">Full Name:
  <input type="text" name="txtFullName" id="txtFullName"
      title="Enter your first and last name.">
</label>
But again, if this information is important, you need to create an
alternative for users that can't access the title via mouse hover.
A common alternative is to add a paragraph or div of the title text
on the screen, and you add an additional aria-describedby
attribute for screen readers (this technique is covered in
creating accessible forms).
Similar to title, the placeholder
attribute can also be used to give the user a hint about your form
element. Unlike title, placeholder
only works with form elements. The
text appears inside the input field as long as the field
doesn't have the focus (the cursor/insertion point isn't inside
the field).
Here's an example:
The field above was created with the following code:
<label for="txtFullName">Full Name:
  <input type="text" name="txtFullName" id="txtFullName"
      title="Enter your first and last name." placeholder="FirstName LastName">
</label>
As with title, placeholder lacks consistent accessibility
in most browsers.
If you really do need to use placeholder (for example,
you're form doesn't have enough room on smaller devices, then add the
aria-label="" or aria-labelledby attribute. The value of the
these attributes is a string (aria-label) or the id (aria-labelledby)
of the element that contains the text you would normally have put
in the element's <label> or placeholder="" attribute. For more information, see
WCAG Technique ARIA6 (opens in the ref tab/window).
This technique is covered in
creating accessible forms)
Now that you know the common attributes used with form input
elements, let's finally start learning the elements!
The Input Element
The <input> element is used to create an input field where the user can
enter data into the form. This tag supports different types of input
fields, including:
Text Boxes
Password Boxes
Radio Buttons
Check Boxes
Hidden Fields
File Uploading fields
Submit and Reset buttons, as well as generic buttons
That's a lot of different ways to get user inputs!
We'll look at most of these types in detail, but some of them
are really only useful if you're doing server-side form processing,
so they will be discussed in other courses.
The <input> tag has a set of attributes that you can use to define
what the input control should look like and how it should work.
Some of these attributes are:
type="" - Defines what type of input field
this is (e.g. text, password, radio)
name=""
The name of the input field.
The value of the name attribute
is used when form data is submitted to the server.
Note when multiple elements are used for a single
input (i.e. radio buttons), all the elements for that
input field will share the same name. Otherwise, each
input should have its own name.
value=""
The value of the control, as entered by the user.
If you want a field to have a default value, you can
assign it to the value attribute in your HTML code.
What the value attribute contains depends on the type attribute. For example, a
text box's value contains the text entered by the user, whereas a
check box's value is defined in the markup and used when the box is checked.
size="n"
The visible size of the field, measured by number of characters (based
on font size).
Note that elements can also be sized using CSS.
As a basic example, here is the code for a text field with an input size
of 15 and some default text:
There are other attributes that are specific to different types of input
controls; we'll look at these individually as needed.
Text Boxes
A lot of inputs can be gathered from a form using simple text boxes.
A text box is just a blank field where the user can type anything they want.
You would typically use a text field for things like a name or numeric value.
Text boxes contain a single line of text; if you're interested in
multi-line text input, you'll want to use the
Text Area control.
To create a text box in an HTML form, you use the <input>
element with the type attribute set to "text":
In the above example, a text box called "txtUserName" is displayed, like this:
Note that you can click in the field to put the insertion point
inside it, but because we used <label for="">, you can also click
on the label text to do the same thing. This is helpful if you have
trouble selecting or clicking things on the screen. We'll talk
more about this in the next section.
Input Labels
Form input elements generally have labels or prompts attached to them.
These tell the user what input is required in each field. In the example
below, there are 2 form fields with labels. The labels indicate that
the first form field needs a user name and the second form field
needs a password.
The "User Name:" and "Password:" labels tell the user
what to type inside each input field.
The <label></label> element can be used in several different ways,
but the most common and the most accessible is to nest a form input element
inside the <label></label> element. For example:
Password fields can be created by using type="password" in your input tag.
A password field is a text field that shows *'s (asterisks)
or dots • when the user types in it.
The contents of the text field will be the characters typed by the user, but
the characters will show up as asterisks/dots on the screen. This is useful if you
want the user to enter something confidential, such as a password!
As you noticed earlier, there are several other input types. We'll
cover those in the next lesson after learn a bit more of the basics,
so you can practice first.
Buttons
Buttons are used to trigger events. Events are things
that happen that cause code to execute, such as clicking the Submit button
on a form (which causes the form to submit). Most forms that will be processed
server-side will need a Submit button. A Reset button is also useful to reset
a form. Generic buttons are useful if you want to create a form that is processed
client-side using JavaScript.
Submit and Reset Buttons
The input tag can be used to create Submit and Reset buttons by simply using
type="submit" or type="reset.
Usually when clicked, a Submit button will trigger form processing as defined by the
form's action attribute. You can also add JavaScript to execute, instead. We
won't cover form processing in this course.
A Reset button will trigger a page reload and therefore will automatically
clear and reset all the input fields on the form. The reset button up above
doesn't work because I disabled it: otherwise the page would reload and you'd
lose your place!
By default, the Submit and Reset buttons contain the captions "Submit" and
"Reset", respectively. However, we still add the value=""
attribute to make sure each button has an
accessible name. To change the captions,
just change the value inside the value
attribute:
An alternative to the <input> element is the <button> element.
Unlike <input>, <button> has an opening tag and a closing tag.
However, you can also use type="submit" and type="reset"
to create Submit/Reset buttons, and you can also use value to change
the caption and accessible name for the button.
Alternatively, you can change the caption and accessible name
on a <button> element by putting the caption/name inside the opening and
closing tags:
One major difference between <input> and <button> for submit buttons,
is that coding simply <button>Click Me</button>automatically
creates a SUBMIT button. This will become important when you start using
generic buttons.
Generic Buttons
You can also create a generic button by using type="button" in the
<input> element or the <button> element.
These buttons don't do anything automatically when clicked. If you want them to
do something, you give them an event handler,
which is a block of code that executes when a specific event occurs.
For example, using the <input> element,
you could create an "Add" button that has an event handler that adds two numeric
inputs when the user clicks on the button (a "click" event).
You create event handlers using a language like JavaScript, so we won't cover that
in this course.
does not create two generic buttons. When using the <button> element,
leaving out the type="" attribute creates a submit button. So the
correct way to create generic buttons would be:
You might use a generic button if you wanted to execute a script or function
without causing a page refresh or without sending the form data to the server.
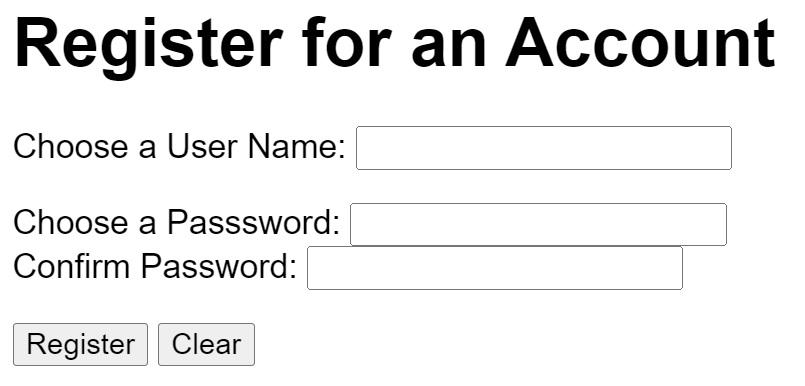
Create a form that allows the user to register
for an account by choosing a username and a password. The
user should also be able to confirm the password they entered
by typing it in a second password field.
A simple User Registration form
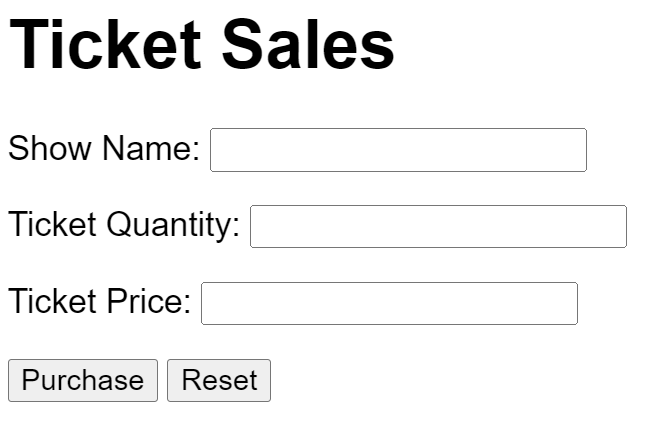
Create a form that allows the user to enter information
about ticket sales for various shows. They should be able to
enter the name of the show, the number of tickets available to
purchase, and the price per ticket. There is a submit button
with the text "Purchase", and a reset button.
A form to collect information about show tickets