Overview of This Lesson
In this lesson you'll learn the basics of relational database structure and how to create a simple database using MySQL and MySQL Workbench. You'll also learn to use Workbench to add tables and populate them with data.
In this lesson you'll learn the basics of relational database structure and how to create a simple database using MySQL and MySQL Workbench. You'll also learn to use Workbench to add tables and populate them with data.
A database is a collection of tables that contain data you can store and use in your applications (not just for web applications: you can use a database with any programming language).
We'll be using a free database called MySQL. MySQL is very popular among web developers.
MySql is a database system that runs on a server and allows developers to store data that can be used to create interactive, data-driven web applications. Developers can create pages that allow a user to view, search, add, edit, and delete data from the database.
Many web sites make use of databases: blogs, news sites, game sites, retail stores, media sites, and many more. MySQL is one of the most popular database systems in use; it's used by companies and organisations such as Facebook, Wikipedia, Twitter, Google, Yahoo, Flickr, Youtube, various government organisations including NASA and the United Nations, Sears, Walmart, Verizon Wireless, Nokia, Associated Press, BBC News, NHL, New York Times, Slashdot, McAfee, Symantec, Zynga games, Amazon, Craigslist, eBay, PayPal, and many, many more.
MySQL is free, fast, and efficient, and can handle very large databases. It also works on a variety of platforms.
Before we define what a database is, we should start from the bottom of what is commonly called the data hierarchy. The data hierarchy shows the different components that make up a database. You will encounter these components repeatedly throughout most of your courses that deal with programming, database development and implementation, and even systems analysis.
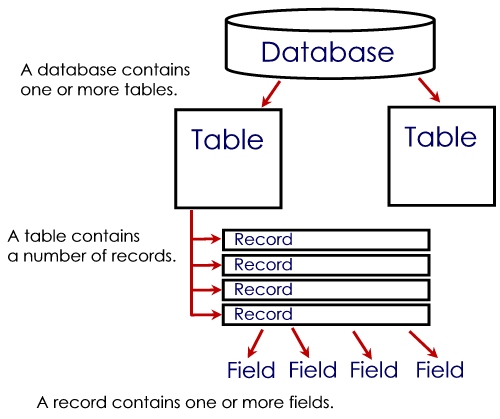
It's easier to explain how the data hierarchy works when you start from the bottom.
If you examine the image to the left, you'll see a number of fields at the bottom of the screen. A field is a piece of information that describes an entity. Fields are also called columns, because they represent the columns in a table of data. For example, as a student entity, fields that describe you would be first name, last name, student number, the name of the program you're enrolled in, the semester you're in, etc. Each field is one piece of information. You can't make a field that describes more than one thing. For example, you can't have a "grades" field because you have more than one grade. However, you could have a field for the grade you received in a specific course, such as your grade for PROG10082.
A field doesn't always have to have a value. Some fields can be empty. For example, if you register at the college but haven't been accepted yet, the value for the field that defines the term you're in would be empty, because you haven't started school yet. On the other hand, some fields must have a value. For example, every student must have a student number, and you wouldn't be allowed to have information in a database on a student if the student had no student number.
A group of fields that are related and describe one element in an entity make up a record. Records are also called rows because they represent the rows in a table of data. For example, the fields student number, first name, last name, address, phone number, and program code could all be the fields in a student's record. Each record describes one element, or one item. For example, a student record describes one specific student, and an inventory record describes one specific item in inventory.
A table is a group of related records that describe a particular entity. For example, a group of student records would describe all the students in the college, and would probably go in the Student table. A group of customer records would go in the Customers table, because they all pertain to the company's customers.
A table always has a specific structure or schema, and each record in a table must follow that structure. For example, the schema of the Students table could look like this:
| Field Description | Data Type | Size | Comments |
|---|---|---|---|
| student number | String | 9 | primary key |
| first name | String | 50 | |
| last name | String | 50 | |
| program code | String | 6 | foreign key - Programs |
| current g.p.a. | Float | n/a |
In this simplified example, each record in the table contains five fields (each row contains five columns). Most of the fields are Strings whose field size is identified by the number of characters. The one numeric field Float has n/a as its size because non-string values are usually of a fixed size (for example, an integer is Java is 8 bytes).
A table may or may not contain records. For example, a table that is created and opened for the first time will probably be empty, or a table that records a day's transactions in a store will be empty at the start of the day when the store opens. In addition, with many tables the programmer can't possibly know how many records will be in the table at any given time. Most tables will allow a user to add and delete records as needed, so the number of records in a table is dynamic and changes. As a programmer for a database, you would need to take all these things into account.
A database is a collection of tables, and those tables are usually related in some way. For example, a small, independent coffee shop might have a database with tables called Suppliers, Inventory, PriceLists, and Employees. The Suppliers table will contain records for each of the companies the coffee shop uses to purchase supplies, utilities such as hydro and water, and raw materials (such as coffee beans, flour for pastries, etc). The Inventory table would contain records for each of the items, products, and raw materials the coffee shop has in inventory at any given time. A typical Inventory record might contain fields for the item identification (we'll talk more about this in a moment), item description, quantity on hand, re-order point (how many items you gets down to before you must re-order more of this item), and supplier identifier (so you know where to find the supplier information for this product in the Suppliers table).
A Database Server is an application that runs on a server machine (the machine itself might be a dedicated database server, or there might be several machines for the database server). Database server software manages the users of a database and the permissions those users have, the individual databases and their tables, and the various connections that users make to the various databases.
A database server can have several databases. For example, a large company could have an Employee Database and a Manufacturing Database. The Employee database would be used by HR and management for contacting employess, paychecks, taxes, work assignments, etc. The Manufacturing database would be used by the manufacturing plant staff and management to manage information about the products they manufacture, the parts, suppliers, vendors, etc. Another example: A large social media platform might have a database for Employees and a separate database for their application's users, postings, user activity, media, etc.
Each table must have a special field called the primary key. A proper table in a relational database must not contain any duplicate records. For example, what if you had two customers both named Fred Smith, and one of the Fred's phoned and wanted information about their account balance. You could probably ask for some kind of identifying information like an address (what if they were parent and child and lived in the same house?) or a birth day (what if they were room mates with the same name who happened to have the same birthday?) but, however unlikely it is that these things would be the same, it's still possible. As a programmer, NEVER assume that just because something is unlikely, it will never happen! What if the two Fred Smiths were actually the same person who somehow got added twice to the same Customers table? This is also possible.
To avoid duplicate records, and to ensure that two records which appear similar are in fact different, we use primary key fields. A primary key is a special field that uniquely identifies each record. For example, no student in the college has the same student number as any other student, so that is used as the primary key in the student table. Books have an ISBN (international standard book number) which is unique for every book that is published by a certain publisher, so that could be used as a primary key in a Books table.
When you're designing some tables, it might not be obvious what the primary key should be. In a lot of these cases, you may need to make one up. This is how things like Product I.D.'s and Supplier I.D.'s get created. In one of your systems analysis courses, you'll probably spend a bit of time learning about how to make up a good format for a primary key field or I.D. field.
Sometimes you'll have a field that is actually a primary key from another table. This is called a foreign key and is used as a reference to the other table. For example, in your coffee shop's inventory table, each record might contain a Supplier ID field. When you need to get the supplier contact information because you've run out of a product, you look up the inventory item's Supplier ID in the Suppliers table to find out who this supplier is. We do this to avoid redundant data - it would be a waste of space to store all the supplier's information with each inventory item!
See how well you understood the concepts you've read so far!
This quick tutorial will allow us to set up some tables and data that we can use to learn some basic database operations. This is by no means a complete lesson on how to use a database, but it's just enough to allow you to do simple things with PHP or Node.js, for example.
For this tutorial, you will need a MySQL database server. If you haven't already done so, you can install MySQL server with MySQL Workbench on your computer.
Make sure the MySQL service is running: if you selected the configuration option to start MySQL Server at system startup when you installed MySQL, then it's likely already running. If you didn't select this option, just go to Services (in Windows, search for "Services" and run the Services application) and find MySQL80 and start the service.
Run Workbench and connect to your database server. Add a
new database called testing (or feel
free to call it whatever you like, just replace "testing"
with your preferred database name):
testing.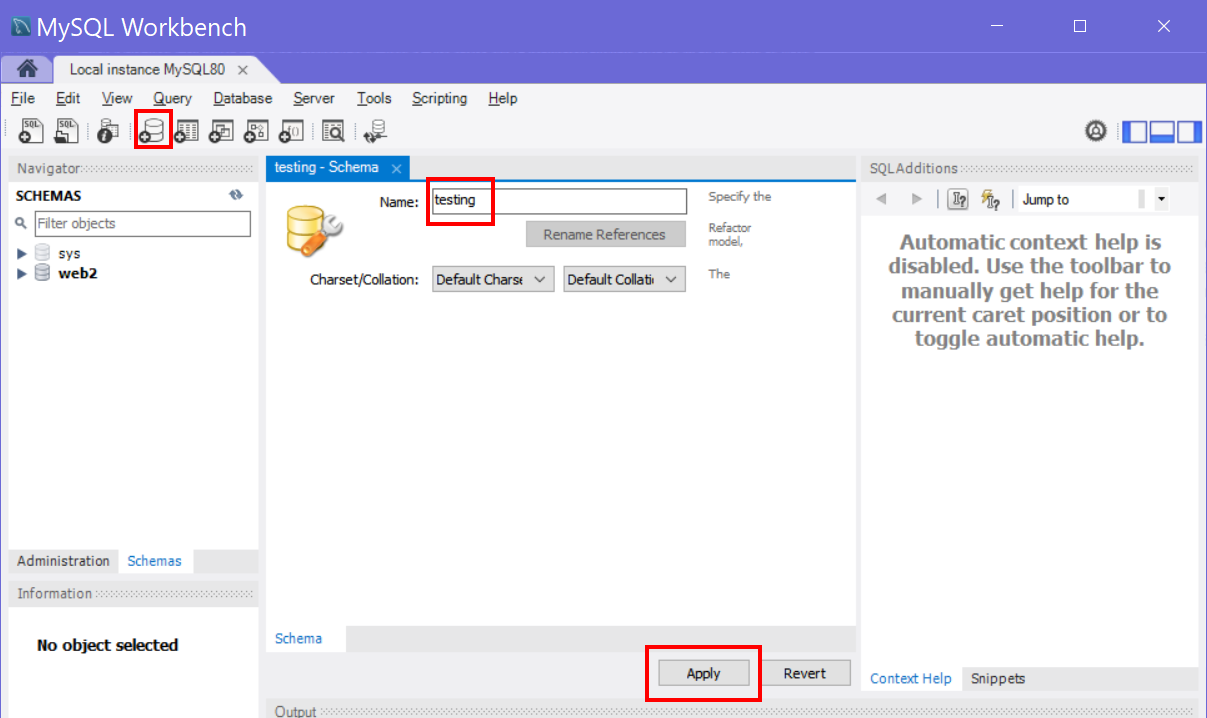
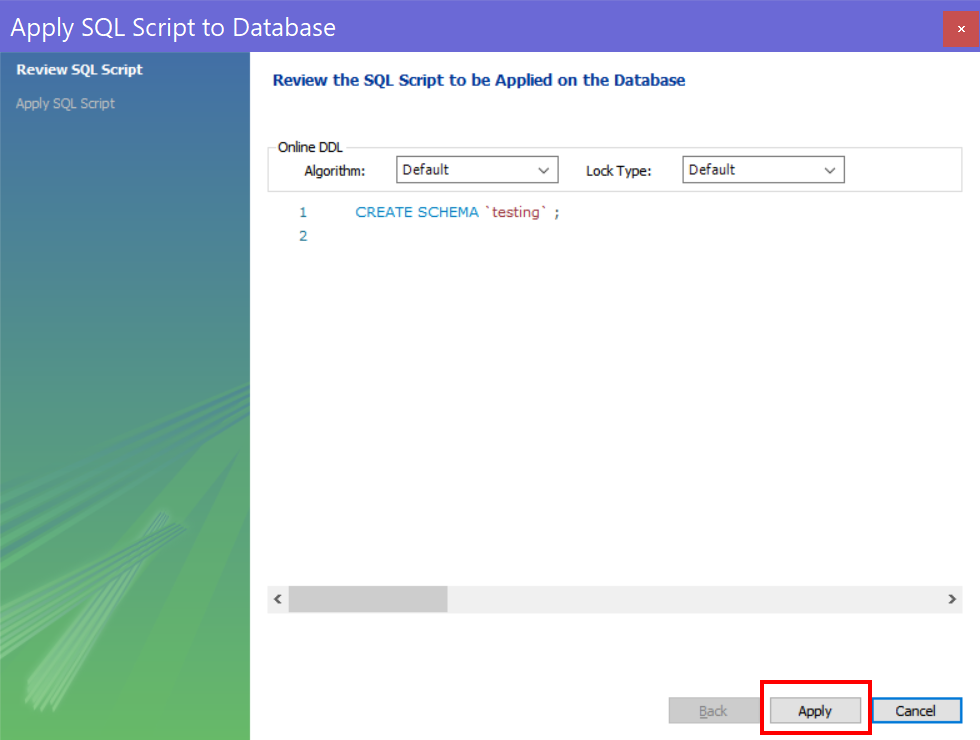
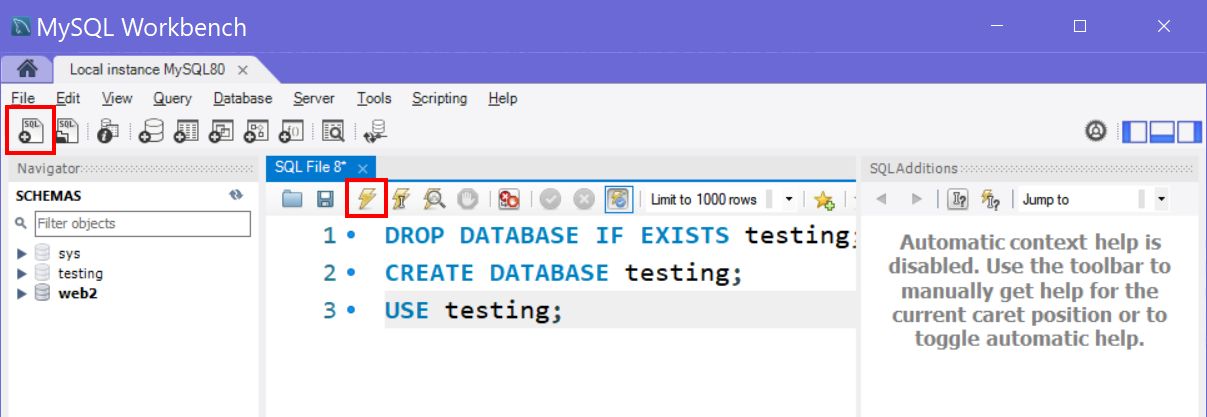
Alternatively, if you prefer, you can just use a new SQL statement by opening a new SQL window (first button in the button bar):
DROP DATABASE IF EXISTS testing;
CREATE DATABASE testing;
USE testing;
After typing or pasting the command, click the lightning bolt icon (3rd button in the query window's button bar) to execute the query.
Now we'd like to add a table to our database. Let's create a simple table that allows us to keep track of inventory items.
If you'd like to do this with a graphical user interface, go to the Schemas tab on the left side of the Workbench window and expand the node for the "testing" database by clicking the arrow on the left side of the database name. Then right-click on the "Tables" node and select Create Table. An area in the main part of the screen will update to show you fields where you can enter your table information.
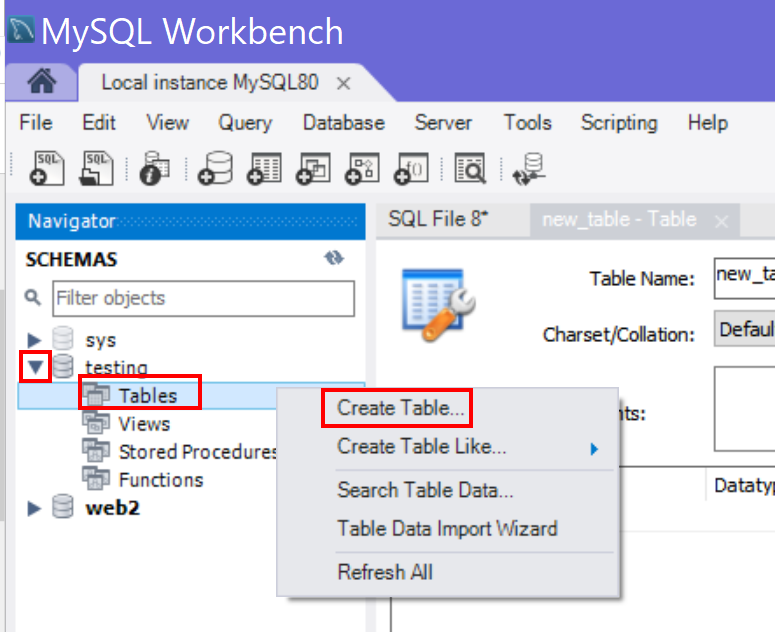
Note that the Workbench interface is not very responsive. If you have a smaller screen, a large font size, or lower resolution, you might find the interface unusable. In that case, you should use an SQL Query window to manually create your table and columns. Instructions to do this are after this section.
In the Table Name field, type inventory
Below the Comments box is a grid where you can enter your column information for the Inventory table. We're going to create the following columns:
| Field Description | Data Type | Size | Comments |
|---|---|---|---|
| id | integer | n/a | primary key, auto number |
| name | String | 50 | |
| quantity | integer | n/a | |
| price | float | n/a |
Let's start by adding our Primary Key field:
In the first row of fields, enter the following values for each field (if a field isn't listed here, leave it blank):
Now, create the remaining three fields in the same way:
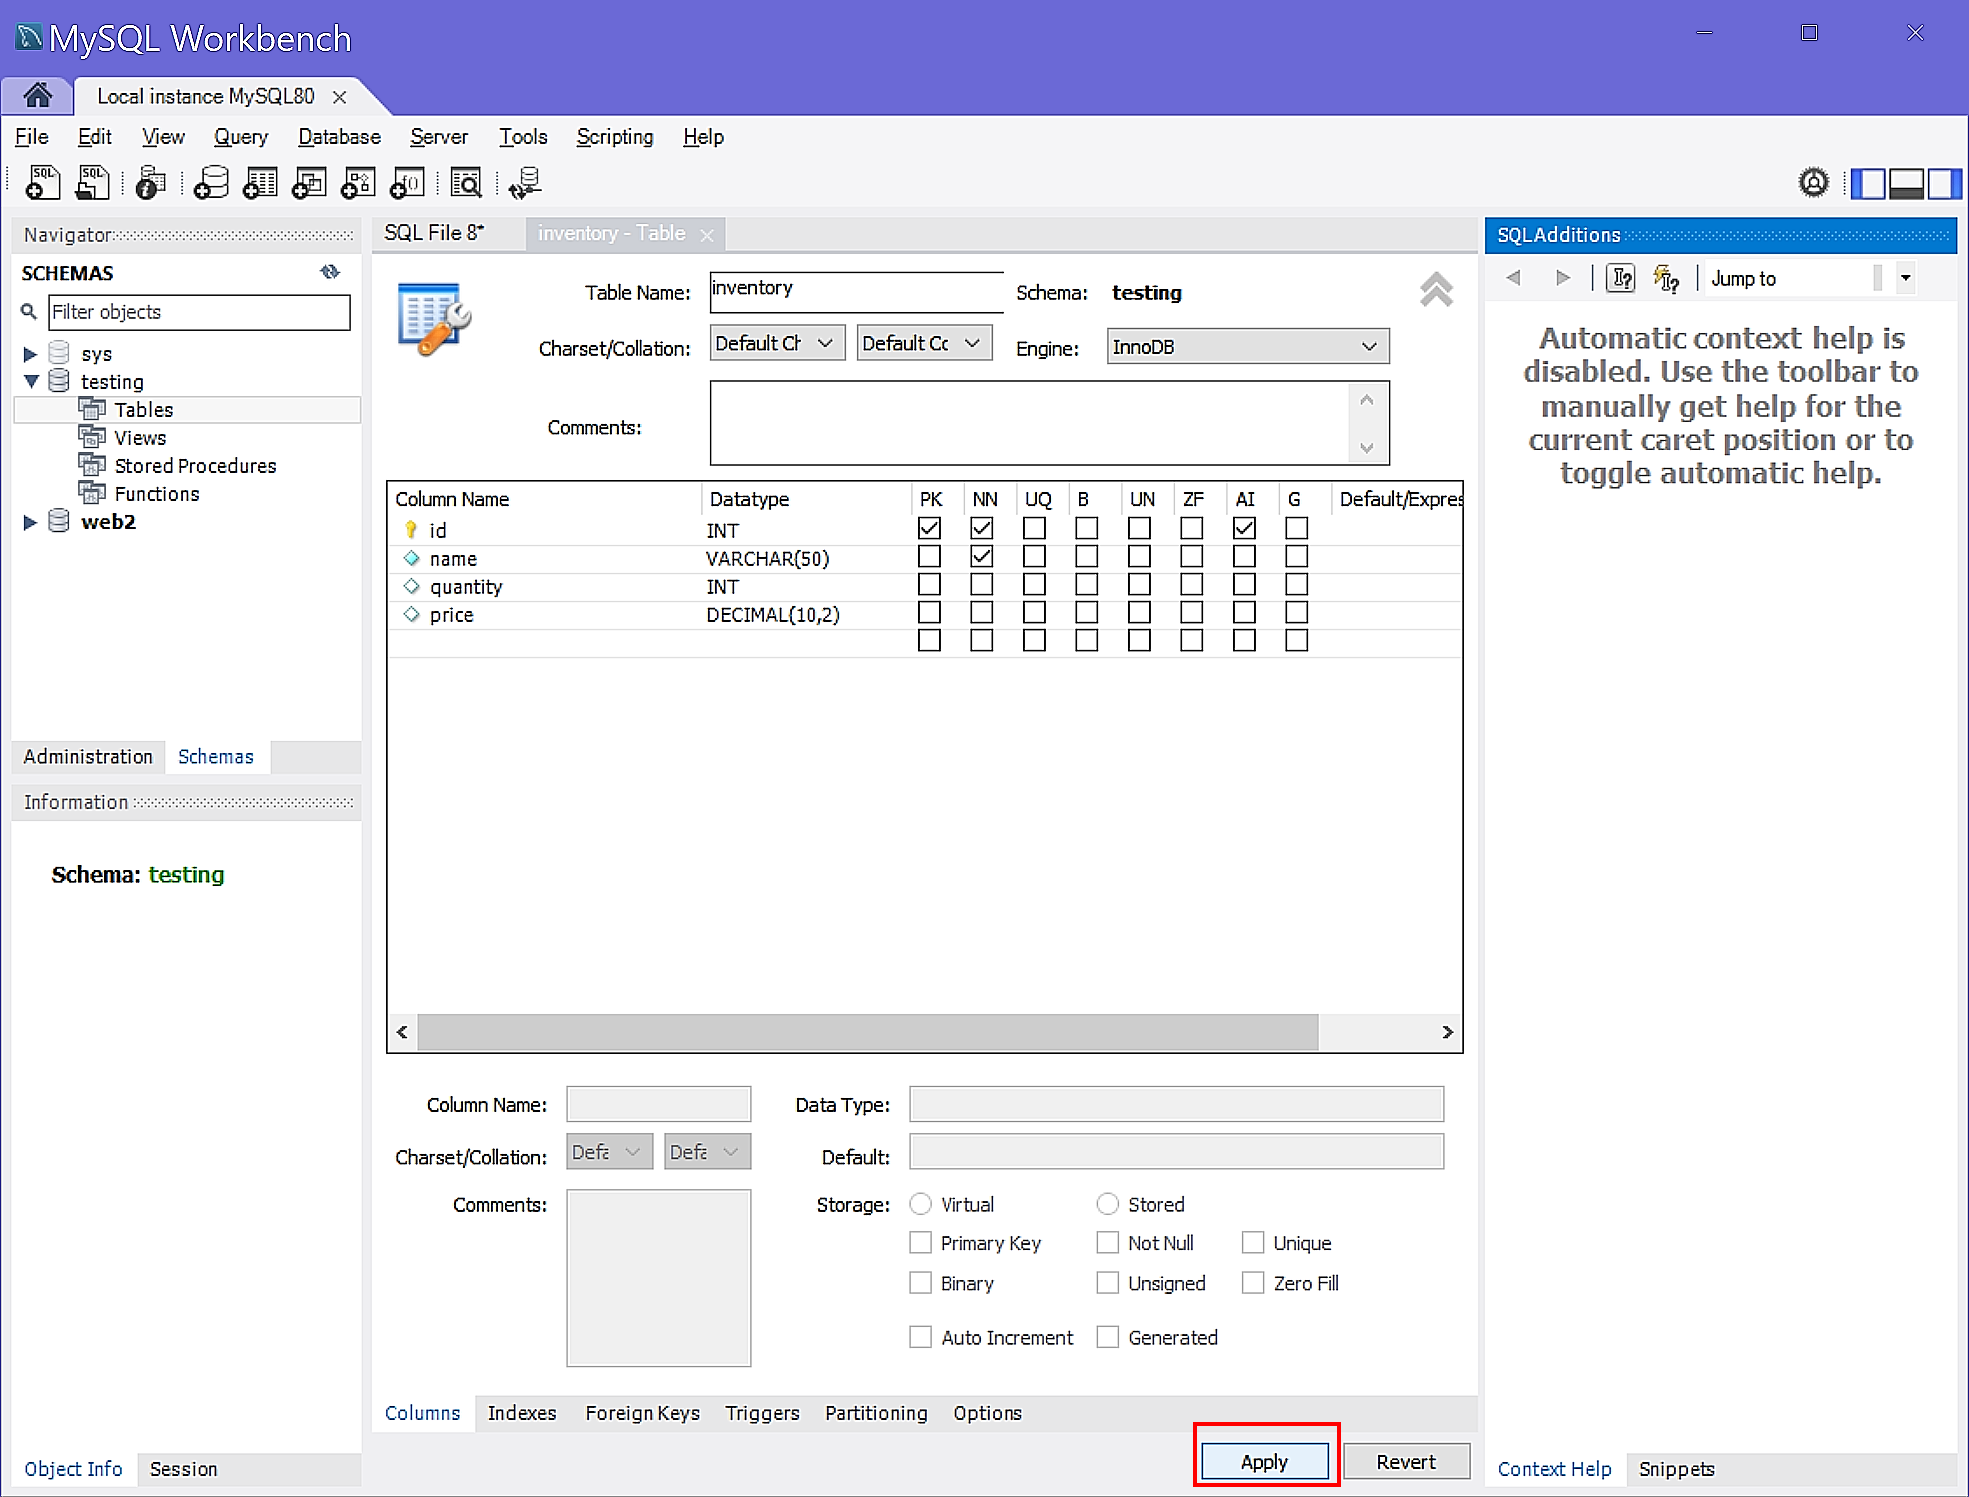
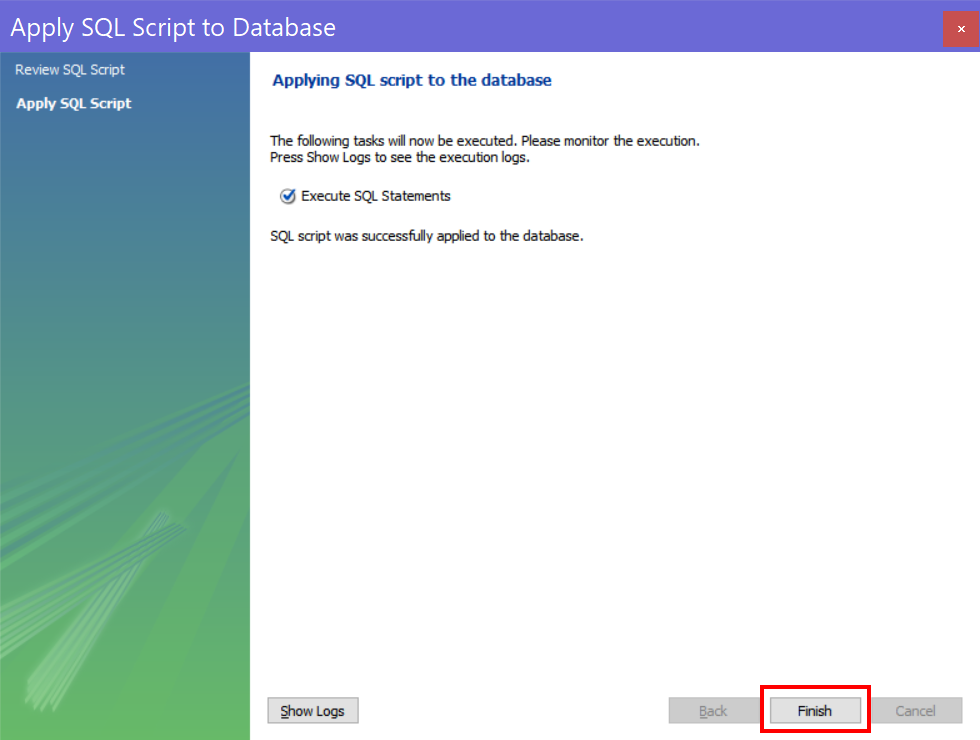
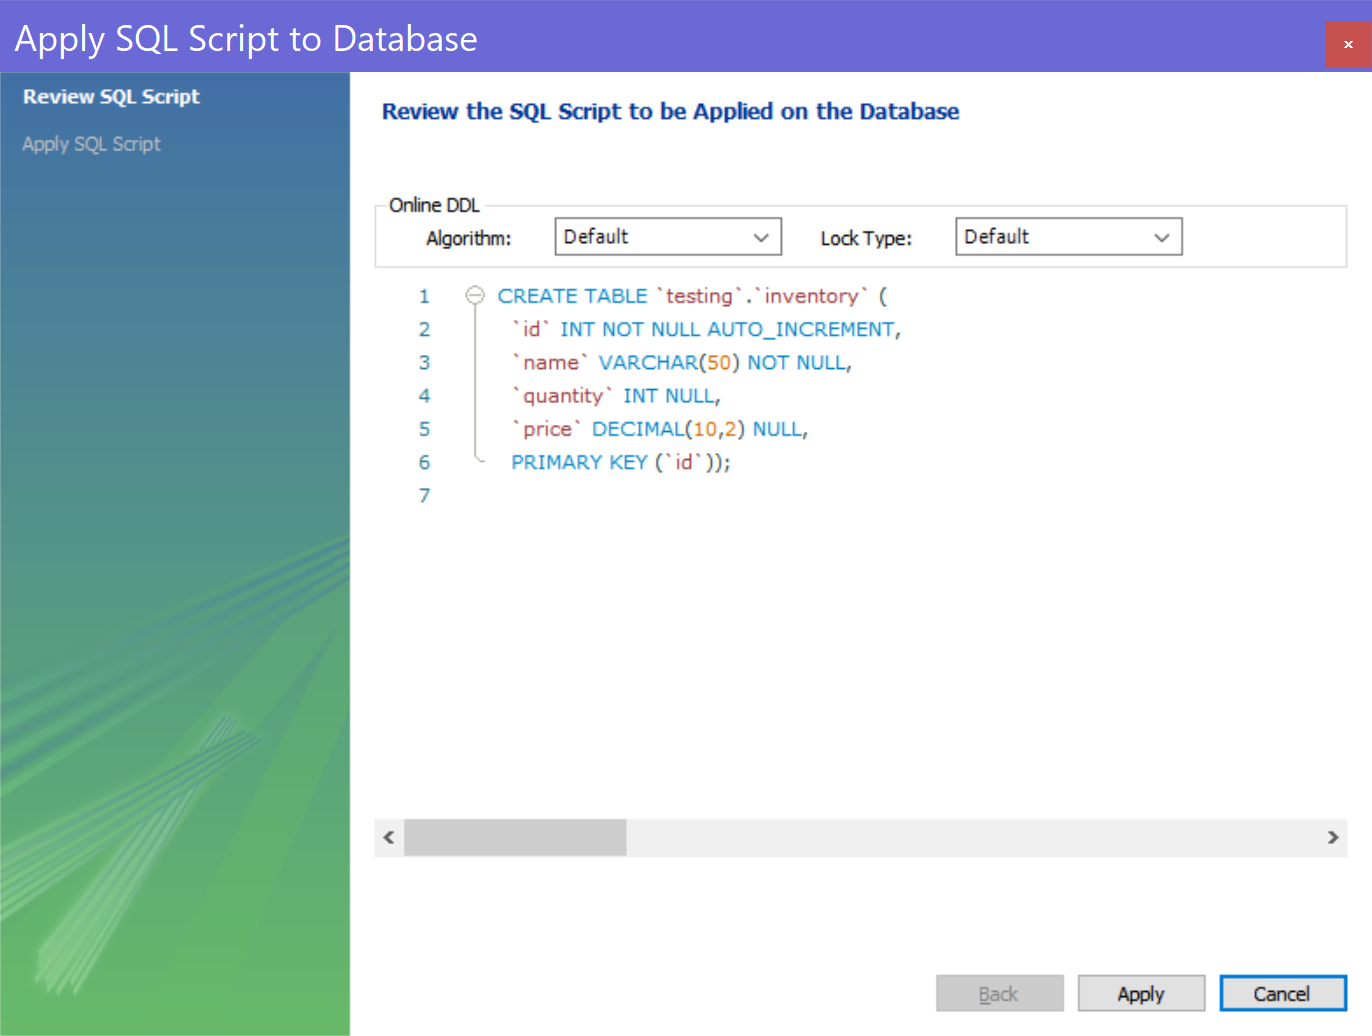
After adding all the fields, click the APPLY button. A window will appear asking you to confirm that you want to execute the SQL statement to create this table and its columns: click APPLY.
When the last screen appears confirming that your table was succesfully created, click FINISH.
If you're unable to use the GUI or simply don't want to, you can create your table and columns using an SQL query. Open a new SQL query window (first button in the workbench button bar) and add the following code:
CREATE TABLE testing.inventory (
  id INT PRIMARY KEY AUTO_INCREMENT,
  name VARCHAR(50) NOT NULL,
  quantity INT,
  price DECIMAL(10,2)
);
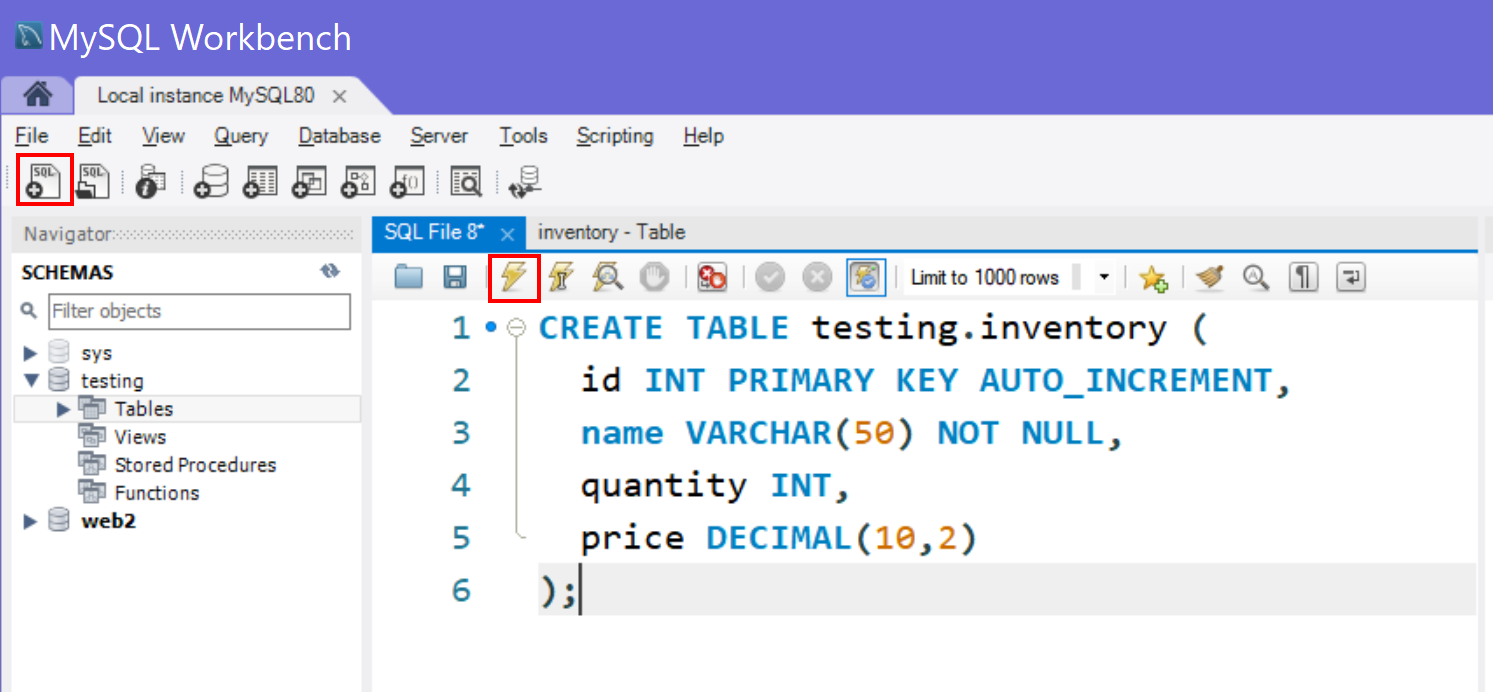
Then press the lightning bolt icon to execute your query.
You can use the Workbench GUI to add records, but using SQL is much more useful: you'll probably need to know how to write SQL insert queries if your're going to be learning how to write application code that reads and writes database data.
INSERT queries add records to your table. A basic INSERT query has the following syntax:
INSERT INTO tableName (fieldName1, fieldName2, ..., fieldNameN)
VALUES (value1, value2, ..., valueN);
In the query, the fieldName items represent the
names of the fields/columns in which you want to
insert values. The value items represent the actual
values going into each of the fields. The values must
go in the same order as the fields: value1 goes into
fieldName1, value2 goes into fieldName2, etc. Here's
an example:
INSERT INTO Music (artist, title, price)
VALUES ("Dropkick Murphys", "Rose Tattoo", 10.0);
The statement above will insert a new record into the Music table with the value "Dropkick Murphys" in the artist field, the value "Rose Tattoo" in the title field, and the value 10.0 in the price field. Note that String values must be enclosed in single or double quotes if you're typing the query out by hand.
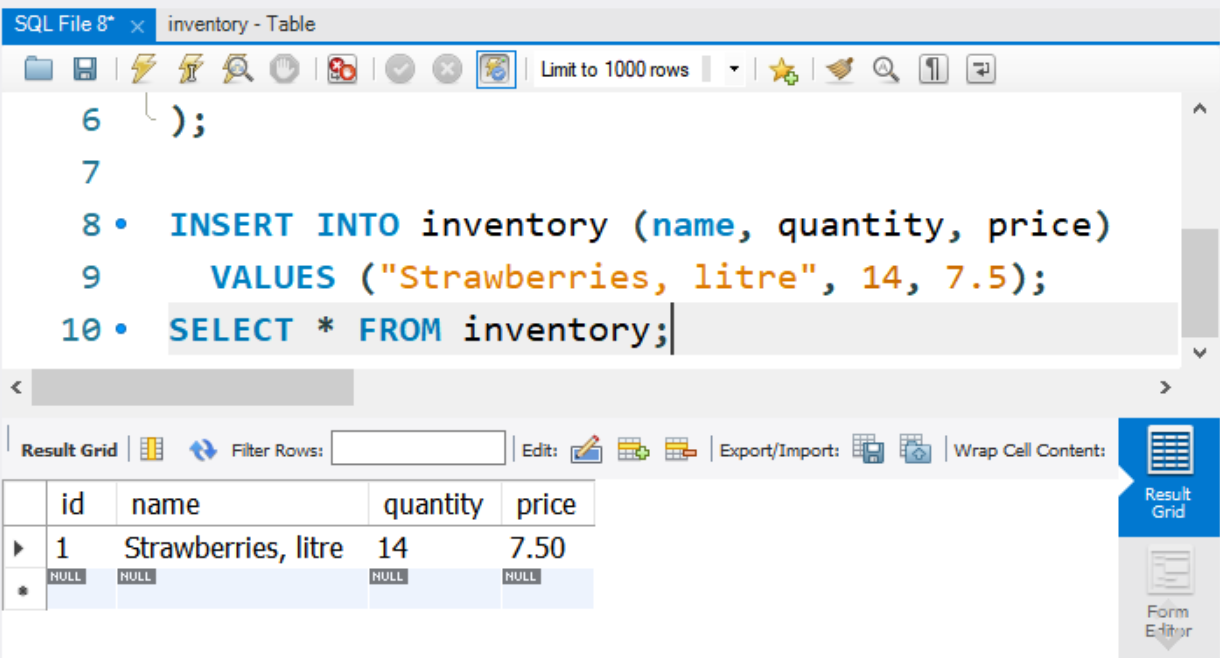
You can try an INSERT query in Workbench: You can use an existing query window or open a new one. Enter the following code and then execute it:
INSERT INTO inventory (name, quantity, price)
VALUES ("Strawberries, litre", 14, 7.5);If you want to check that the record was added, you can add a line of code to your query:
SELECT * FROM inventory;You should then see your record appear below the editor:
You can also add multiple records at one time. Just include each set of values in parentheses, and separate groups of values with a comma-space:
INSERT INTO inventory (name, quantity, price) VALUES
  ("Apples, Basket", 10, 3.5),
  ("Nectarines, Basket", 7, 4.0);
Use the whatever technique you like to create four more records in your inventory table:
If you're going to use your database to read/write data in a web application, you'll need to create a "guest" user with limited privileges. If you use your admin or root account, anyone using the page with database access will be able to do things like alter the structure of our tables or even delete the entire database using SQL queries. To keep our data safe, we use a guest account with limited permissions in our web application code that accesses our databases.
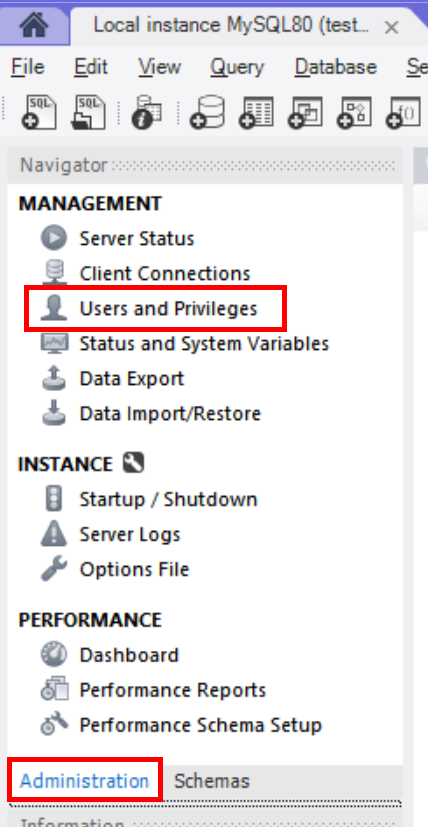
In Workbench, click on the Administration tab on the left side of the screen, at the bottom of the Navigator window. Then select "Users and Privileges".
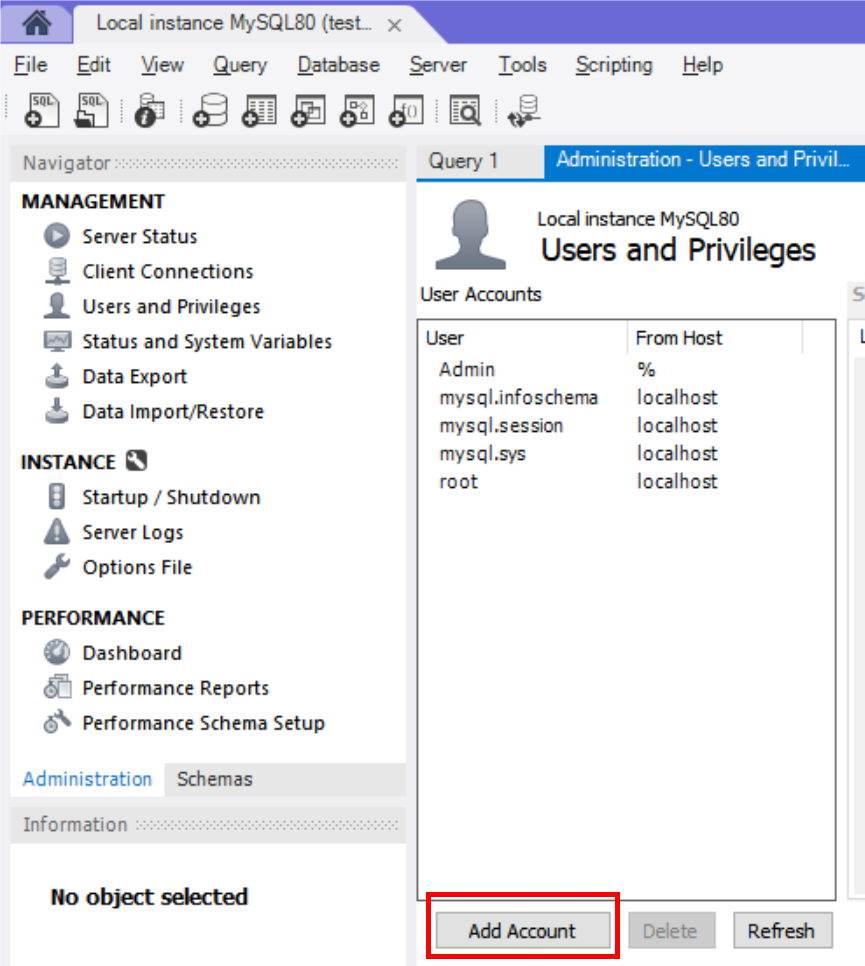
If you are prompted to enter your admin password, do so.
In the Users and Prvileges window, click Add Account at the bottom of the User Accounts list.
Some fields appear where you can enter the name and password for your guest user. Add the following data to the fields:
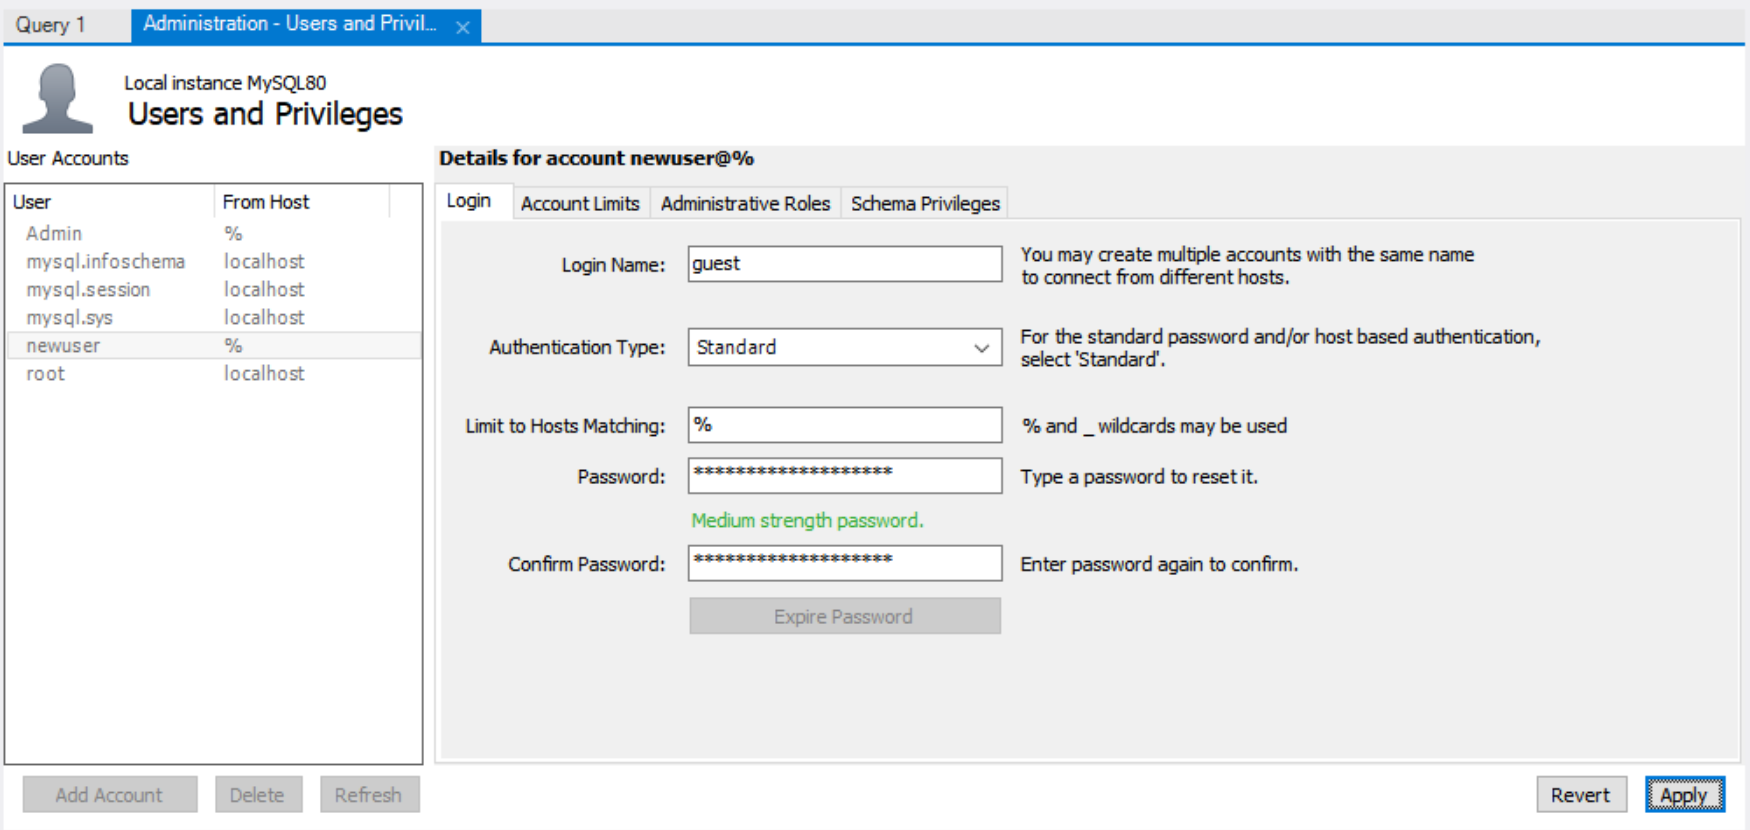
If you entered everything correctly, you'll see your new user account in the accounts lists.
Users don't automatically have access to every database. You need to give them access so that they can perform queries. Select your guest account in the list and then click on the Schema Privileges tab.
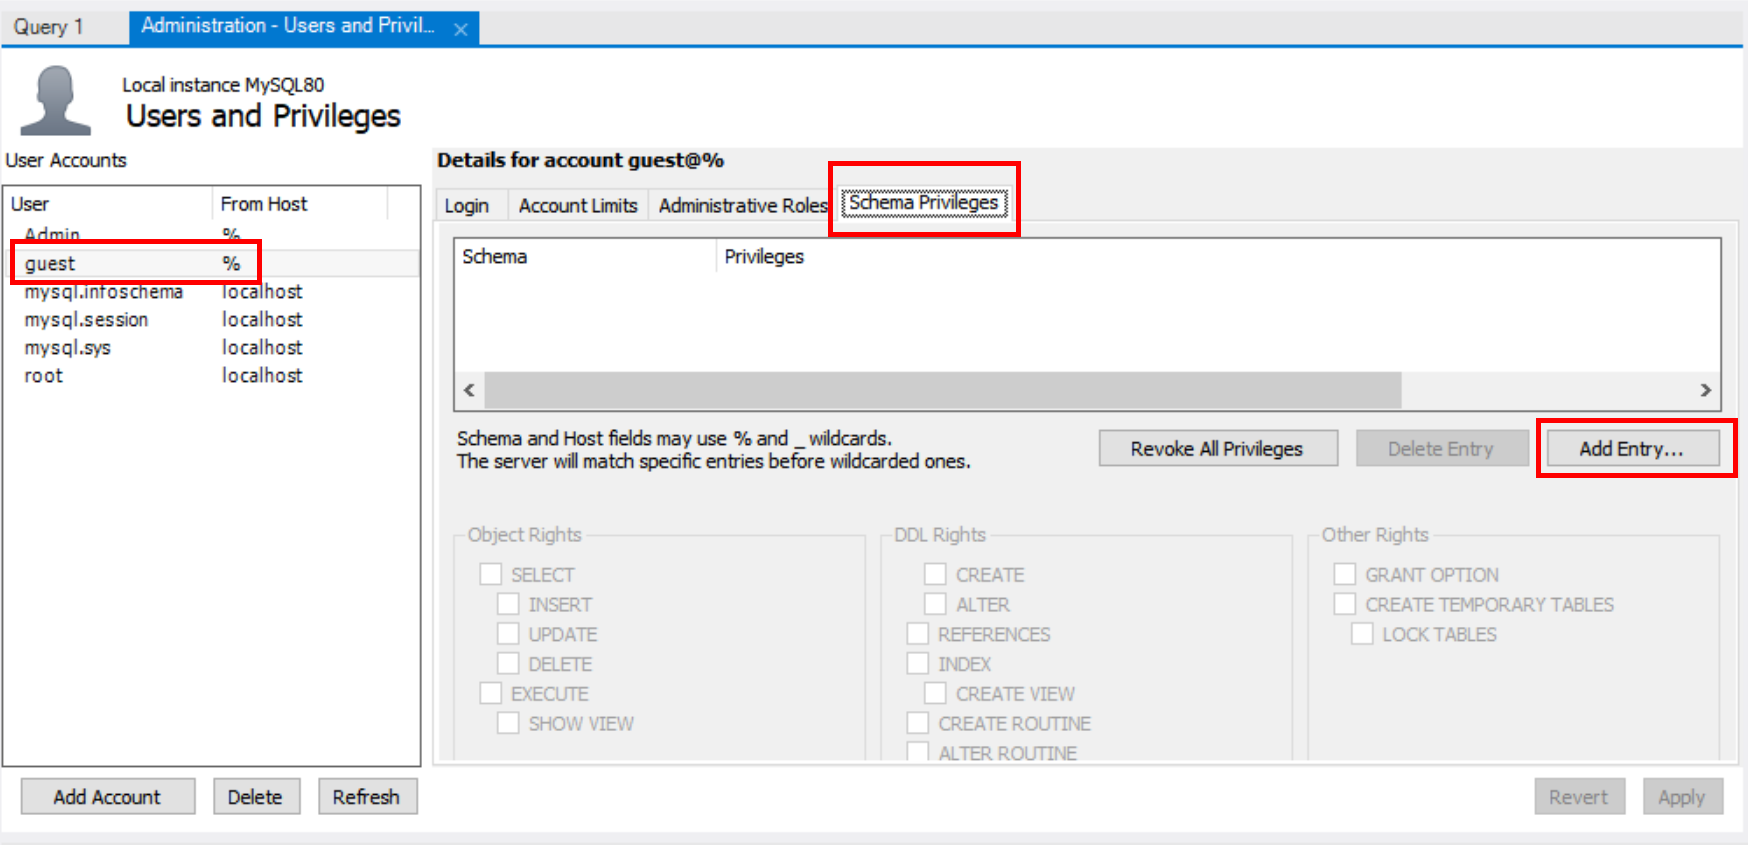
To add privileges/permissions for the user, click on the Add Entry.. button.
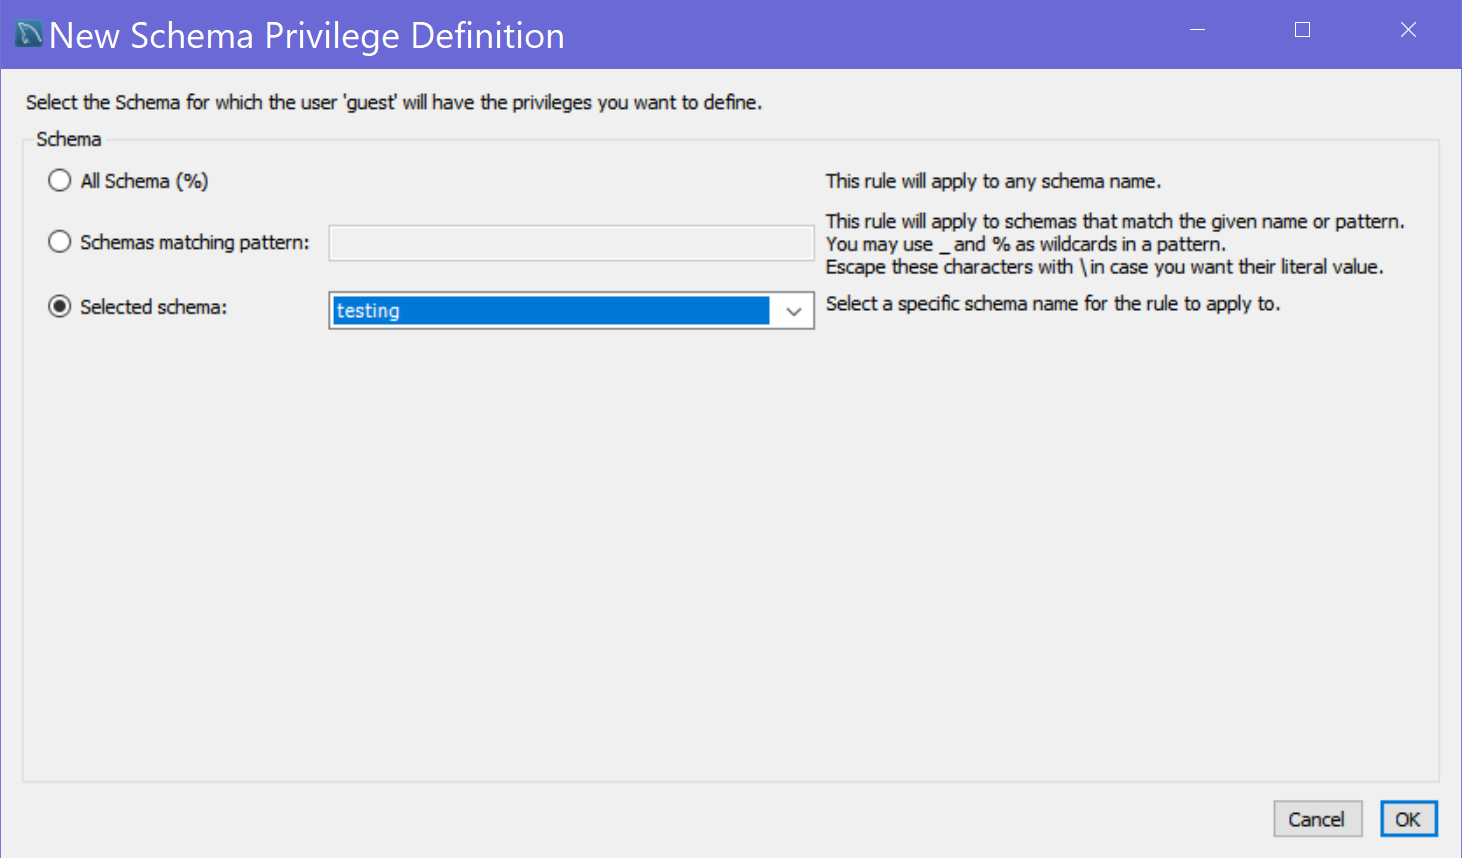
In the New Schema Prvilege Definition window, you can choose to allow your user privileges on all databases or just on specific databases. To allow permissions on specific databases, select "Selected Schema" and choose the database from the dropdown list. Then click OK.
Now you can check off which permissions you want the user to have. For a basic guest user, you would just choose SELECT. For other kinds of users, you might also want INSERT and UPDATE privileges (e.g. if a person is able to register for an account and edit their profile).
Once you've selected the permissions for your user, click on the APPLY button.
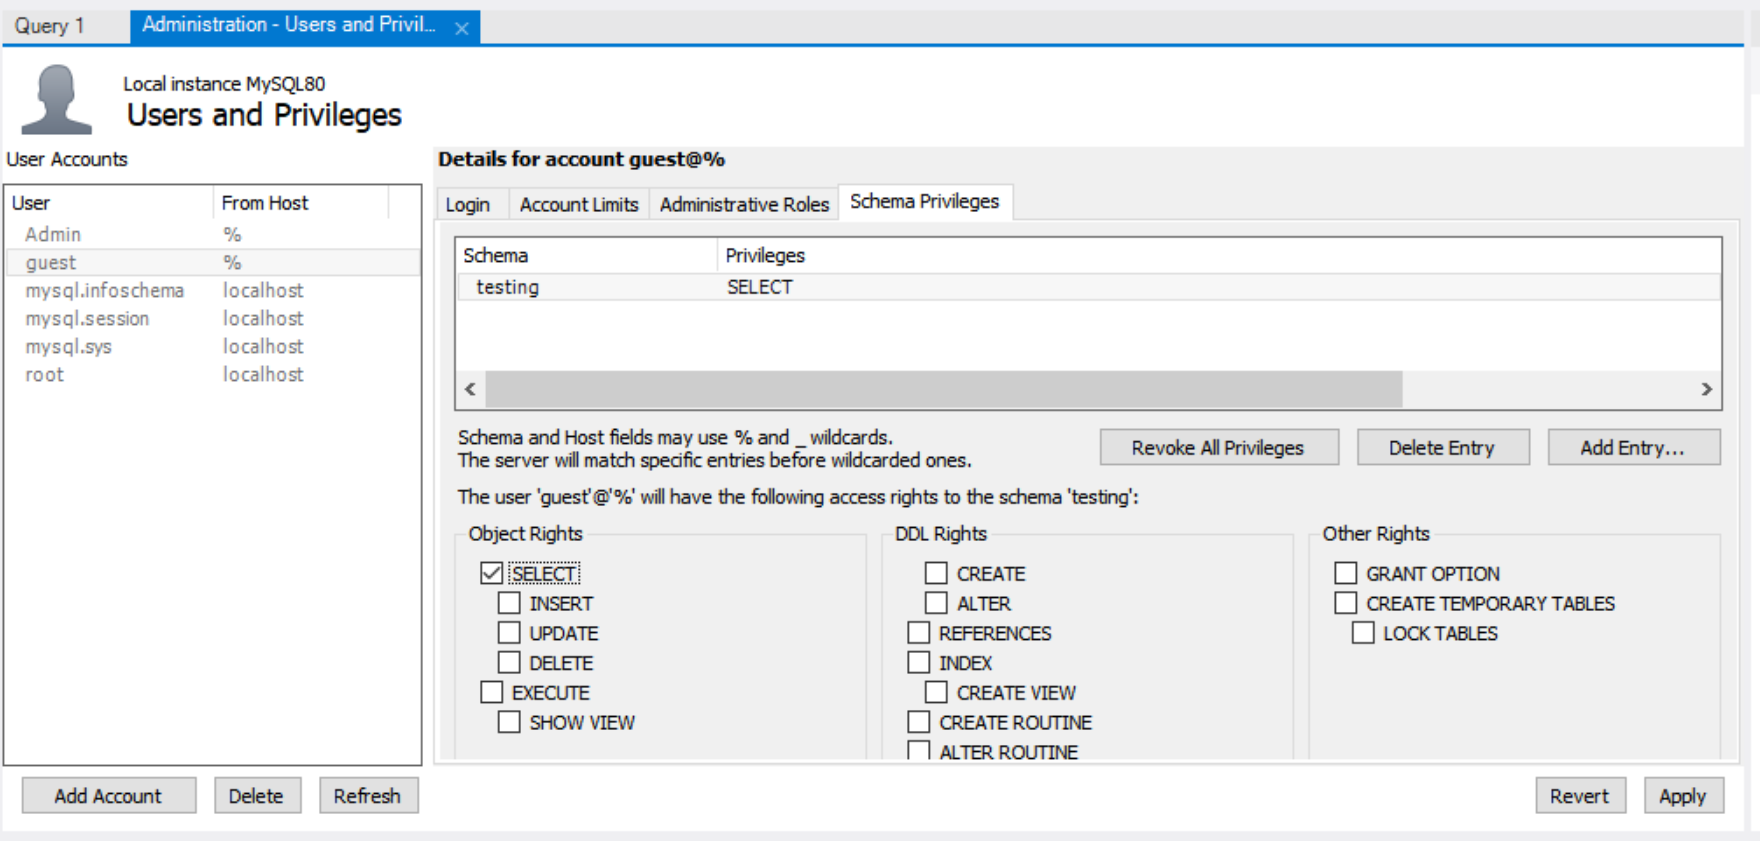
Once you click Apply, the software will add the selected permissions to your user. You're now ready to work with your database in whatever language you choose!