Once you have learned how to create forms for gathering
user inputs, you will want to write code to process the
form inputs. For many applications this is done on the server
and can be done with many server-side technologies such as
PHP, Enterprise Java (servlets), or Node.js. An important
part of processing form input data is validation
of the input data to make sure it's correct and within any
required ranges or values. This can be done on the server side
but it's also a good practice to validate input data on the client
side before it even goes to the server. Client-side can be done
with JavaScript, but thank to some additions to one of the more recent
versions of HTML, we can do quite a lot of validation using HTML
attributes on our input fields!
This lesson shows you what attributes allow you to perform client-side
validation and how they work.
Input data validation generally involves checking for the
following things:
Ensuring an input value is of the required type. Examples:
Making sure numeric field only contains digits, or
making sure a decimal field only contains digits and
a, optional, single decimal point.
Making sure a text field doesn't contain any characters that
aren't letters and spaces.
Making sure that mandatory input fields aren't left empty.
Making sure input data is in the right format. Examples:
Making sure a Canadian postal Code is in the form A1B 2C3
(letter, digit, letter, space, digit, letter, digit).
Making sure a student ID is exactly 9 digits.
Making sure a person's username or login name is between 8 and 16
characters and contains only letters, digits, and the underscore
character.
Making sure data is within valid ranges. Examples:
Ensuring a price is greater than $0.
Making sure a province name is an existing province.
Making sure a date is a valid date e.g. June 31, August 42,
and Feb 29 2001 would all be invalid dates.
Why is client-side validation important?
Submitting the form (i.e. by clicking the form's Submit
button) causes the browser to make a request to whatever
resource is identified in the form's action=""
attribute. The server receives the request along with all
the form inputs, and then executes the requested file.
An extremely important component of this kind of form processing
is validation of the input data. Generally, the server-side
program will have code that checks all the input data to make
sure it's correct. Even though there is usually server-side
code to perform this kind of validation, it's also very important
to perform this validation on the client-side, also. But
why perform the same validation on both the client-side and the
server side? Isn't that redundant?
Performing both client-side and server-side validation isn't
redundant at all. There are a few reasons why you should perform
validation on both sides:
Efficiency: Why would we want to waste processing by
sending a request to the
server with invalid data? It's much more efficient if we can
validate the data first: if any data is invalid,
we don't need to waste time
performing a request to submit the form. Additionally,
the user doesn't have to wait for the request to complete
to see any error messages or problems with their input data:
they can see the errors right away.
Convenience: When performing server-side
validation, it's important to send a meaningful response
back to the user that includes error messages and other information
that helps them understand what they did wrong. Because form submission
requires a request/response cycle, you will have to send the input
data back in the response so the user can see the inputs they had
entered before form submission. Writing this code can be tedious and
time-consuming. With client-side validation, there is no page refresh,
so the user's data is still there on the screen along with error messages,
and it requires a lot less code to make this happen.
Reusability: Many parts of an application are re-usable: you might re-use the
same input form for other server-side programs, and you might use
the same server-side script with other input forms. You may not
know who coded the other components, and how robust their validation
is, so always include validation on whichever client- or server-side
component you're working on, in case it's ever used with another
resource that has less robust validation.
Security: Despite all your attempts at creating thorough client-side validation,
it's still possible for hackers to use your form to send
malicious code to your server-side program. Having server-side
validation is still important to maintain the security of your
application.
Client-side form validation can be done using built-in
form validation with HTML, but more complex and custom
validation can also be done with
JavaScript
Constraint Validation.
This tutorial focuses on Built-in HTML Validation.
Accessible Form Validation
In a previous lesson we learned how
to make forms accessible. It's also important to make sure that
any error feedback and other validation issues are accessible.
Client side validation can be cumbersome for users with various
disabilities and/or assistive technologies.
Labels and Instructions
An easy way to create accessible forms with accessible validation
is to make sure that a form contains adequate labels and instructions.
If your intentions are clear, the users are less likel to make errors.
WCAG Success
Criteria 3.3.2: Labels or Instructions
is a level-A criteria for accessible forms. To meet this criteria,
ensure that form inputs have
clear and easy-to-understand labels
(discussed in a previous lesson) and also clear instructions that
are easy to understand and accessible. You should ensure that your
form and its inputs have the following characteristics:
All inputs have accessible labels with meaningful text,
either with <label>,
aria-label, or aria-labelledby.
Ensure that inputs with options (check boxes, radio buttons,
lists, etc) also have accessible labels with meaningful text.
Provide accessible instructions (e.g. using
aria-describedby) where necessary to inform
the user about valid ranges (e.g. entering a price greater than 0
or a term number between 1 and 6), valid values (e.g.
a field that is only allowed letters), and valid formats (e.g. a
field that must be a valid Canadian postal code).
Where possible, pre-fill fields with data that is appropriate
(e.g. if asking a customer the date, pre-fill the date field
with the current date) or use auto-fill (e.g. using
the autcomplete attribute
to use the browser's auto-fill feature).
You also have to try not to clutter up your screen with
too much information: users with cognitive disabilities may
have difficulty if the screen has too much text and/or it
is too distracting.
We've already looked at many WCAG Techniques related to
SC 3.3.2, so here's a summary for your reference (all links open
in the ref tab/window):
G131: Providing descriptive
labels along with
one of the techniques for providing description
(ARIA1,
ARIA9, G89,
G148),
or predictive layout or relationships
(ARIA17,
G162). There are also
additional techniques
we will discuss later in this lesson.
It's important to ensure that all users are able to see
and be notified of error feedback. Users who are visual can
see visual cues such as a red outline around an invalid field
or an X icon in/beside an invalid field. They can also read
error messages that appear dynamically on the screen. Users who
are unable to see colour or discern the meanings of icons,
or who can't see at all, will not perceive these cues.
ARIA21: Using Aria-Invalid to Indicate An Error Field
- this technique uses the aria-invalid="true" attribute
to convey to an assistive device that the element contains an
invalid input. You would use this if you're using a non-semantic element
as your input field or you are re-purposing an existing element by
adding the role attribute (e.g. role="textbox").
This is useful when you have a series of error
messages for different input fields on your screen and you need
a way for a screen reader to identify which field(s) the
error messages apply to. You can also use it if your visual
cue has no text (e.g. a red border or an error icon).
Addtionally, it is often important to suggest corrections
or assist with information about valid inputs.
WCAG Success Criteria 3.3.3: Error Suggestion
is met when a user is notified of an input error and suggestions
regarding correct inputs are provided. This helps users with
cognitive disabilities, who may not understand how to correct
the errors that have been made with inputs. This also helps
users with visual disabilities more easily understand the error,
and also helps users with motor disabilities reduce the amount of time
spent entering inputs.
Many of the techniques already described above assist
with meeting SC 3.3.3.
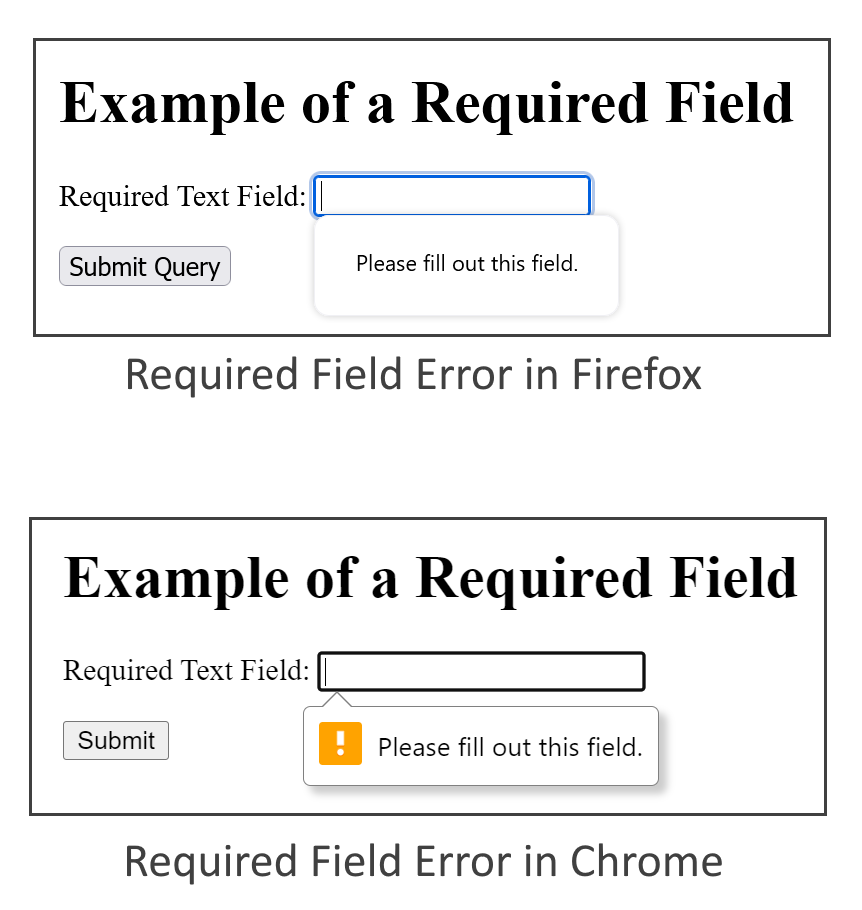
Creating Required Fields
The simplest and most common input validation is making
sure that a field isn't left empty. We can do this by
adding the required attribute to an input
element. The required attribute is a boolean
attribute, so it's not assigned a value. If it's present,
it's "true". If it's not included in the tag, it's "false".
When the required attribute is included in
the opening tag of an element, the form will not submit.
Usually a default error message will appear that indicates the
field is required, but how this appears depends on which browser
is being used.
The Required field error in Firefox and Chrome
You can try an example and see the code for a required text
field using this Codepen:
WCAG Technique ARIA2 (opens in ref tab/window)
can be used to indicate in a non-visual way that an input field
created using non-semantic elements
is a required field. When using a semantic <input> element, then
the required attribute would be used to indicate that
the field is required and not allowed to be empty. When using
non-semantic elements or a semantic element with role="textbox",
the aria-required="true" attribute conveys
to the user via assitive device that an input field is mandatory
and must be filled in.
When you add the required field to an <input>,
<textarea>, or <select> element in
the HTML, the accessibility tree will automatically convey that
the field is required (e.g. the equivalent of aria-required="true").
But if for some reason you're using non-semantic elements to create form inputs
(e.g you're creating a custom widget),
you should add aria-required="true" instead of
required so that the required state is picked up
by the accessiblity tree in the browser.
This <div> element uses role="textbox"
to add the semantics of the <input type="text" ..> element.
Notice the aria-required is used to indicate that the
field is required.
Minimums and Maximums
There are two sets of attributes that lets you specify minimums
and maximums for a field:
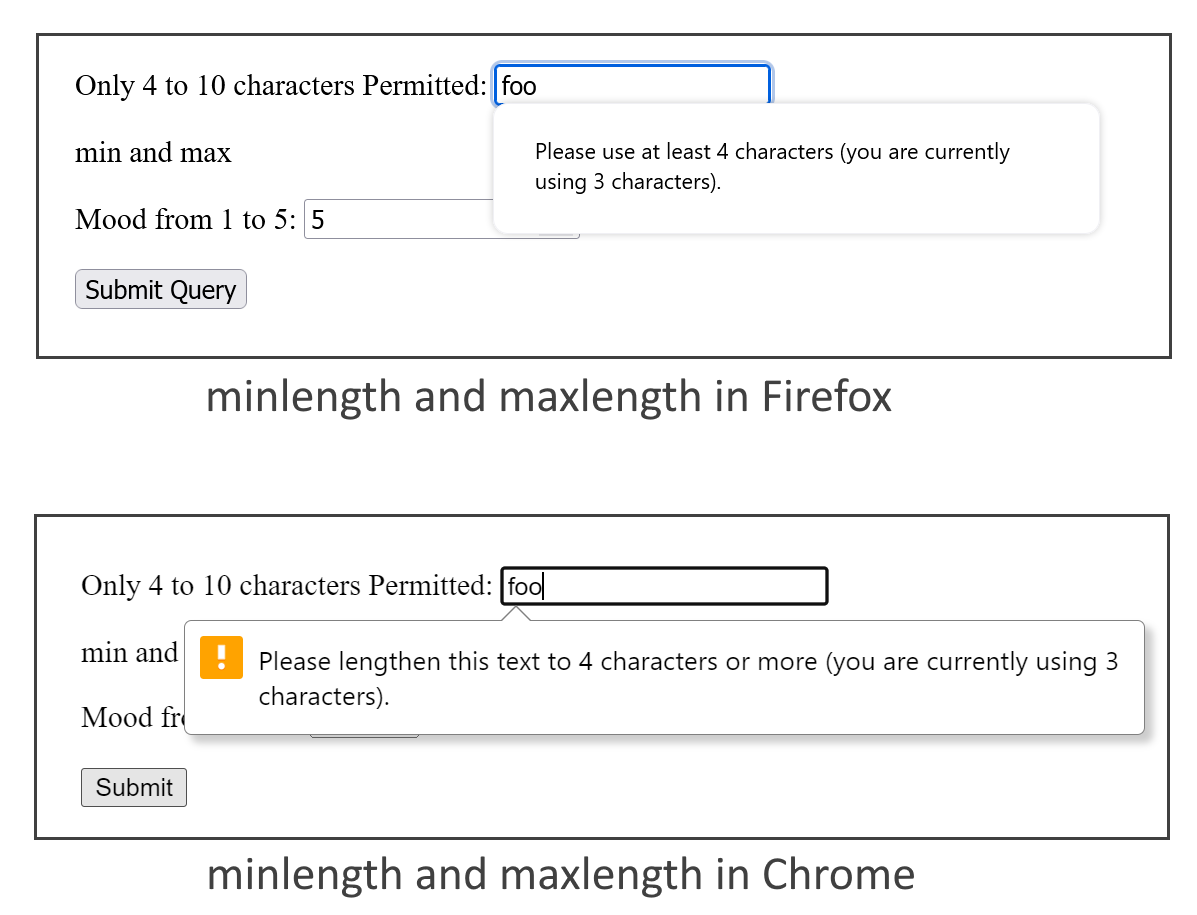
Min/Max Number of characters allowed in a text field:
minlength="" accepts an integer number
and defines the minimum number of characters permitted in a
field. If the number of characters is less than minlength,
an error message appears on form submission.
maxlength="" accepts an integer number
and defines the maximum number of characters permitted in a
field. If the number of characters is greater than maxlength,
an error message appears on form submission.
The minlength and maxlength attributes
can only be added to the <input> or <textarea> elements.
The values must be greater than 0. If there is no minlength or
maxlength attribute, or if either are set to a value of 0 or less,
then there is no minimum or maximum number of characters.
A field with a minlength error in Firefox and Chrome
Note that the exact error message in Firefox, "Please use at least
4 characters (you are currently using 3 characters)" differs slightly
from the message you receive in Chrome, "Please lengthen this text to
4 characters or more (you are currently using 3 characters)" but
both error messages indicate exactly what's wrong and how to fix it.
Note that they also state how many characters are being used, which
is helpful for visually impaired users.
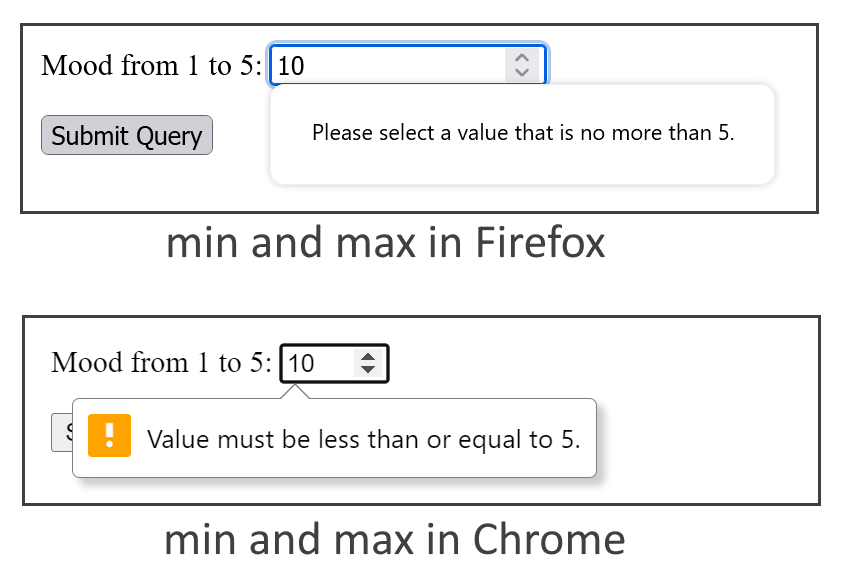
Min/Max value allowed in a numeric field:
min="" accepts an integer number and defines
the minimum value permitted in a numeric field. If the input
value is less than min, an error message appears on form
submission.
max="" accepts an integer number and defines
the maximum value permitted in a numeric field. If the input
value is greater than max, an error message appears on form
submission.
The min and max attributes can be
used on <input> elements that have a type=""
of number, range, and several of
the date/time input types. Its value depends on what the input
type is, and you can find more details in the documentation.
A field with a max value error in Firefox and Chrome
Note that the error messages in Firefox ("Please select a
value that is no more than 5") and Chrome ("Value must be
less than or equal to 5") are different, but get across the
same message.
You will often need to verify that a particular input follows
a specific format or pattern. For example:
Ensuring a text field only contains letters or ensuring
a numeric field only contains digits.
Ensuring a field contains a Canadian Postal Code in the
form A1B 2C3, with or without the space.
Ensuring a course code is 4 letters followed by 5 digits.
This can be achieved with the pattern="" attribute.
This attribute is assigned a regular
expression. A regular expression is a series of special
characters that "pattern matches". For example, the regular
expression \d{9} matches exactly 9 digits. If you set
a field's pattern attribute to that regular expression,
the field will only be valid if it contains exactly 5 digits:
Regular expressions are beyond the scope of this course, but
they're definitely something you should learn, as they are used in
almost every language and several other technologes.
If you are interested, I have a regular expression tutorial with
videos:
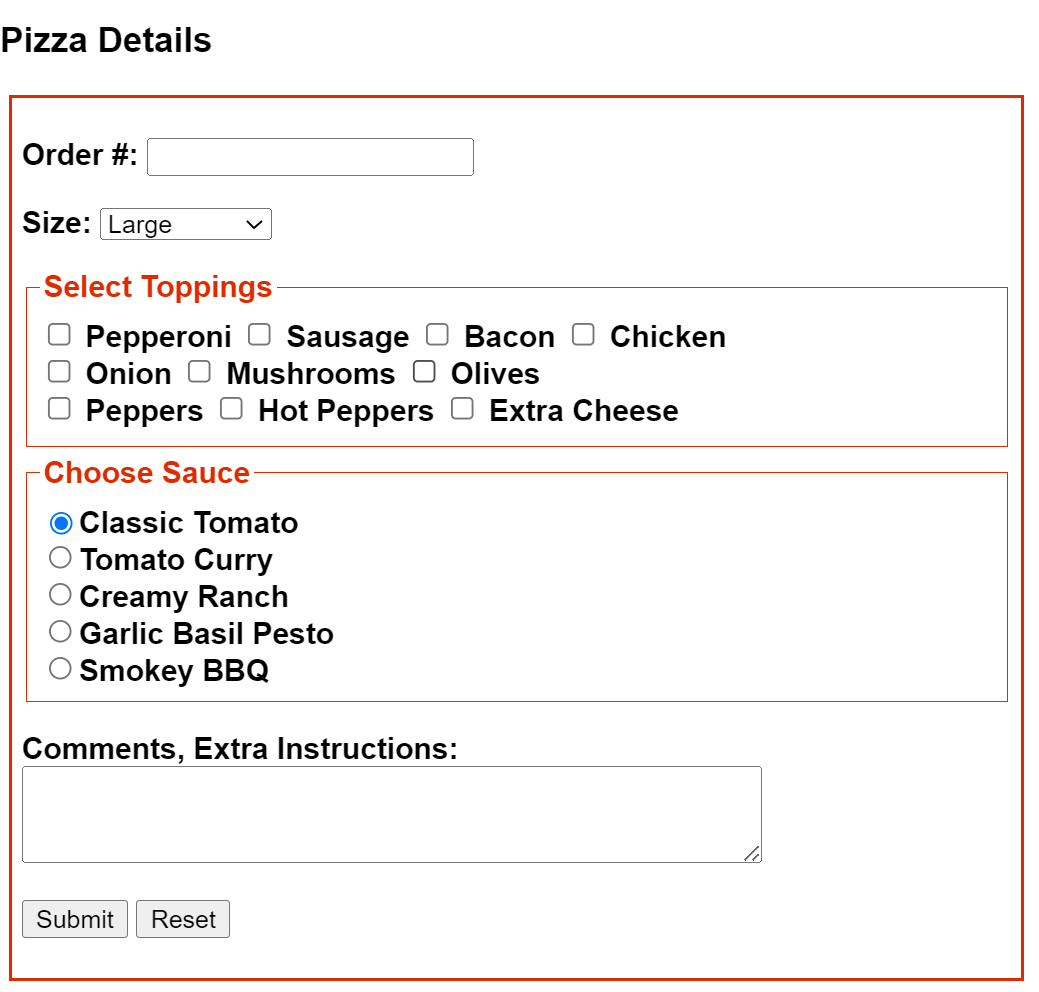
Try putting it all together with this exercise: Create a form
for a pizza shop that allows a user to enter the details for
a single pizza. The form should contain:
A text field for the order number. This field is
required and can only contain digits. Order numbers are always
5 to 12 digits and can't be less than 5 digits or more than 12
digits.
A drop-down list for the pizza size. The list includes
the various sizes and the value of each list item is the price
of that size, according to the following table:
Pizza Sizes
Size
Cost in $
Extra Small
9.99
Small
11.99
Medium
14.99
Large
16.99
Extra Large
19.99
Party Sized
21.99
This field is required and the default is "Large".
A set of checkboxes for the available toppings. List any
topics you like: the user can select all of them, some of them,
or none of them. Include at least 10 toppings.
A set of radio buttons that allows selection of a sauce.
The sauces available are "Classic Tomato", "Creamy Ranch",
"Tomato Curry", "Garlic Basil Pesto", and "Smokey BBQ".
All sauces are the same price so the value of each radio button
should be a short name for the sauce (e.g. "tomato" or "ranch").
The default selectoin is "Classic Tomato" and this field is required.
A Textarea for any extra comments or directions. This field is
optional.
A submit and a reset button.
The Pizza Form (I added styling, you don't have to)