Refresh
this page because I am probably still making changes
to it.
This lesson shows you how to create your first Spring Boot
Project. You'll learn what all the different parts of a
basic Spring Boot project are for and what files go where.
It is assumed that you have installed an IDE that allows
you to create Java Web Applications with Spring Boot.
My demonstrations use Eclipse with Spring Tools.
Creating Your First Project
We'll start off with a basic project that will
allow us to test our installation. First, there are a
few important terms and concepts to consider:
In "real life", you will want to ensure your applications
are easily searchable and also have a unique identifier.
The standard identifier for a Maven project, which
is also called its "coordinates" is the project's
group name, followed by its artifact name, followed by its
version number.
The group name or group ID
is a unique name used
as the base for the coordinates that identifies the
company or team/group that created this project.
For example, if you worked for a large pet store and were
developing a suite of new applications for that store,
you might have a group name of backwards.domain.petstore.
All your projects for that suite of applications would
go under that group name.
The artifact name will be the name of the .JAR
file for this deployed application, so whatever you choose
for the project name must be file-name friendly and follow
naming conventions for JAR files. This name should also be
unique for this specific project. For example, if your suite
of pet store applications consisted of an inventory application
and an online shop application, you would give them
different artifact IDs, such as "Inventory" and "OnlineShop".
The version number follows standard
versioning (I assume you learned about this in another course?).
For example, if this is the first major deployed version
of your application and you're working on the 4th patch
of the 3rd minor update, you might have version 1.3.4
So in our pet store example, a unique ID for a particular
build might be backwards.domain.petstore:Inventory:1.3.4.
You don't actually need to worry about the unique ID for projects
in this course, but it's helpful to understand why those 3
pieces of information are important!
Note also that a project has a package name.
A project's package name is the root package for that
particular project. For example, the online store
could have a package name of
backwards.domain.petstore.shop and the inventory application
could have a package name of
backwards.domain.petstore.inventory.
Creating the Project in Eclipse
Now that we have have a basic understanding of project
characteristics such as group name, artifact name, and package
name, we can create a new project.
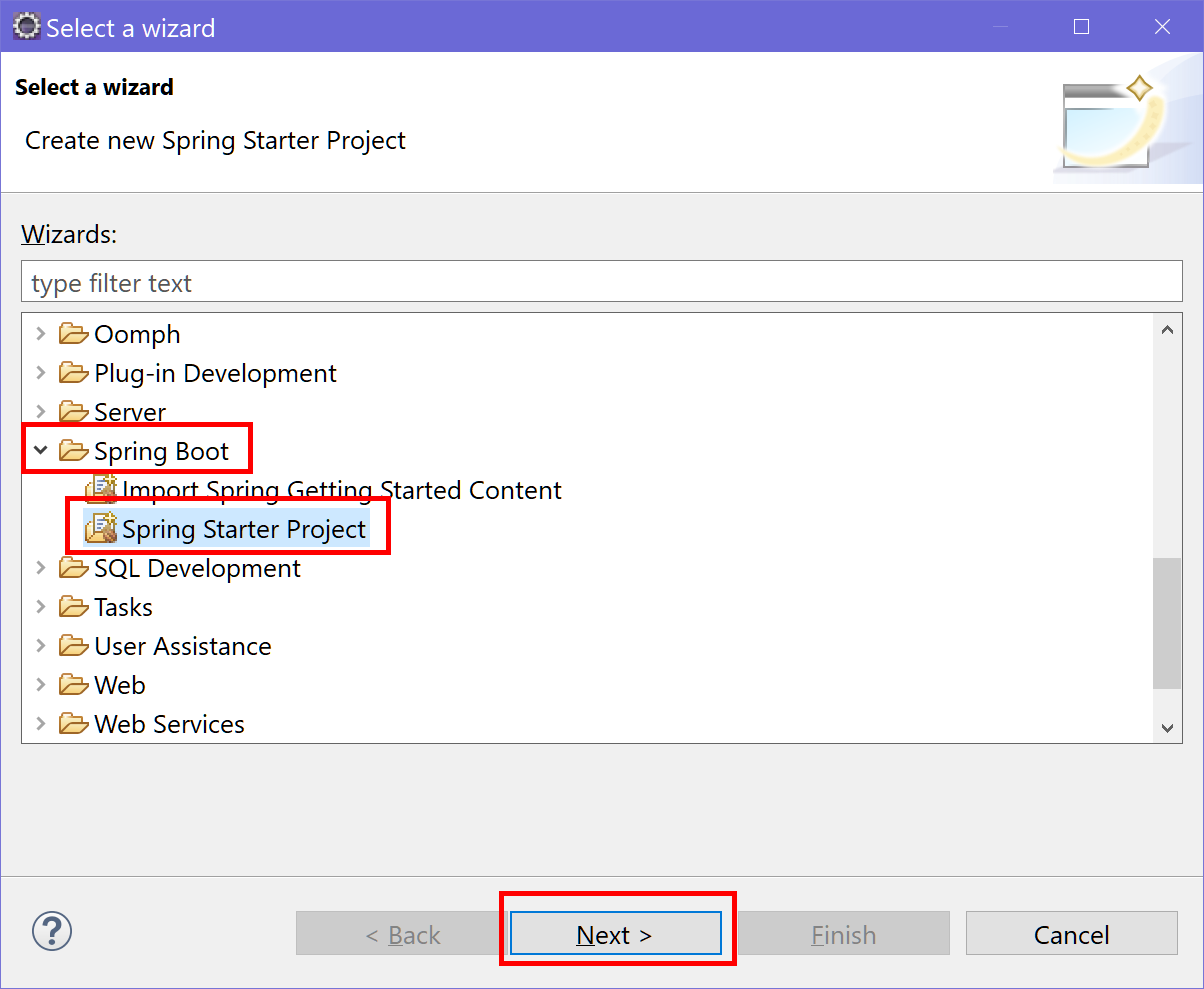
In Eclipse, select from the menus File > New > Other.
Scroll through the list and look for the "Spring Boot"
category. Open it, and select "Spring Starter Project".
Alternatively, you can just type "spring" in the Filter text
field, which is probably faster. Once that's selected,
click the NEXT button. Select Spring Boot > Spring Starter
Project and then click NEXT
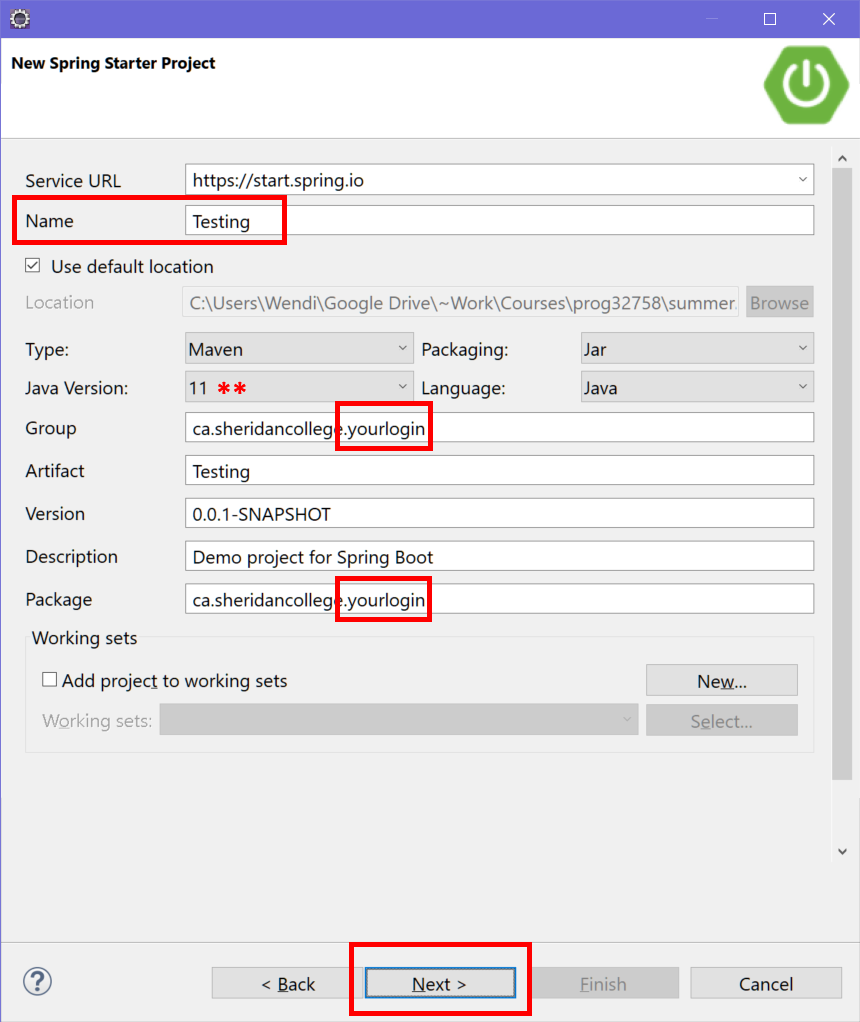
Now it's time to enter the project details. First,
enter a name for this project. In the example I used
"Testing", so you can use that for this first project
if you wish. The project name will also default to
this artifact name, which is fine.
The Type should already be set to "Maven" and the
Packaging should already be set to "Jar".
Select your Java version e.g. 14 or whatever
14+ version you have.
NOTE: there was a bug with a recent version of Eclipse:
for "Java Version" it might list only 11 and 16, even if
you have 14, 15, or later versions installed. Don't
panic. Select the closest version number closest to
the version you have if your version isn't there.
Note that I have not yet tested this on a version
above 15 (I am currently testing 17).
Language should already be set to "Java".
For our projects, the group name will be the same
as the project's package name. For all your projects
in this course, you should use the group name and
package name
ca.sheridancollege.yourlogin
Where "yourlogin" is your own Sheridan login name.
Make sure you use proper naming conventions e.g.
ca.sheridancollege.flintst
and NOT ca.sheridancollege.FLINTST,
sheridancollege.ca.flintst or CA.sheridan_college.FlintSt:
remember that standard package naming conventions are
to use the domain name backwards, all lower-case, no
symbols. NOTE: failure to follow these conventions for
evaluated projects will result in penalties on your
evaluation grade.
As mentioned earlier, Artifact name will default to
the project name, which is fine for this course.
Version should be left alone. The default of "0.0.1-SNAPSHOT"
simply means this is a "snapshot" version, which is
any version that is a work in progress, still under development,
not ready for release. Maven will not use a snapshot
release as a dependency for another application (which is good,
but not something we really care about right now).
Description is simply a description of your project. I really
don't care if you fill this in or not, I'm not going to look
at it, so you can leave it alone if you want.
Package name,
as mentioned above, should be set to
the group name. Copy and paste the group name if that is
easier for you. In a "real" application, this might be
different (as described above) but for this course, you can
use the group name unless you're told to do otherwise.
That's all you need to do: click the NEXT button. A basic set of project details
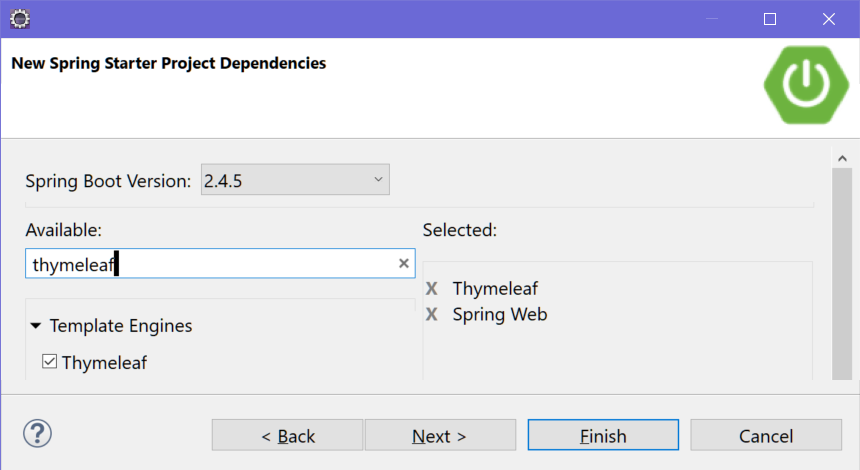
On the next screen is where we will add the dependencies
for our project. The list of items you select on this screen
will change and grow as we learn more of the things we can
do with Enterprise Java applications! For our first project,
we'll keep it simple: we need to add the Spring Web dependency
so we can create basic web applications, and the Thymeleaf
dependency (which allows you to create dynamic pages using
templates, but we'll learn the details in an upcoming lesson).
The easiest way to find a dependency in the list is to
search for it: in the text field type "spring web".
The list below will filter out most of the items
so that we can more easily see the item Spring
Web. Check off this item.
Locate the Spring Web dependency
Repeat the previous steps to add the Thymeleaf dependency:
search for "thymeleaf" and select Template Engines >
Thymeleaf. Locate the Thymeleaf dependency in the
Template Engines category
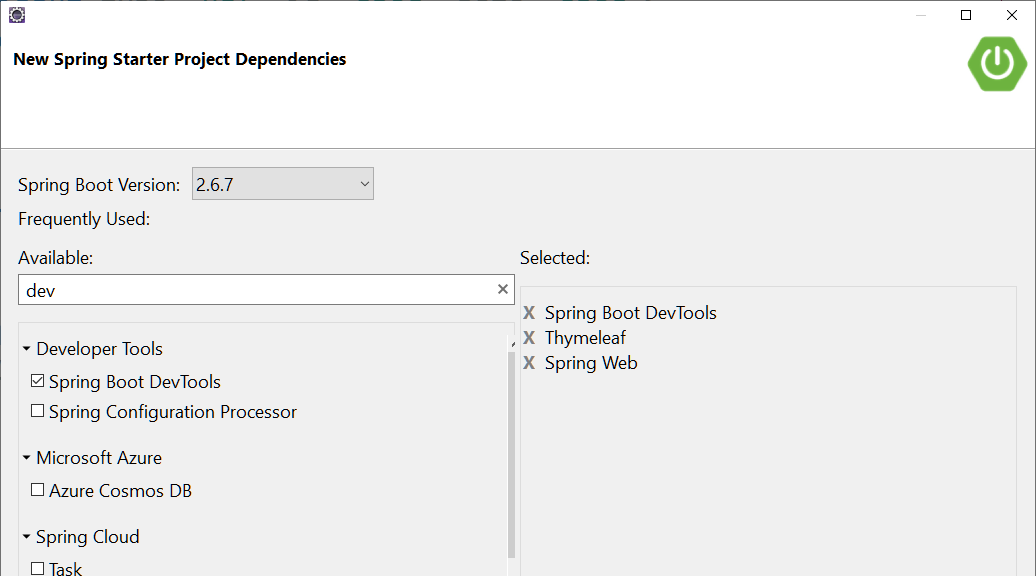
Repeat the steps one more time to add the Spring Boot
Dev Tools in the "Developer Tools" category (this adds some
convenient features, like refreshing the application on
the server whenever we make changes and save our files).
Locate the Spring Web Dev Tools dependency in the
Developer Tools category
Next time, you'll notice that Spring Web and
Thymeleaf appear near the
top so they will be easier to find!
Click Finish
You now have a project! Before we start coding, we need to
understand the basic project structure.
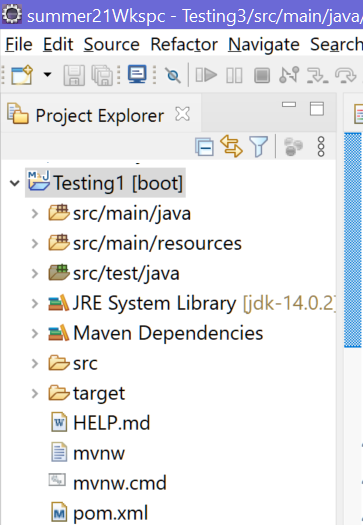
Project Structure
You might have already
noticed, if you expand the project in the project explorer, there
are already a lot of files and "nodes" there. Understanding
what these items are is important: Different parts of your
application must go in specific places, or the application
won't work properly.
The first 3 items you'll see in your project are actually
logical directories: they're there for easy access because
you'll be working with these three directories the most.
src/main/java - where your java source files are stored that are part of this artifact
src/main/resources - configuration files, web files (html, css, images, etc),
other files that are part of this artifact
src/test/java - test code and resources
Expand the project node for your project inside the
Project Explorer
The other items in the list include:
JRE System Library - classes that are part of Java!
Maven Dependencies - Maven and Spring classes
src - all the source material for the build. In fact, the first 3 items at the
top
of the list are inside the /src directory. Go ahead and look inside: you'll see
that /src has a subdirectory called /main, and /main has subdirectories for
/java and /resources.
target - all the output of the build, including all the bytecode/class
files for all the classes you compile.
help.md - text file containing links to various bits of documentation.
You don't actually need to know this. I only mention it in case
you were wondering what it is.
mvnw and mvnw.cmd
- these are part of the Maven Wrapper, which allows you to run the
maven project without actually having Maven installed on the system. mvnw is for
Linux and mvnw.cmd for Windows. You don't actually need to know about these
files, but someone always asks me what they are!
pom.xml - defines the dependencies and modules needed for this project.
When someone refers to your "pom file", this is what they mean, they're not
talking about pomegranates.
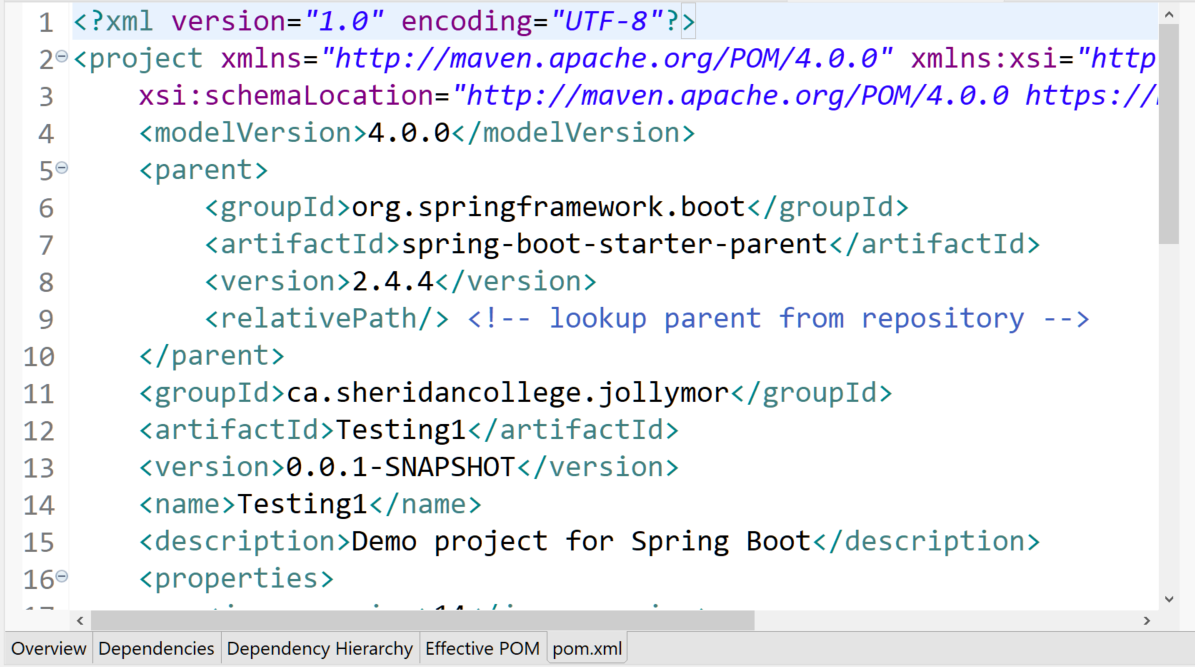
It's worth talking a bit about the POM File (pom.xml).
POM stands for Project Object Model.
The POM is where you configure the different parts of
your project's dependencies. For example, we have already added
a dependency for Spring Web, so if you wanted to change
the details of how Spring Web worked for this specific
application, you can do that in the POM file. If you wanted
to add another artifact to your application, you can add this
dependency by coding an entry for it in the POM file.
The POM is written in XML (Extensible Markup Language, a sort
of sibling or cousin of HTML). In Eclipse, you can
open the pom.xml file and edit it directly, or you can view
it in more of a graphical user interface. Let's give it a try:
Go to the project explorer and double-click the pom.xml file
in your project.
You should see all the XML code that makes up the POM.
You might even recognize some of the project configuration
you set up when you created the project.
The contents of the pom.xml file
Along the bottom of the window showing the pom file contents,
click the Overview tab. This shows you the exact same information
in a more graphical form. It's nice to have, if you're not a fan
of reading/editing XML code!
The contents of the pom.xml file
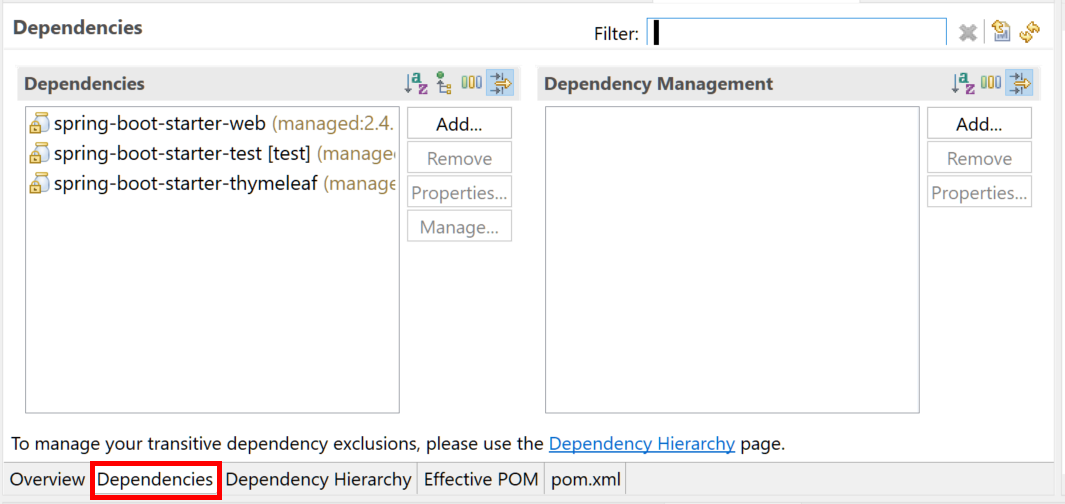
Clicking the Dependencies tab will show you the dependencies in
this project. Right now there are only 3 items: spring-boot-starter-web,
spring-boot-starter-test, and spring-boot-starter-thymeleaf.
The first is needed to create web-based enterprise projects
using Spring Boot. The second is needed to test (e.g. using
JUnit) our project. The third is for the Thymeleaf template
engine, which allows us to create dynamic HTML pages.
The dependencies defined in the pom file
At times later in the course, you will need to go in and edit
this file by adding dependencies, so don't be afraid of exploring
the pom file!
When you're done exploring, close the pom.xml file.
Let's look at one more file. When you create a new spring boot project,
it automatically creates an application class for you. You probably
won't ever need to edit this file, but I want to look at it anyway
in case you do decide to do something extra that requires you
edit this file.
In your project explorer, expand the node src/main/java. Inside,
you'll see your ca.sheridancollege.yourlogin (whatever "yourlogin" is)
package. Expand the package, and inside, you'll see the file
"TestingApplication.java" ("Testing" is whatever you named this
project/artifact when you created it).
package ca.sheridancollege;

import org.springframework.boot.SpringApplication;
import org.springframework.boot.autoconfigure.SpringBootApplication;

@SpringBootApplication
public class Testing1Application {

    public static void main(String[] args) {
        SpringApplication.run(Testing1Application.class, args);
    }

}
Your application class is the main starting point
of this entire application: it starts up the whole
application and configures it. You'll see that
inside the main() method, there's a call to
SpringApplication.run(). This statement
starts up the application as a stand-alone app and loads
everything the application needs.
One of the ways in which we can easily configure the
different classes and methods of our application is by
using annotations. Annotations are
the items that start with the @ (at) symbol, and they're
part of the various Java/Maven/Spring classes, so they need
to be imported.
On line 6 you'll see the annotation
@SpringBootApplication (it's import is on line 4).
This annotation indicates that this application should
do certain things that make our life easier, like auto-configure itself
when you don't manually configure certain things like
database connections. It also ensures that all the standard
components are exactly where they're supposed to be.
When you're done, you can close the application class.
Let's add some things so we can actually run this application
and make it do something! We'll start off with a couple of
basic HTML pages.
Adding HTML Pages
HTML pages and other web resources go inside the src/main/resources
node of your project. Inside that node, you'll see two
other nodes: static, and templates.
src/main/resources/static is for static web content that
doesn't have any parts/code generated by Java code.
This is
where your /css directory, /images directory, and /scripts
directory will go.
This is where you will place HTML pages that don't
have any content dynamically generated by server-side
code or Thymeleaf (which we'll learn later, not today).
Anything in this directory can be directly accessed
via a URL.
src/main/resources/templates is for dynamic web content
that is dynamically generated using server-side code (i.e.
Java) or Thymeleaf.
When you eventually learn to code with Thymeleaf,
all of your Thymeleaf pages/templates/fragments will
go here.
Any files here can't be accessed directly by URL.
Files here can only be accessed via a Controller
method that returns the page/file as a resource
(you'll learn what this means in a moment).
src/main/resources
will contain other files.
For example, it contains application property files
that define the properties of your application (such as
how to connect to a database server). It will also
contain things like SQL files that define any
schema/data for in-memory databases.
To understand the difference between the /static and the /templates
directories, let's add one HTML page in each:
Expand the src/main/resources node so you can right-click
on the /static directory.
Select New > Other
You can scroll down to the Web category and open it,
then select "HTML File" but it's faster to just type
in the filter text "HTML", then select "HTML File"
when it appears.
Once you've selected "HTML File", click the NEXT
button.
For "File Name:" type "staticPage.html".
Go ahead and add some basic HTML to your page
so that you know this is the html page inside
the /static directory (and not the /templates directory).
Save your changes.
Now repeat the steps above, but this time right-click on
/templates, and call your HTML file "templatePage.html".
As with the first page, add some HTML code to your
template page so that you konw this is the page in the
/templates directory, and not the other one.
Let's try our application so far and see how it works.
Running the Application
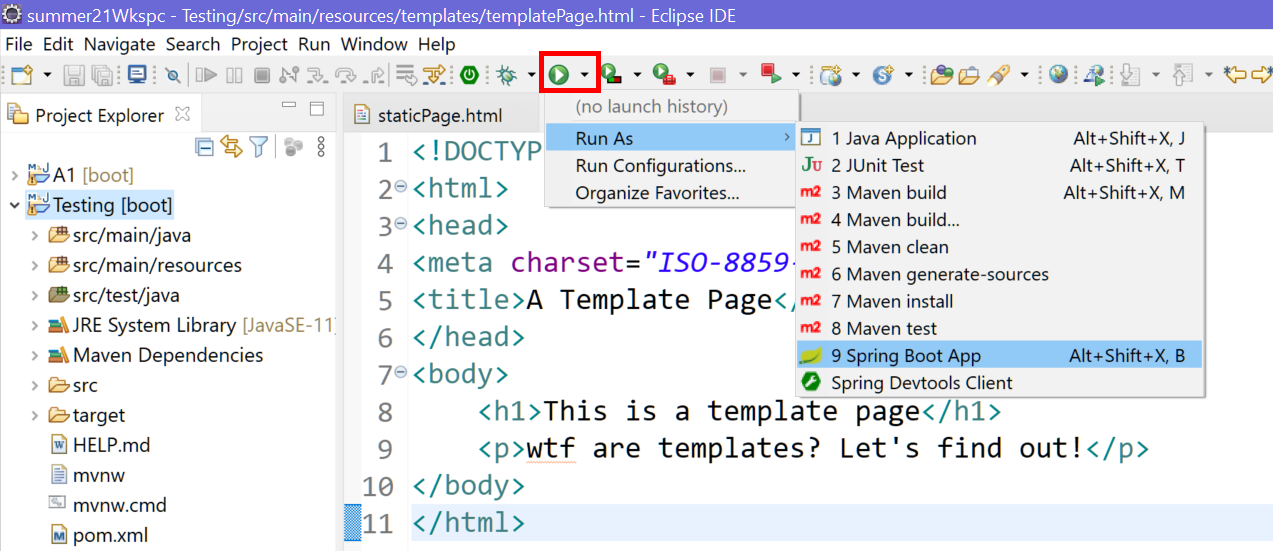
In the project explorer, right click your "Testing" project
node and select Run > Run As > Spring Boot App.
Alternatively, you can locate the "Run" button (green circle)
in the button bar at the top of the window. Pull down
the little arrow on it and select Run As > Spring Boot App.
Select Run > Run As > Spring Boot App
Be patient. A console window should open at the bottom of
the Eclipse IDE and it should be spewing forth some
information. Eventually it will stop spewing, and the last
line will say something like:
2021-05-07 16:51:30.067  INFO 13424 --- [           main] c.s.jollymor.TestingApplication
    : Started TestingApplication in 4.904 seconds (JVM running for 6.738)
That means your application is now running!
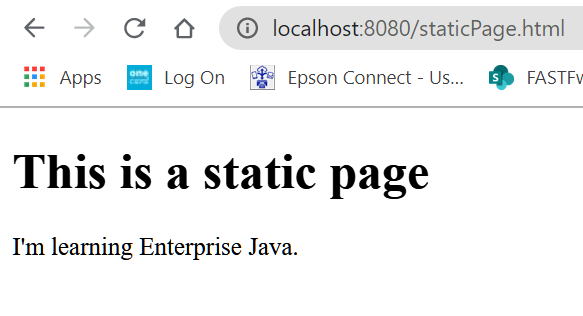
Of course, it doesn't appear to do anything, but remember, this
is a web application! So now, open up your browser and in
the address bar type:
http://localhost:8080/staticPage.html
Your static page should load. If it doesn't load or you
see an error, check that you typed the above URL
correctly. Make sure if you called staticPage.html
something else, that's what you use instead of staticPage.html.
Output from loading the static page
If that's not the problem, go to the output console in
Eclipse and see if there's a stack trace. You might be
able to figure out the error from the stack trace, just
based on your own experience in Java 1 and Java 2.
If not, copy and paste the entire contents of your output window
and send it to me in an email (you'll find my email
contact info in SLATE), or find me on Discord and we
can do a screen share, so we can figure it out.
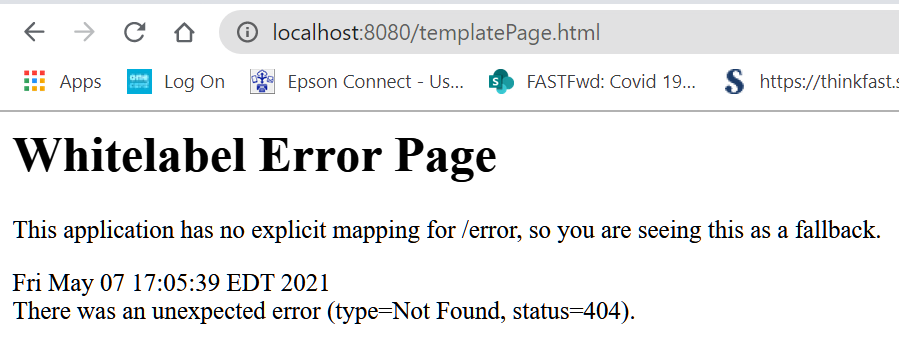
Now try loading your other page:
http://localhost:8080/templatePage.html
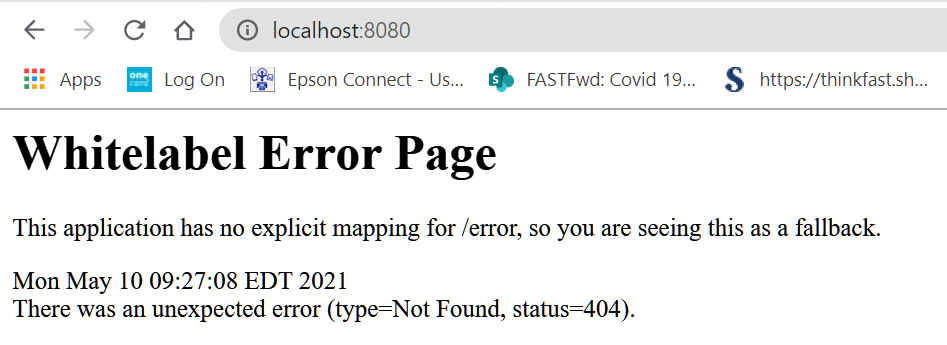
When you try to load the template page,
you see a 404 (not found) error.
When you try to load the template page, you get a 404 error.
Why? We know the page exists! You could try editing the
URL and adding /templates, but that won't help (notice we
didn't use /static/staticPage.html when we loaded the
static page, and it still worked).
This is how spring applications work: Anything in the
src/main/resources/static directory is the web root of
any static pages/files. If you went into Eclipse and
added an /images sub-directory to /static and put an
image in there, you could easily access that image in
the browser as localhost:8080/images/picture.jpg.
However, as mentioned earlier, you can't access anything inside
/template directly. You can only access it via a Controller.
Let's find out what that means!
Go back to Eclipse and terminate the application: you should
see a button with a red square in the button bar, and also
in the console output window. Either one will do: click
it to terminate or stop your application.
Adding a Controller
Recall that the Controller is part of the
MVC design pattern,
and it's job is perform tasks
between the view and the model, to do the main processing
parts of your application. Let's add a Controller.
Controllers should always go in their own package. In fact,
all components will do this: controllers in a controller
package, data access classes in a database package, etc.
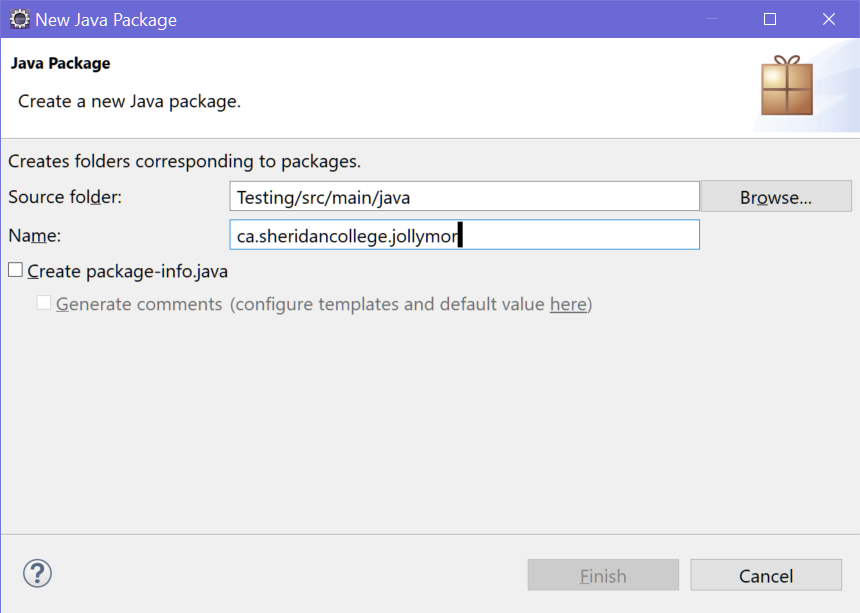
Expand src/main/java and right-click
your ca.sheridancollege.yourlogin
package, and select New > Package.
You're going to add a controllers package
to your root package
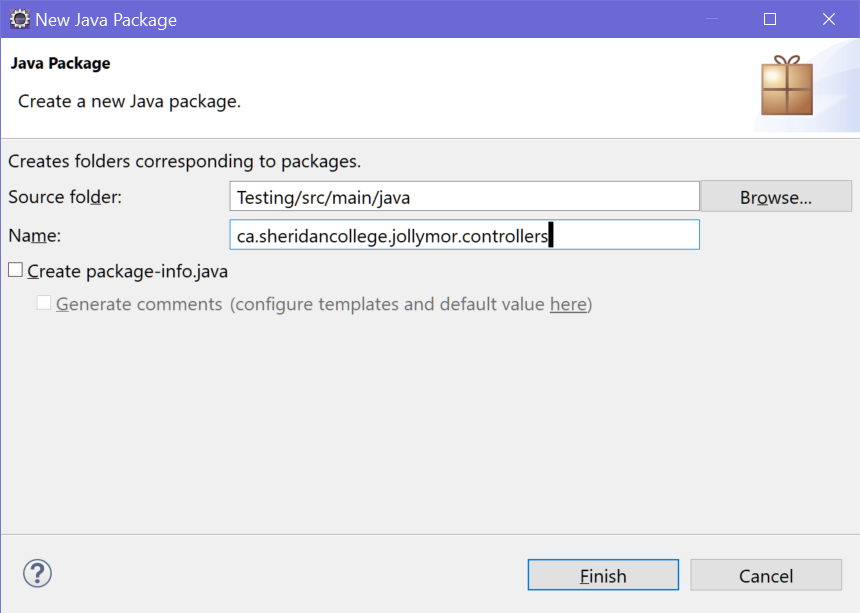
You'll be asked to enter the package name. After your login name,
add the text .controllers.
Add ".controllers" to your existing package name
If you happen to right-click on src/main/java instead, that's ok:
just select New > Package and type the entire package name
ca.sheridancollege.yourlogin.controllers
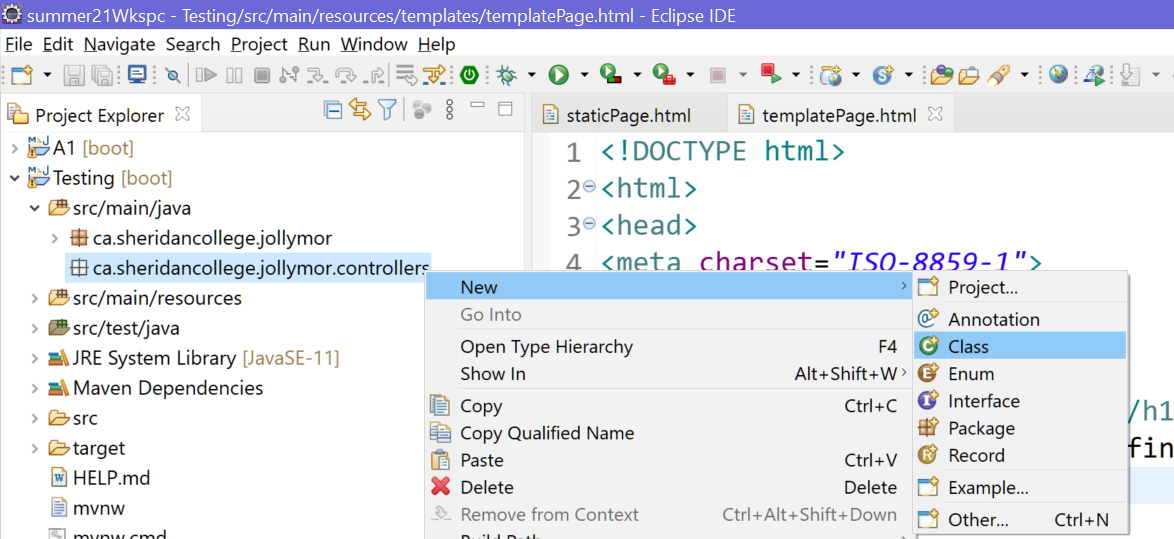
Once you've added the controllers package, right-click the
.controllers package and select New > Class.
Add a new Java Class to the controllers package
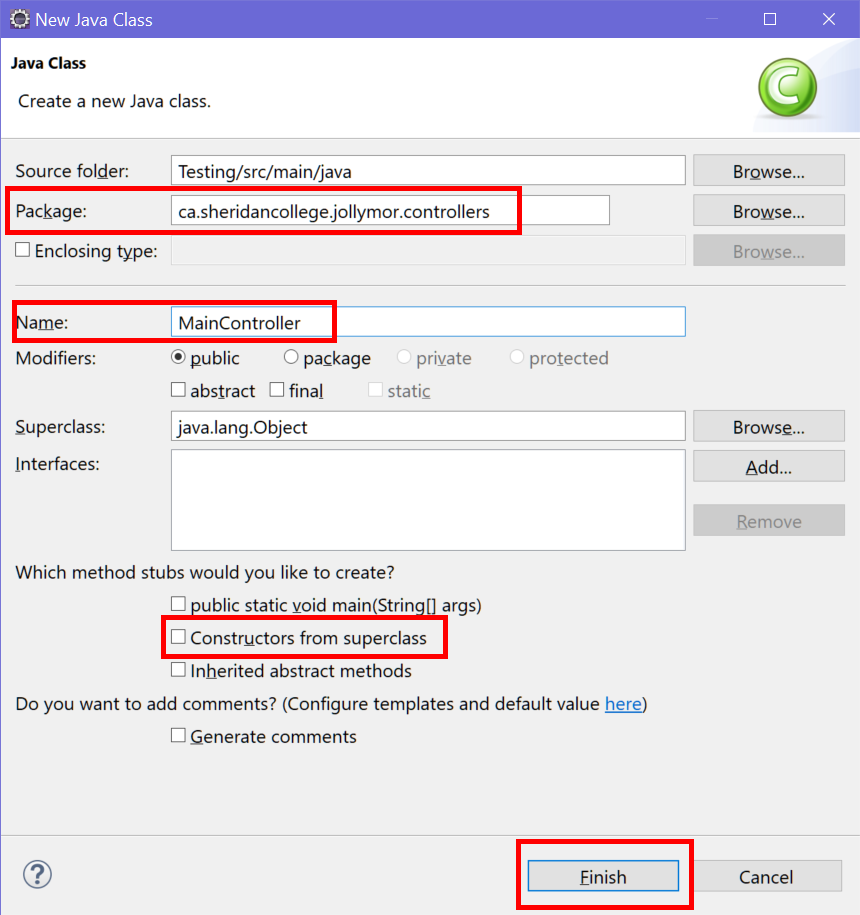
For the name of your class, enter MainController. This will
likely be the name of your controller class for most examples
and exercises. You don't need any constructors right now,
so if that option is currently checked, you can uncheck it.
Make sure your controller is in the .controllers
package and give it a standard, self-documenting class name.
A project can have more than one controller,
(and we'll do that in a later lesson) but you generally have
a "main controller" - the controller that does most of the
work, or a controller that contains the more important
tasks. Some developers call it "HomeController" and some
will name it according to what the project or controller does.
For example, a controller that mostly performs tasks with the
inventory pages might be called "InventoryController".
For your own practice, feel free to call the controller anything
you like, as long as it's a standard class name that is
self-documenting. In my examples, I'll probably always call
it "MainController".
Once you've entered all the information for your controller class,
click the FINISH button.
The first thing you need to do with this class is tell
Spring that this is a controller class. Spring won't
know this is your Controller unless you tell it. One of the
cool things about Spring is that we can do this right in
the code using Annotations (in the "old days" we had
to add code to an XML configuration file, and that
was tedious).
Go above the class header and add the
@Controller annotation.
This annotation identifies this class as a controller class
(as opposed to a data repository, or a web service, or
anything else).
package ca.sheridancollege.jollymor.controllers;

import org.springframework.stereotype.Controller;

@Controller
public class MainController {

}
So what goes in a Controller class, anyway? This is the code
that executes when the user triggers an action in the View,
or when a model update triggers some kind of action. The
controller's job is to do all that behind-the-scenes code.
For example, when the user clicks Submit on a form, the
controller captures the input data and processes it.
If you've ever written a JavaFX application, you used the Controller class
to contain all your event handlers. You'll find that
a controller in a Spring application is pretty much the
same thing!
Your controller is always going to consist of methods,
and sometimes some private data members. The methods
will execute when certain things happen; they're
often referred to as handler methods
because they handle, or deal with, specific events
that might occur. The private
data members are used to give us access to certain
objects in our controller, but we won't look at those
for a few lessons.
One of the most common things you'll have in a controller
is one or more handler methods
that loads a specific view that
you've placed in the /templates folder! Recall that
in our current Testing program, we're able to directly
load anything inside the /static folder, but we aren't
able to access anything inside the /templates folder.
That's because you can't access anything inside /templates
unless you've got a controller method that loads that
file for you! Let's see how it works:
Inside your Controller class, add the following code:
@GetMapping("/test")
public String testing() {
    return "templatePage.html";
}
Here's an explanation of this code in detail:
Another annotation!
the @GetMapping annotation maps an HTTP GET
Request to this specific handler method. In other words,
when a GET request is made to a URL in your application
that ends with "test", this method will execute.
@GetMapping is in the org.springframework.web.bind.annotation
so you'll need to import org.springframework.web.bind.annotation.GetMapping.
The string literal inside the brackets ("/test") is a
URI pattern. I'll talk more about this in the next
lesson.
Tip: If you wanted a method to execute when a POST request
is made, you would use @PostMapping, but you probably
guessed that already!
Our handler method is called testing(). This is a made-up
name.
You can call this method anything, but it must be a
standard method name and it needs to be
self-documenting.
You will eventually have several handler methods in your
controller, and it's important to make sure that you (or
another developer) can easily tell which methods do which
things without much effort.
The method returns a String. Sometimes your handler methods will
return other things, but most of the time it will always be
a String. The string represents the name of a view that
you want to load.
Right now our handler method doesn't have any parameters but
we will quickly learn in the next few lessons that you
can easily pass data into your handler methods (like form
input data!!)
Handler methods always need to be public.
As mentioned above, the handler returns the name of the
view you want it to load, as a String. In this case, I'm returning
the name of the templatePage.html
file I have in the /templates
folder (if you named yours something else, be sure to use
that name, instead!)
So this handler method simply says, "when someone goes to
the URL http://localhost:8080/test, load the page
/templates/templatePage.html".
Try it! If you didn't stop your application earlier, you'll
need to restart it (there's a "Relaunch" button in the button
bar, about 4 buttons to the right of the Run button).
If you stopped your application after the last test, just
re-run it again by using Run > Run As > Spring Boot App
(Actually, if you use the Run button up top, you can click on
it's little arrow and it should now have an entry for running
this Testing project - Eclipse remembers your past
"run configurations" for you).
Go back to your browser and retype the URL
http://localhost:8080/staticPage.html
to make sure that still works.
Now edit the URL and type http://localhost:8080/test
NOTE: If you changed the pattern inside @GetMapping, you'll need
to use that instead of "/test". For example, if you have
@GetMapping("/foo") then your URL need to be
http://localhost:8080/foo
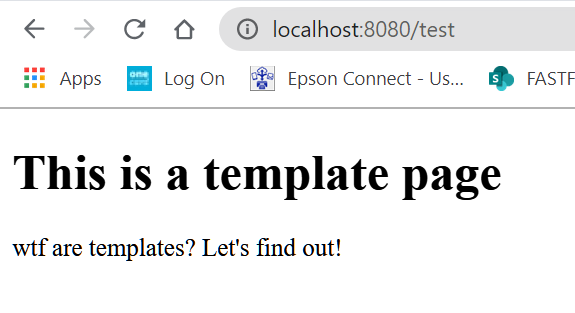
You should see the output from your template page! If
you see a 404 error, make sure your GetMapping() pattern
matches what you typed in the URL, and make sure that the
return statement in the handler method matches the name
of your HTML page in the /templates directory. If that
doesn't solve the problem, go back and make sure you followed
all the steps above.
You should see the output from your template page.
If you see any 500-series error, there might be a stack trace
in the output console in Eclipse that can be helpful. If you
are unable to solve the problem, contact your professor and
provide all the details, including all the output from
the console window, proper screen shots, etc.
What happens when you just go to
http://localhost:8080? Try it.
Going to this address should load the root of your
project. In a normal web project, this would load any
index.html page by default. However, we see an error
instead.
If you try to go to the web root at http://localhost:8080,
you'll get a 404 error.
There are two ways you can fix this:
If your main index page is a static page, then simply
add an index.html page into the src/main/resources/static
directory.
If your main index page is a dynamic page, then
add the index.html page into the src/main/resources/templates
page and add a handler method that maps the root "/"
to your index page:
@GetMapping("/")
public String index() {
    return "index.html";
}
Exercise
Add a file to your current project's /templates
called about.html. Add some content to your about page -
whatever you like! I'll show you in a later exercise how to
include images or an external CSS.
In staticPage.html, add a link that uses "aboutme" as the href
e.g. <a href="aboutme">All About Me!</a>
In your controller, add a handler method that maps to /aboutme.
The method should return the file name of your about page "about.html".
Run (or re-launch) your project. You might have to refresh the
static page in the browser to see the link you added.
Click the All About Me! link and you should see your about page.