Refresh
this page because I am probably still making changes
to it.
So far, we've learned how to write code in our
controller that can receive requests and
send responses back to the client.
A lot of the time, you're going to want to pass
data into your handler methods in the controller.
For example, if the user wants to add a book to
the books database, you'll need to have them
input the book data into a form. That book
data then needs to be sent along in the request
body to the controller for processing.
Recall that a form generally has a
method
attribute and an action
attribute.
The method attribute determines how
the data from the form is sent to the server for processing. There are
several methods you would but the most common ones used
to send form data are GET and POST.
The action attribute will determine
what script or program receives your form data. This will be a program that
processes the form data, and probably displays some sort of feedback or result
on a new page, as defined by the script/program.
For example, if you saw a form that was enclosed in the following form tag:
You would know that this form sends it data to the showResults.php
program for processing, via the POST method. All of the other controls
that make up your form must go between the <form> and </form> tags.
In a Spring application, your form's action
attribute will be set to any value that can be matched with a URL pattern
in your controller. This means it doesn't have to be a file
name and it doesn't have to refer to any directory/file
that actually exists.
Review: GET vs. POST
Recall the differences between GET and POST from your previous readings/review:
GET vs. POST Request Methods
GET
POST
Data is sent as key-value pairs as part of URL, therefore
data is visible to a user
data is visible when page is bookmarked or
in the browser history
data can be cached
it's easy to hack
Data is sent inside the HTTP request, therefore
data is not visible to a user
data is not visible when page is bookmarked
nor in the browser history
data can't be cached
it's more difficult to hack
Data can only be plain text
Data can be plain text, objects, binary data, etc.
Data is limited to the size limit of a URL (generally
2,048 characters)
There is no limit to amount of data you can send
No problems reloading the URL or using the browser's BACK
button to go back to the URL
When browser reloads/revisits the page, the form data
must be resubmitted
The general rules for mapping handler methods with GET or POST is as
follows:
Use POST when:
Transmitting Sensitive Data: since POST
doesn't send the data
as part of the URL, you should use it for sensitive
data like logins, payment information, etc.
Writing to a File/Database: if you use GET,
the user can reload/refresh the page, which causes whatever
method you're calling to execute again with the same data.
Using POST requires a resubmission of the data, so the
user is less likely to accidentally perform a file/db
write with the exact same data multiple times.
Transmitting Large Amounts of Data
or Mixed Types of Data: POST has
no restrictions on the amount and type of data
you want to send, whereas GET can only handle 2k-4k
characters and those characters can only be ASCII
characters.
If none of the above conditions apply, use GET.
GET is a lot faster than POST.
So when you use the POST method to send form data to
the server via the request, the input data is sent along
inside the Request Body. When you use the GET method, the
data is sent along in the URL as key-value
pairs.
Recall that the question mark (?) character is used to separate
the URL from the query string, and that query string contains
the parameters defined as
key-value pairs (name=Fred). The key is on the left of the equals (=) sign
and represents the parameter name. The value is on the right, and
represents the value of the parameter. In our example, the parameter
is called "name" and it will contain the value "Fred". To pass multiple
parameters, separate each key-value pair with an ampersand (&) and to include
a space in the value, use a plus (+) sign. For example
http://www.some.server.com/addPerson.php?name=Aegon+Targaryen&department=Iron+Throne
Accessing Form Data in the Controller
So naturally now the next thing you're probably wondering
about is how do we fit the puzzle pieces together: how
do we take the inputs from an HTML form that are sent
to the server in a Request object, and then process
that input data that we retrieve from the Request
object and send it back to the client? Here we go!
Inside a controller's handler method, you can
access form data easily using the
@RequestParam annotation.
This annotation is attached to a handler method's parameters.
Each parameter matches one of the form inputs.
How does the controller know which key-value pair
to match to each parameter? You must make sure
your handler's parameter variable names match the input
field's name-attribute value exactly
.
For example, let's say you have the following form:
Here, the input field names are set to firstName
and lastName. Therefore, the handler method should
include a parameter for firstName and a parameter for
lastName:
The @RequestParam annotation
binds each parameter variable to its specific request parameter
in the query string.
For example, when this form is submitted after the user
enters "Sydney" for first name and "Greenstreet" for last name,
the query string will be "firstName=Sydney&lastName=Greenstreet".
@RequestParam String firstName is automatically bound
to the firstName key/value pair in the query string, and
@RequestParam String lastName is automatically bound
to the lastName key/value pair in the query string.
It works as long as the parameter variable name matches
the key, or the name attribute value of the form.
If you don't want to use the name attribute value of the
field for your parameter variable name, you can
tell @RequestParam the name of the form field:
In the above example, the controller retrieves the value
from the key "firstName" in the query string and stores
that value in the Java variable "fname". Similarly,
it gets the value from the key "lastName" and stores
it in the variable "lname".
You can also do this with less typing by just putting
the form field name in quotes:
Recall from web programming, when you were learning
PHP, that request parameters are always strings.
The values the user enters are transmitted from the
form as string values, and yet we are able to use
specific data types in our parameter variables.
In this form example, we're asking for a quantity, and a
price. We would assume that quantity should be an integer,
and price should be a floating point. When we create the
handler method for this form's request, we can use
those specific data types for the quantity and price
parameters:
@GetMapping("/doForm")
public String formSubmit(@RequestParam int quantity, @RequestParam double price) {

}
The values in the query string will automatically be
converted into the appropriate types. Note that this
will cause an error if there's a problem parsing/converting
the value. For example, if the user types a quantity
such as "hi" or "1.5".
Casting and parsing errors can be avoided with some client-side
error handling using
HTML5 constraint validation and/or JavaScript validation.
However, it's still a good idea to make sure you handle
exceptions dealing with this issue in your controller.
We'll learn how to do this in a later lesson, so for now,
you can use client-side validation to ensure your inputs
are of the correct types.
Create a quick form that asks for an item name, quantity, and price.
Write a handler method that executes when the form is submitted:
the handler should grab each input value and (for now) display them
on the console using System.out.println() (you'll have to load the
page in the browser and then come back to the IDE to read the
console). The handler can simply return the index page or
form page for now. We'll learn more appropriate
ways to display output later in this lesson and in future lessons (Thymeleaf!)
Overriding Response Output
As we're learning what we can do with a controller, it's a bit
annoying that we can't really do much to see any output
to our program. Of course, you can print things to the
console using System.out.print/println/printf() but
that means you have to go to the browser to load the page,
then come back to the editor to look at the console.
Even though you'll rarely do this in an actual application,
it's helpful to know how to produce web page output
in your handler methods. Think of this like System.out.print/println/printf()
but to the web page, instead.
First, edit your handler method:
Change the return type
to void (you'll have to comment out the return statement, if
you have one).
Add a parameter for an HttpServletResponse object.
The HttpServletResponse parameter is created automatically:
it references the actual HTTP Response that is going to
be sent back to the client.
So when you add this parameter, you are able to access
the HTTP Response and edit it in your code!
The HTTPServletResponse object is created automatically by
Spring, and it contains the entire response being sent back
to the client.
This is an example of dependency injection, which we'll
talk about next week.
Spring does this a lot, and it's one of the reasons why it's
so cool and easy to work with.
Now that you have access to the response object, you can use it.
To modify the response being sent back, you have to retrieve
the output stream object from the response object. This object
is a java.io.PrintWriter, which is nice because you're already
familiar with PrintWriter: you used it in Java 2 when you worked
with data files. So you can use print() and println()
with it:
@GetMapping("/doForm")
public void formSubmit(HttpServletResponse response,
    @RequestParam() String firstName,
    @RequestParam() String lastName) {

    // skipping some important minimal html for brevity
    try {
        PrintWriter out = response.getWriter();  // get the output stream

        // create bad html document
        String output = String.format("<html><body>" + firstName +
            "<br>" + lastName + "</body></html>"):
        // add output to response body
        out.println(output);

       // close the stream!!
       out.close();
    } catch (IOException ex) {
        // if there actually are errors, we need to see what they are
        ex.printStackTrace();
    }
}
The above code uses the response object's getWriter() method
to retrieve an output stream we can use to create a response
body. Then we create the HTML response we want, and
add that output to the response body using the println()
method on our stream object. Finally, we close the stream
when we're done.
Note that we have to use a try-catch to handle any IO
Exceptions that PrintWriter might throw!
Until I show you how to use Thymeleaf and HTML next week,
you can test your examples and demonstrations by
outputting to the response body, if you want.
Exercise
Modify your previous example to display the output
to the response object instead of using the console.
More About Request Parameters
There are a few other important details you should know
about when it comes to request parameters in your handlers.
By default, the parameters are required, but you can change
this to make one or more parameters optional. You can also
provide default values for parameters whose values are
not sent to the server.
Optional Parameters
Recall from web programming that the checkbox input only
sends data to the server when the box is checked. When the
box is unchecked, no data for that input is sent to the server.
For example:
With the form above, if the user's inputs of "Mackenzie",
"Monaghan" are entered for first name and last name, and
the check box is checked, then the query string is
firstName=Mackenzie&lastName=Monaghan&fun=true
is sent to the server. But if the box remains unchecked,
then the query string
firstName=Mackenzie&lastName=Monaghan
is sent to the server.
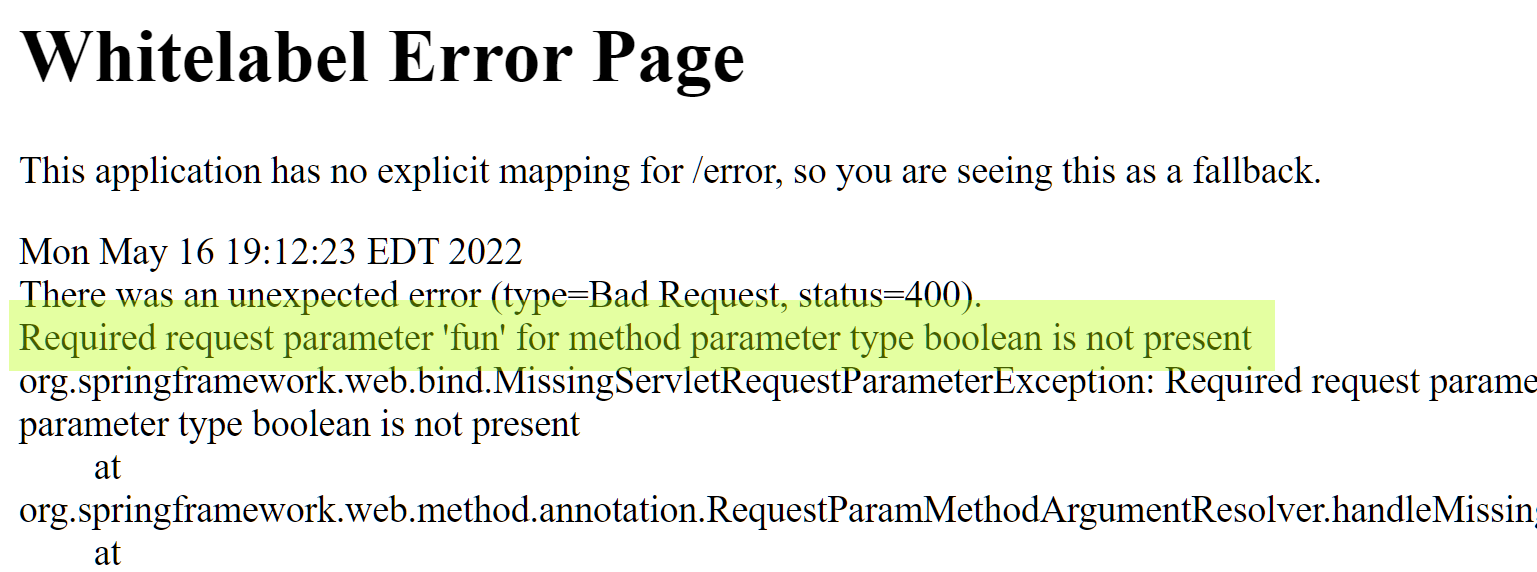
If you try out this example, you'll see that you get an
error when you try to run the program.
Error that occurs when a parameter is missing its value from the form
So how do we deal with this? Our controller's handler method
would be expecting a request parameter for the "fun" field,
but if the user doesn't check the check box, there is no
value for the parameter and the program crashes.
To fix this, we can create optional parameters.
To make a request parameter optional, you just add the
required
property to the @RequestParam annotation and assigning it a value
of false as a boolean literal.
Any request parameter defined with
@RequestParam(required=false) is considered optional.
If a paramter does not have required=false then it is
a required parameter.
Assign Default Values to Parameters
You can also assign a default value to a request parameter.
For example, if the user doesn't enter the last name,
you can assign a default value. Just use the defaultValue
property inside the @RequestParam and assign the value
as a String:
If the query string contains a key-value pair for
lastName, it will be used. But if the query string
doesn't contain a key-value pair for lastName, then
the lastName parameter variable will be assigned the
value "none".
This can work for any parameter. For example, if your user
doesn't enter a price in the price field, you can assign
a default price:
@GetMapping("/doForm")
public String formSubmit(@RequestParam int quantity,
    @RequestParam(defaultValue="5.99") double price) {

}
What if you want to use more than one property in the
@RequestParameter annotation? Just separate them with
a comma, but if you're using the short form for name="",
then you'll have to expand it to the long version.
For example, you'll have to do something like
name="id", defaultValue="1" and not
"id, defaultValue="1"
Working with dates and times is much easier than
it used to be, especially after Java added a
whole new API for dates and times in the
java.time packages.
Older applications would use the
java.util.Calendar and java.util.Date classes to deal
with dates and times. As of Java 8, we use the
java.time classes, such as the java.time.LocalDate
class. The java.sql.Date class is a class used
for modeling dates that are read from or written
to SQL databases.
So which should we use? It depends on what
you want to do. For new POJO/Bean classes that
have a date/time as a data member, use the
java.time.LocalDate (or LocalTime, or LocalDateTime, whatever
is appropriate) class. The java.util.Date
class is older and most of its methods are
deprecated, so you shouldn't use it anymore.
Example: Creating a LocalDateTime Object
You can create a LocalDateTime from integer
values representing the year, month, and date of
the month. The static LocalDateTime.of()
method takes various numbers of arguments - you can
see in the documentation that it's over loaded so you can
pass it year/month/day/hour/minute, or
year/month/day/hour/minute/second, or LocalDate object /
LocalTime object, and several others. Either way, the
of() method returns a LocalDate object.
For example:
// 15th May, 2020 4:45pm
LocalDateTime someTime = LocalDateTime.of(2020, 5, 15, 16, 45);
// overloaded version takes a Month enum:
LocalDateTime otherTime = LocalDateTime.of(2020, Month.MAY, 15, 16, 45);
This could be handy if you're getting your date
from your user using integer values (such as a numeric
input field for year, and some select drop-down lists
for the month and date).
Notice that there's an overloaded version of the
LocalDateTime.of() method that accepts a
java.time.Month enum value.
Often your user will enter the date as a String
e.g. "2018-05-15". In this case, you need to parse
the date. You could do this manually with your
own code:
There are also some classes that help you
do these exact same tasks in the java.time and
java.time.formatter packages.
java.time.DateTimeFormatter provides
methods that allow you to define date/time formats.
For example, the static DateTimeFormatter.ofLocalizedDate(string)
accepts a
FormatStyle enum constant (FULL, LONG,
MEDIUM, SHORT) and returns a DateTimeFormatter
object you can use to format a LocalDate using
ISO standards.
Alternatively, you can use pattern symbols
to create your own custom format string and then create
a formatter using the DateTimeFormatter.ofPattern()
method.
DateTimeFormatter formatter =
DateTimeFormatter.ofPattern("yyyy MM dd");
Once you have a formatter, you can then
use the LocalDate.format() to create
a formatted String for a date, or you can use
LocalDate.parse() to parse a String into a LocalDate object
(in which case the formatter is defining the format that
your date String should have, so you'd want to make sure
that any of those strings contain something that
actually does match the formatter).
For example:
// gets the current date
LocalDate rightNow = LocalDate.now();

// make a formatter for date# fullMonthName 4-digitYear
DateTimeFormatter formatter = DateTimeFormatter.ofPattern("dd MMMM, yyyy");

// get the current date as a String
String dateString = rightNow.format(formatter);

// get the current date as a LocalDate object from a String
LocalDate nowAgain = LocalDate.parse(dateString, formatter);
Date/Time Objects and Beans
Note that if you create a bean with a LocalDate, LocalTime,
or LocalDateTime object as a member, you'll have to make
sure your accessor and mutator methods do an object copy
instead of a reference copy when appropriate.
LocalTime rightNow = LocalTime.now();
// reference copy: the address of rightNow is copied to notNow
// so both variables point to the same object in memory
LocalTime notNow = rightNow;

// object copy: later is being given a copy of rightNow by creating
// an entirely new object with the same time values as rightNow
LocalTime later = LocalTime.of(rightNow.getHour(), rightNow.getMinute(), rightNow.getSecond());
Date and Time Input Fields
In an HTML form, you have the option of using the HTML5 date or
time input types. For example:
However, when you run this, you'll notice you get an error when
you submit the form:
2021-05-21 14:25:27.394  WARN 15116 --- [nio-8080-exec-2]
.w.s.m.s.DefaultHandlerExceptionResolver :
Resolved [org.springframework.web.method.annotation.MethodArgumentTypeMismatchException:
Failed to convert value of type 'java.lang.String' to required type 'java.time.LocalTime';
nested exception is org.springframework.core.convert.ConversionFailedException:
Failed to convert from type [java.lang.String] to type
[@org.springframework.web.bind.annotation.RequestParam java.time.LocalTime] for value '14:25';
nested exception is java.lang.IllegalArgumentException: Parse attempt failed for value [14:25]]
Basically, the controller isn't able to convert the time from our query string
into a LocalTime object. That's because the default format for a query
string date and time doesn't match the default used by the LocalDate,
LocalTime, and LocalDateTime classes. We have to configure the format
ourselves, and that will cause the controller to convert the date/time
in the query string into the correct format.
We can do this by adding the
@DateTimeFormat annotation to the date, time,
or local date/time parameter. We then set a property called "iso"
to the format we'd like to use. The iso property must be
set to one of the
DateTimeFormat.ISO enumeration values: DATE, DATE_TIME, TIME, or NONE.
In the example above, I used the TIME constant since I'm formatting
a time string into a LocalTime. If you had a date string to
be converted into a LocalDate, you'd use DateTimeFormat.ISO.DATE,
and for LocalDateTime you'd use DateTimeFormat.ISO.DATE_TIME.
Alternatively, you can also change the date/time format in
your project's application.properties file so that it matches
the format used by HTML. Recall that the application.properties
file is in the src/main/resources directory node in your project.
To change the date and/or time formats, just assign the format you
want to any of the values
spring.mvc.format.date (to format
the date), spring.mvc.format.time
(to format the time), and
spring.mvc.format.date-time (to
format the date and time as a single unit, i.e for a LocalDateTime
object). For example:
Here, I've made the formats for dates and times to match
the same formatting used by the HTML date and time input
fields. When you add these to your application.properties
file, you no longer need to use the @DateTimeFormat()
annotation on your date/time parameters.
Exercises
1. Create a new project and add
your Book bean to it
in a .beans package.
Create a form in /templates that allows a user to enter
the isbn (required, maximum 13 characters),
title (required),
author, price (required and must be a valid decimal number),
and genre.
If you like, you can create
a drop-down list box for the genres and use that to assign
a numeric value to the genre field, it would be good
practice/review).
The form page should map to the URL pattern
/newBook. The form action should map to the URL pattern /addBook.
The input form for entering Book data.
Add an input field to your form that allows the user to enter
a number of copies (this input is required and must be a valid
integer value of 1 or greater), and a submit button. Your
form should submit data via POST.
The handler method that processes the form should receive
all the input data as parameters. Remember that author
is optional.
If genre is not provided, use the value 1 as the default.
The handler method should construct an instance of Book and
set all the data members that were provided. Then it should
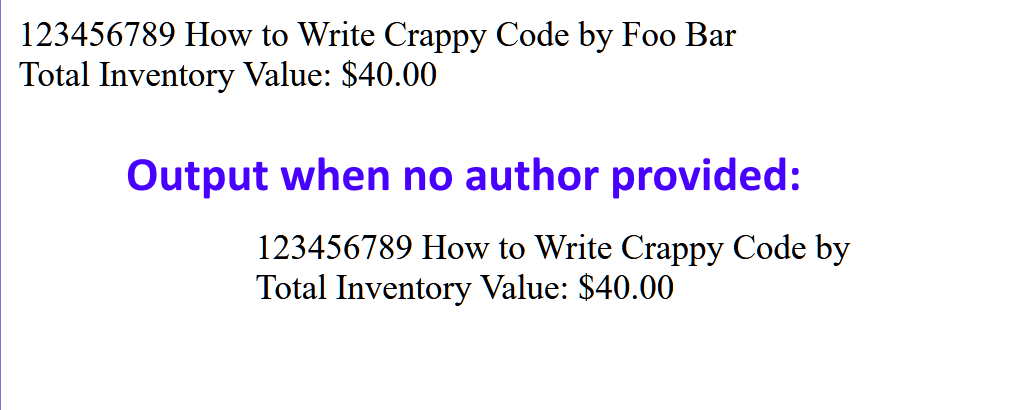
calculate the total value (book price * number of copies).
Build some basic response output that provides a response
in the following form:
book object as a string
Total Inventory Value: $x.xx
Where x.xx is the total value, formatted to 2 decimal places.
Other than what is mentioned, you don't have to format your output
with CSS unless you want to (you will have to hard-code it :P ).
Response output in the browser
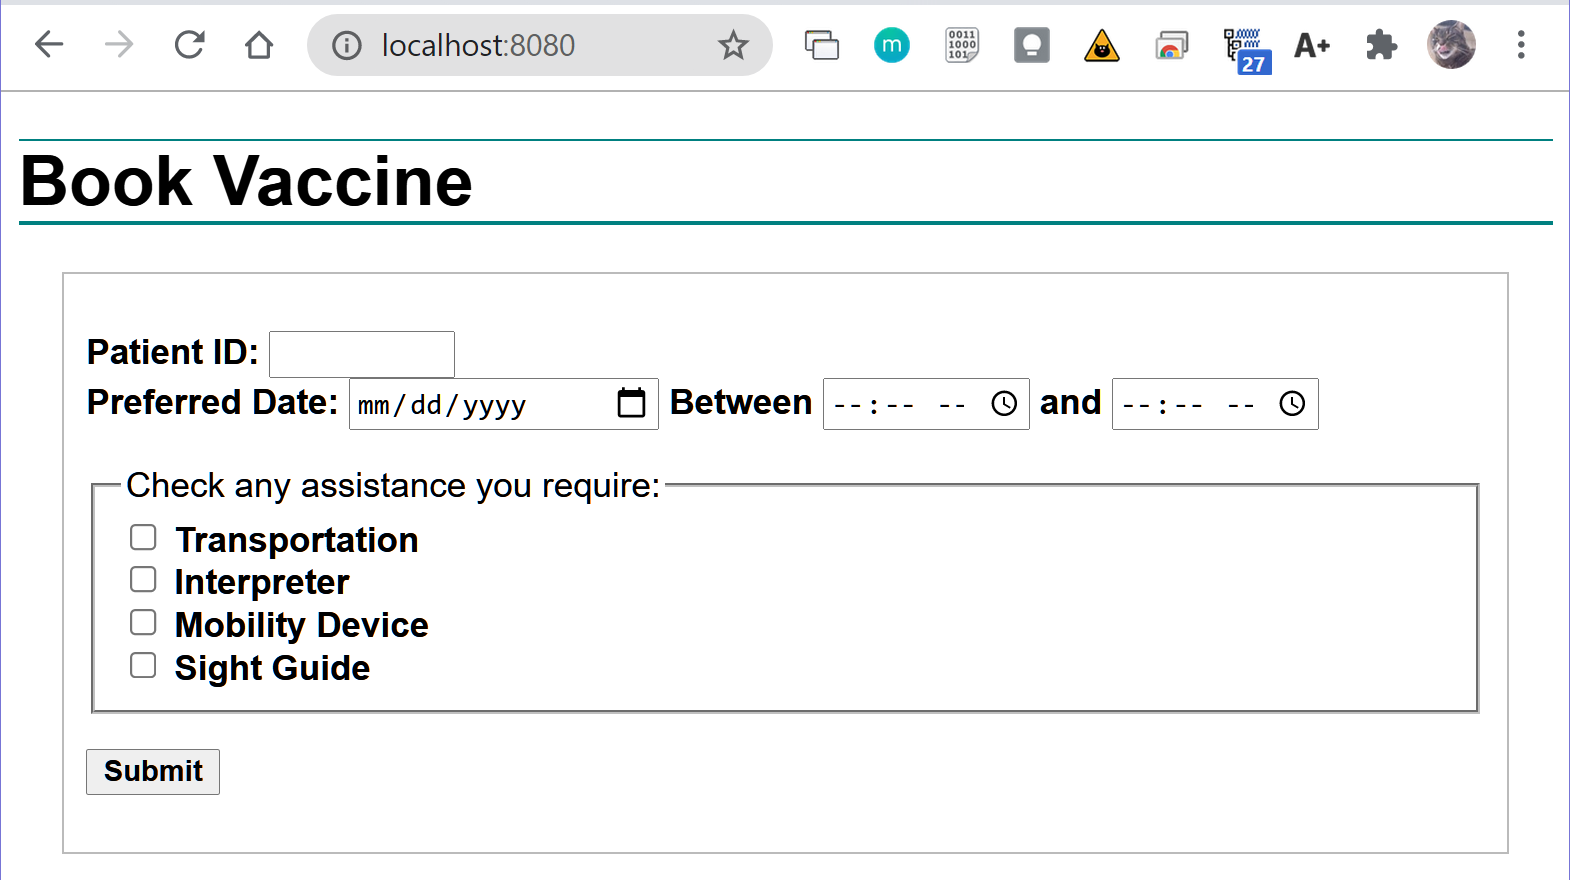
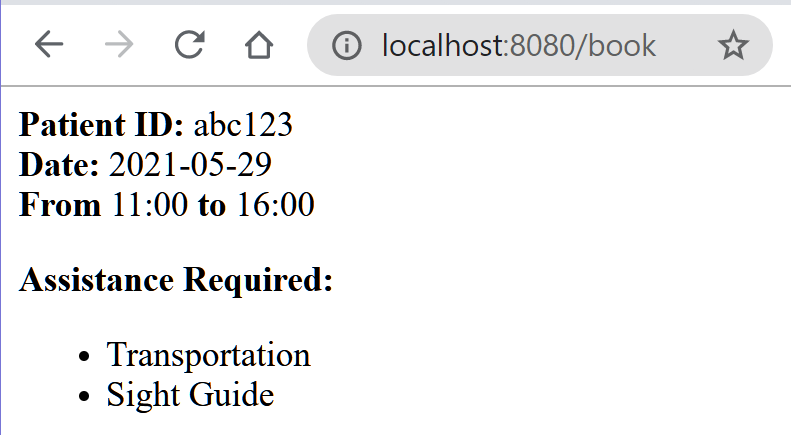
2. An application is needed for patients to book appointments
for vaccines. A patient will need to enter their patient ID
and indicate whether or not they require assistance with
their appointment. They also need to select a desired
date along with a range of times of availability.
A form should prompt the user to enter the patient ID
(any combination of numbers/letters), the date they prefer
for their appointment, and a range of times of availability
(a start time and end time, e.g. if someone is available from 9am
to 12:00, the would choose 9am for the first time and 12:00pm for
the second box. The form should also include 4 check boxes
to ask if the patient needs assistance: Transportation,
Interpreter, Mobility Device, Sight Guide.
See the screen shot below. The form should send data via POST,
since patient data is always private.
Form to book an appointment
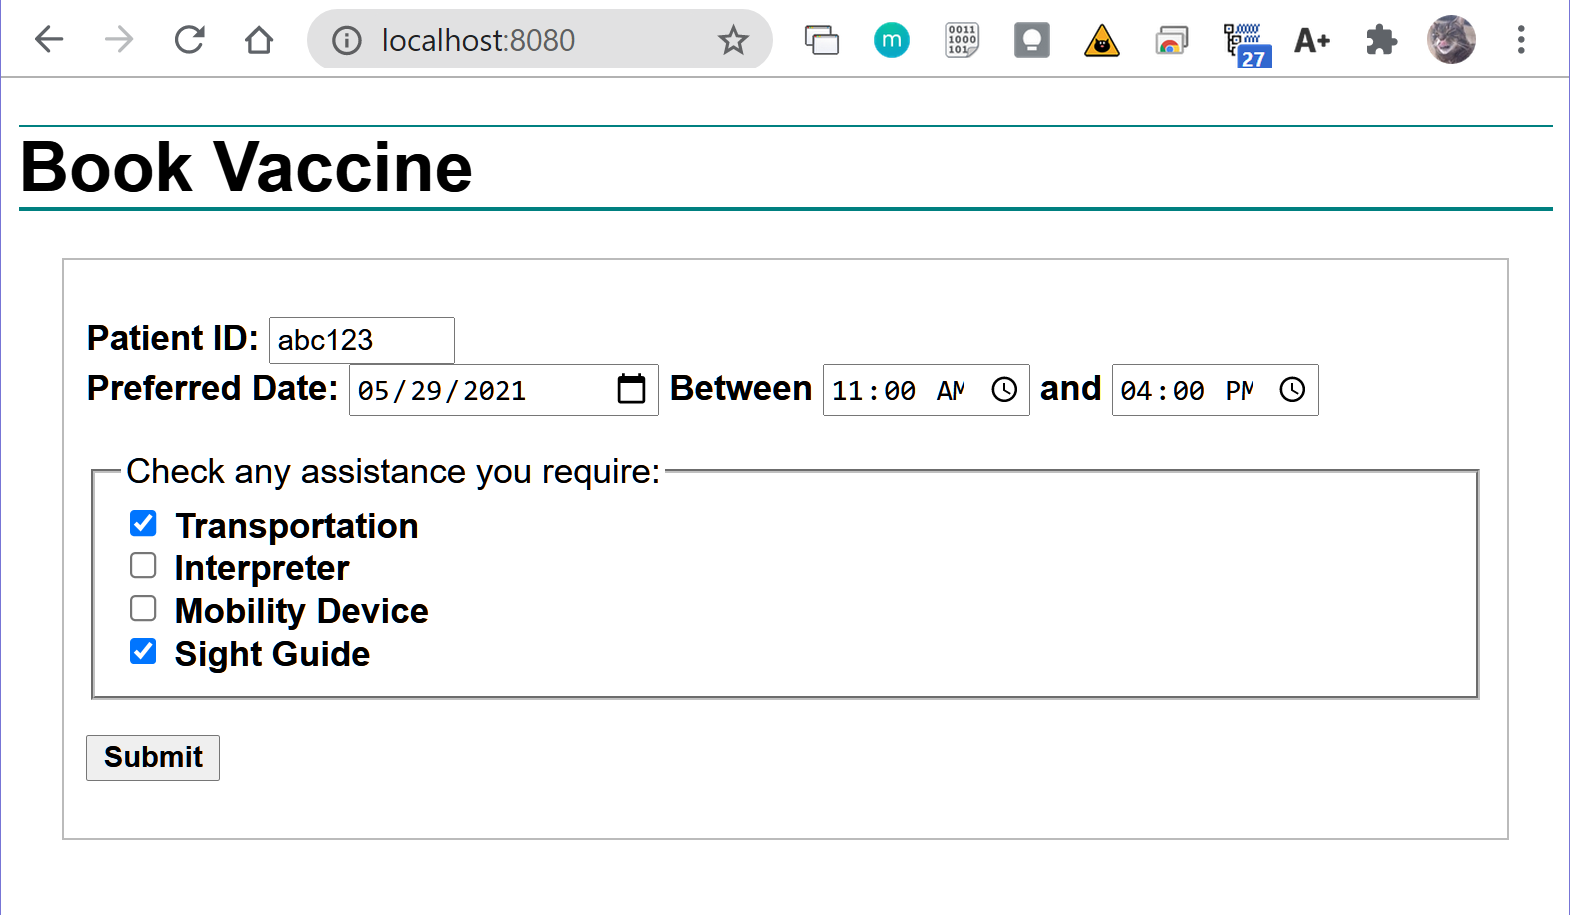
The four checkboxes are not mutually exclusive: the user can
check any number of them: one of them, some of them, or
none of them. The checkboxes are an array (i.e. they all
have the same name). I used Strings for the checkbox values
because it's going to be way easier/less coding in the handler
method!
Don't forget to make your form accessible by properly nesting
label/input elements, and by including fieldset/legend for the
check boxes.
The form should be in the /templates folder and be mapped to
the root "/".
The handler method that processes the form inputs should
receive each input value and add some output to the
response in the following format:
Response output for appointment booking form
You don't have to add any fancy formatting, but the checkbox items
that are checked must appear in an unordered list. Note that if
the user doesn't check any boxes, the list doesn't appear at all, not
even the "Assistance Required:" heading or empty list container elements:
Response output for appointment booking form with no assistance