Refresh
this page because I am probably still making changes
to it.
JUnit tests are an important part of program development:
Nothing is worse than presenting your application to the client
and having it crash, or receiving the angry phone call from
a user complaining about a program that doesn't work as
it should. In this lesson we'll use your prior experience
with JUnit testing to test your Spring applications.
Imagine you are demonstrating your program to the client to show them how
the project is coming, and the program crashes due to a bug or coding
error! Your client is not going to be impressed. Imagine you developed
an application for a client and a bug or mistake caused them to lose
thousands (or hundreds of thousands) of dollars. Imagine you developed
a part of the software for autonomous
vehicles, a piece of vital medical equipment, or an air control system.
Mistakes in those applications could cost lives.
Why do we unit test, why do we use tools like JUnit? Why
don't we just look at our code and desk-check it (go over it
manually and write down what the values of variables are, what
is output, etc)? Why don't we just add a bunch of System.out.println()
statements to make sure our code is doing what it should be doing?
The process of using printlns is actually referred to as
LMAO (Looking Manually At Output), or even more specifically,
LMFAO (Looking Manually For Abnormal Output). The problem
with this technique is that:
It's tedious and time-consuming - do you really want
to spend time examining hundreds or thousands of lines
of output?
It's prone to error: when you're looking at hundreds or
thousands of bits of output, you're very likely to miss
or overlook something.
You'll have to change/update your printlns every time
you modify something in the code that might change
values of variables, outputs, etc.
For example, say you decide to modify the player/teams program to include
the ability to add, edit, and remove teams. You have to make sure that
all the parts of the program that work with a team still function: adding/editing/deleting
a player, creating the drop down list of teams, retrieving the list of teams, etc.
You'll have to add printlns to track all the variables, data members, method outputs,
sql query results, parameters, and anything else having anything to do with the teams.
In a large application for a professional league like the NHL or World Cup Football,
where you're also keeping track of games and matches, scores and game details,
this gets to be a tedious process that in some cases might take so long that it
becomes impossible. Additionally, inspecting this kind of data visually is not
guaranteed to find mistakes: humans are prone to error and after just a few
solid minutes of examining output, it's very easy to miss something.
Tools like JUnit can make this process easier and automated.
You don't have to look over hundreds of lines of output: a simple set of
JUnit tests can tell you right away if actual results don't match
expected results.
Unit tests are run every time the project is rebuilt,
so it's automatic. Where visually inspecting output might tell you of any
current mistakes, unit testing can flag mistakes in future builds without
you having to do a lot of extra work. In fact, many programming teachers
use unit tests to test your code in your assignments! It's much faster
than manually testing the program with different data sets!
JUnit Setup
JUnit is already part of the Spring Web
dependency. You can view it in your POM file. You'll see it
as "spring-boot-starter-test". In fact, if you look at the XML
code for your POM file, you'll notice it looks like this:
The <scope>test</scope>
element means that this dependency will be ignored when
this application is packaged and deployed. Anything with test-level
scope is treated this way, and that's a good thing: you don't
want those things taking up space/resources in your application
when they're not something the client would need or use.
If you're using an older version of Java (15 or earlier) you might
have problems with JUnit5 and will need to set up your projects
to use JUnit4. You only need to follow the instructions
below if you can't run JUnit5.
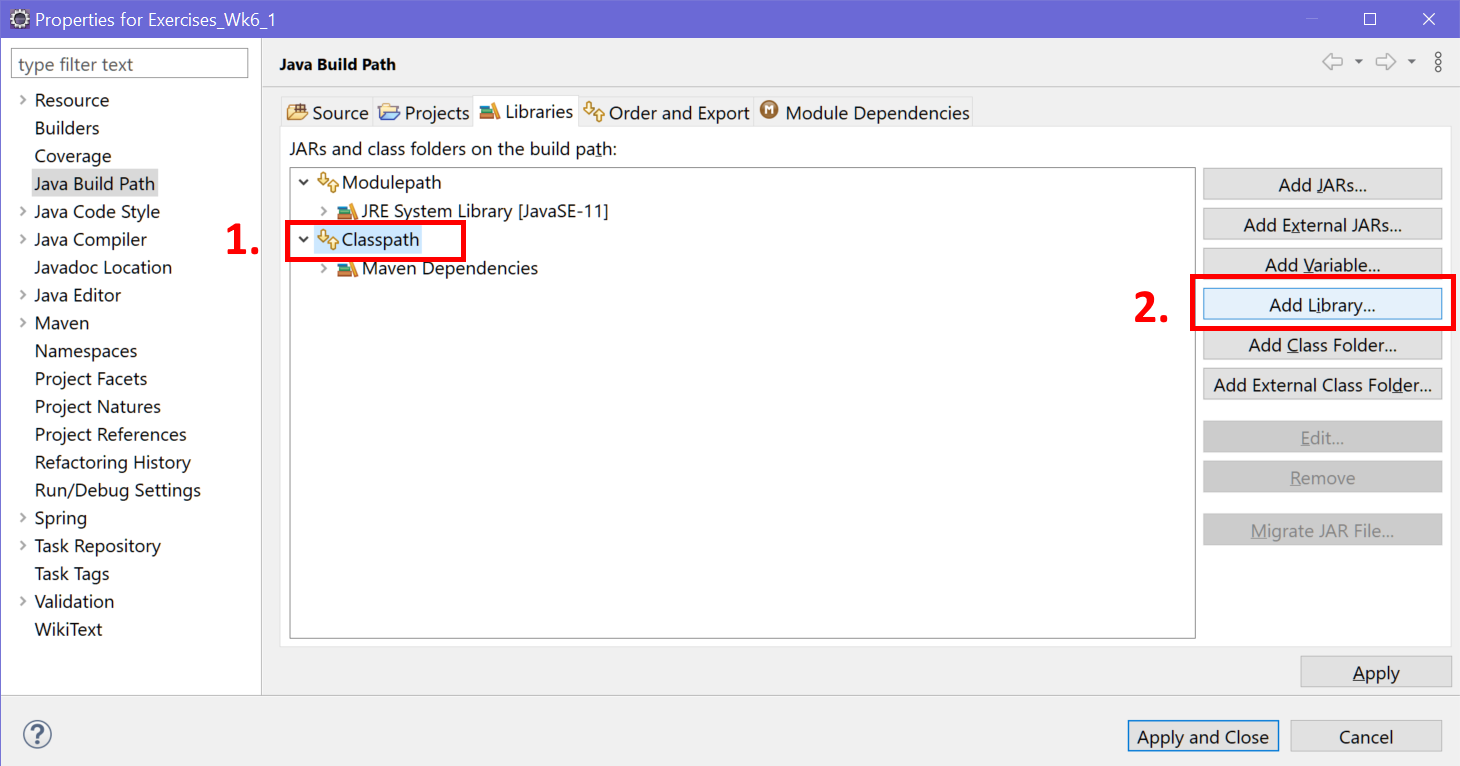
Right-click the project in which you want to use JUnit and
select Build Path > Configure Build Path.
In the Libraries tab, select "Classpath". Then
click "Add Library".
Add a library to the Classpath
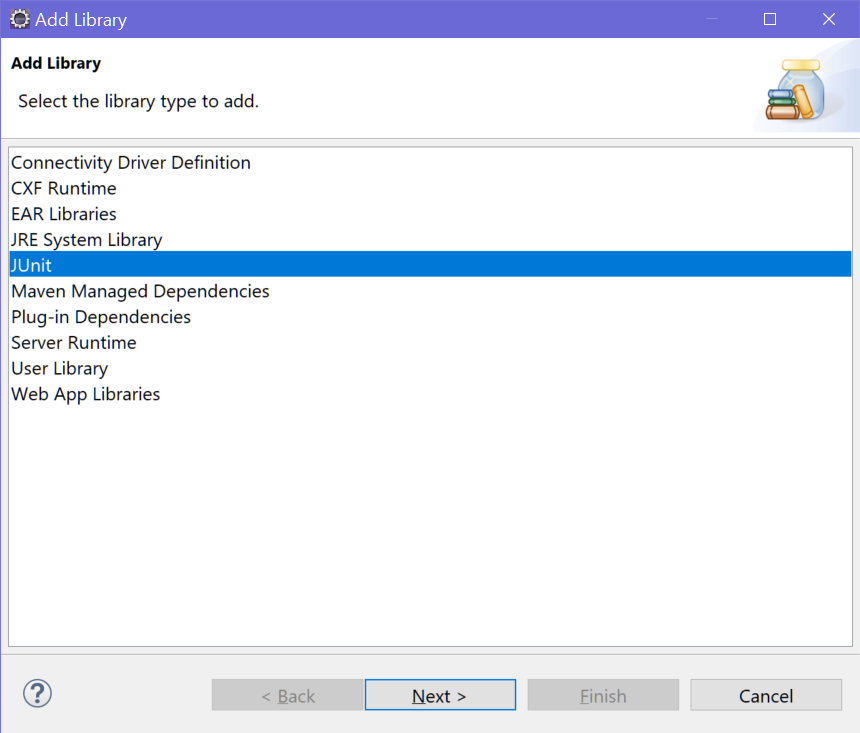
In the "Add Library" dialog, select "JUnit" and then click NEXT.
Select JUnit and click NEXT
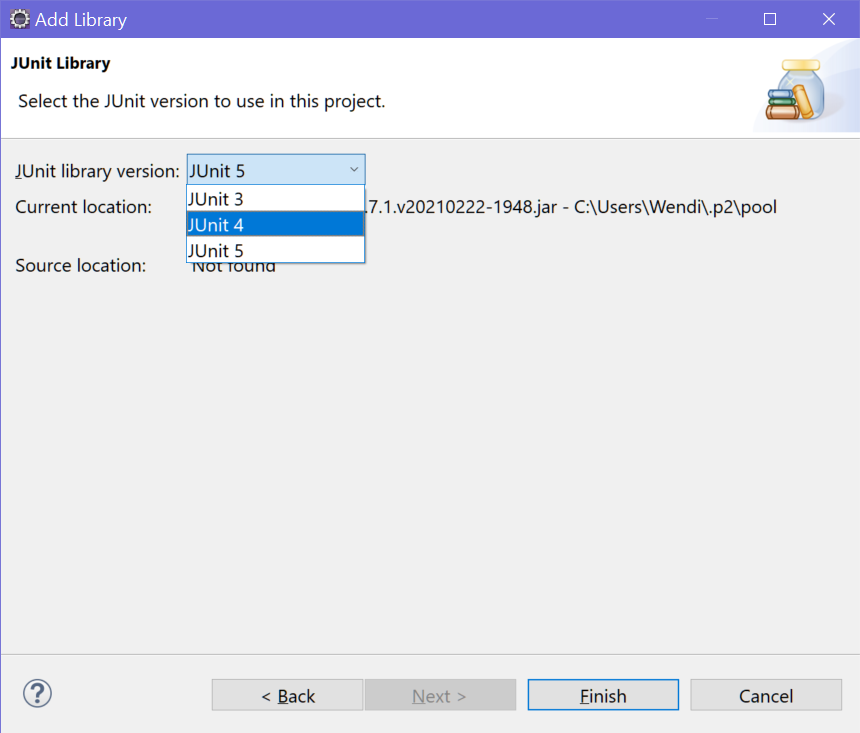
In the next dialog, select JUnit4 and then
click FINISH.
Select JUnit4 and click FINISH
In the build path, ensure that JUnit4 is now listed under
Classpath. Don't click Apply and Close yet.
Verify JUnit 4 is under Classpath
Now, make note of the Java SE version
that's listed under the Modulepath in the same window where you just
added JUnit4 to the classpath. In the first image above, you can
see above my classpath node is the modulepath node, and it
lists Java SE-11.
In the list along the left side, select "Java Compiler".
If prompted to apply changes to the build path, go ahead
and say Yes/OK.
Near the top of the dialog for Java Compiler you'll see
"JDK Compliance" and under that, a checkbox for
"Use compliance from execution environment....".
Look at the drop down list on the right: it should have
the same version number as the one you just made note
of under the modulepath setting. If not, change it to
the correct number. If the list is disabled, uncheck
the checkbox to enable the drop-down list.
Click APPLY AND CLOSE, even if you didn't need to
make any changes to this dialog box.
If you didn't have to make any changes to the Java Compiler
settings, you likely never will until you install a new
Java version, so with future projects, you can skip
those steps.
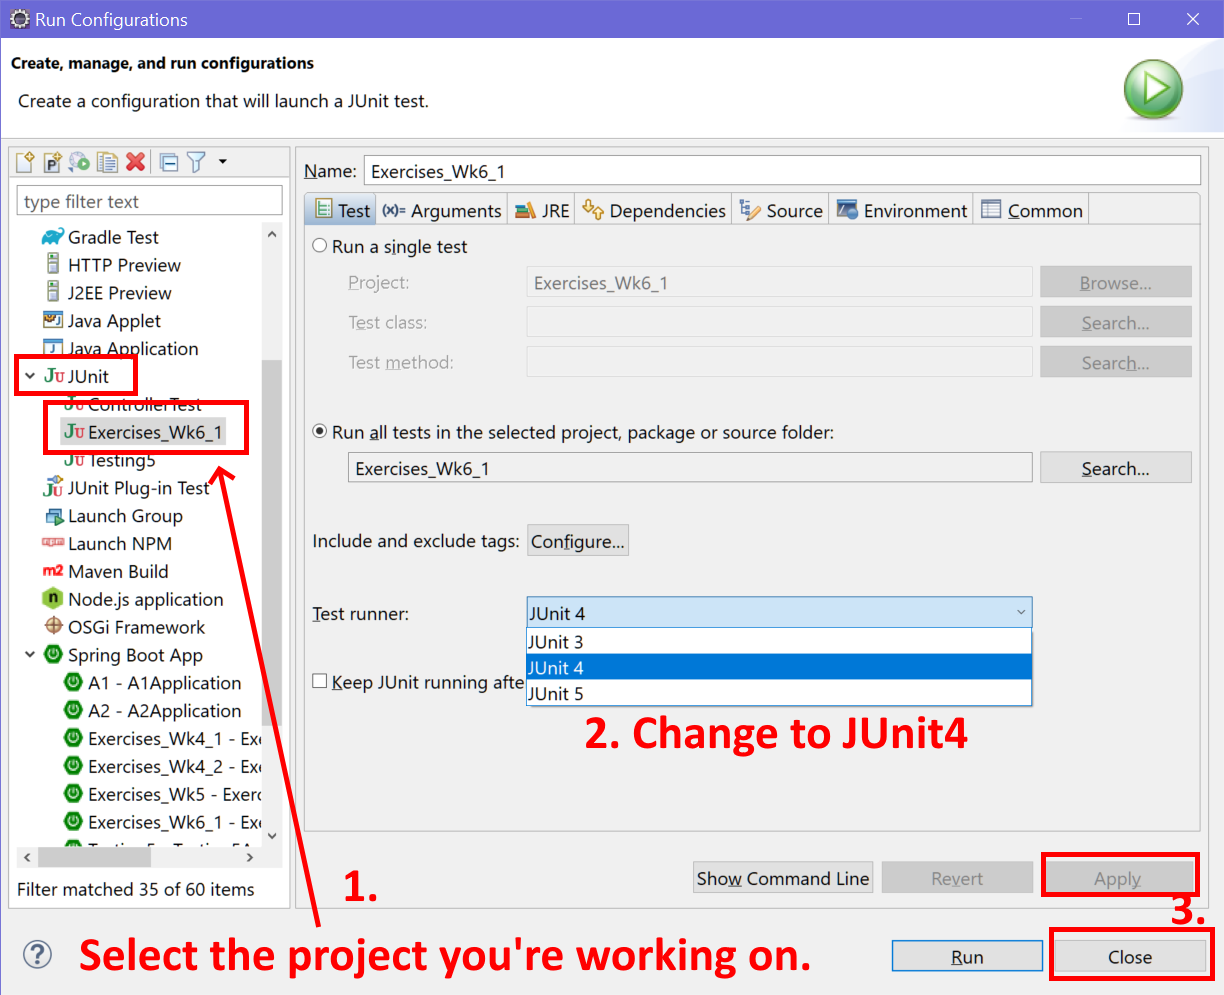
Now you have to edit the default JUnit Run Configuration for the
current project and make sure it's set to JUnit4.
Right click your project and select Run As > Run
Configurations.
Change Test Runner to JUnit4
NOTE: if you don't see an item for your current project
in the JUnit category, make sure the "JUnit" node is
selected and then click the tiny "New Launch Configuration"
button right above the "type filter text" field.
Find the JUnit node in the list on the left and open it.
Then look for your current project and select it.
In the middle of the dialog on the "Test" tab,
look for "Test Runner:" and
select "JUnit 4" if it's not already set.
Click APPLY, then click CLOSE
Database Tests
Let's get right to it and try it out. Open up your project
for Exercise 3 from the lesson on Sessions.
If you chose not to complete that exercise, use any project
where you've done some database access.
Database Access Tests
We'll start with some database access tests. In the Project
Explorer, go to your project node's src/test/java directory
and expand it. This is where all of your JUnit test classes
go!
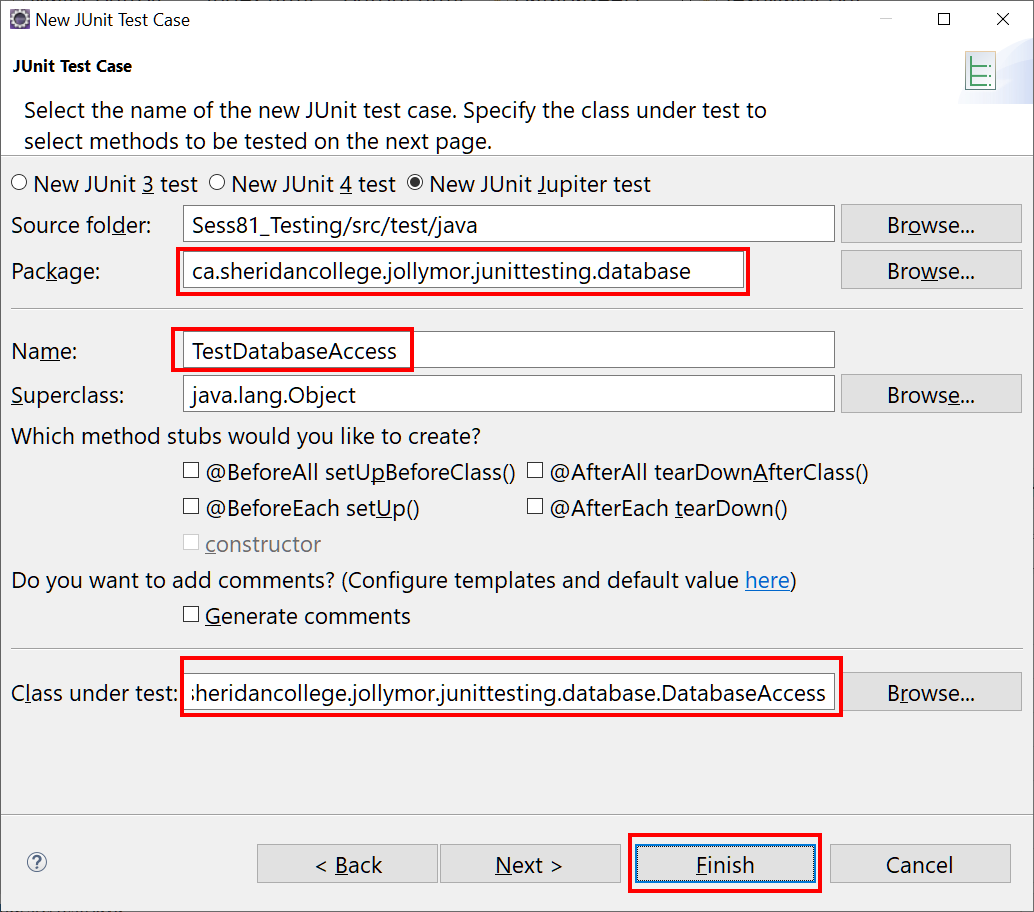
Right-click the package in there and select New > Other and
then search for and select JUnit Test Case.
Then click the NEXT button.
Make sure this class goes in the .database package
for this project: add ".database" to the end of the value in the
"Package:" field. You should organize your test classes
exactly like you would organize any other classes.
Name the class "TestDatabaseAccess" (add this value to
the "Name:" field).
Recall from Software Development class that you should
always use names that start with "Test" followed by
the class or component you're testing.
In the field "Class Under Test:" type in the fully-qualified
name of the class you're testing. In this case, the name
of your DatabaseAccess class, including the package name
(e.g. my.domain.thingy.database.DatabaseAccess)
You can also try the BROWSE button: enter the name of the
class you want to test and then select it from the list.
Update the package name, enter the class name and the
fully qualified name of the class you're testing.
Above the class header, add the following annotations:
If you're using JUnit4 ONLY:@RunWith(SpringRunner.class)
If you're not using JUnit4, you don't need to add @RunWith() and
you can skip to the next step.
@RunWith defines the test runner to use for these unit
tests. If you don't specify one in the parentheses, JUnit
will use a default runner.
Specifying SpringRunner.class allows us to include the
@Test annotation on our testing methods.
SpringRunner is in org.springframework.test.context.junit4
and I notice that I'm unable to automatically import it
in Eclipse until after I've imported @SpringBootTest and @RunWith, so
you might want to do that one last when you're doing your
imports.
This annotation tells Spring Boot to look for a main configuration
class (one that is annotated with @SpringBootApplication (see the
First
Spring Boot Application lesson), and you
should recall that our startup class in the package root has this
annotation) and to use that class to start up a Spring application
context.
In other words, it's identifying which class contains all the information
needed to create a new application in which we can perform
our tests, one that mirrors the actual application.
This annotation sets up an H2 in-memory database using our
application's configuration settings (those defined in application.properties
and also in schema.sql and data.sql) that we can use in our tests.
Adding these annotations will allow us to create test methods inside this class
that will be able to run on a "test version" of our application, including
the database we've created.
So we're ready to add some test methods. To test our database access
methods, we need a DatabaseAccess instance! We can @Autowired one in:
@Autowired
private DatabaseAccess da;
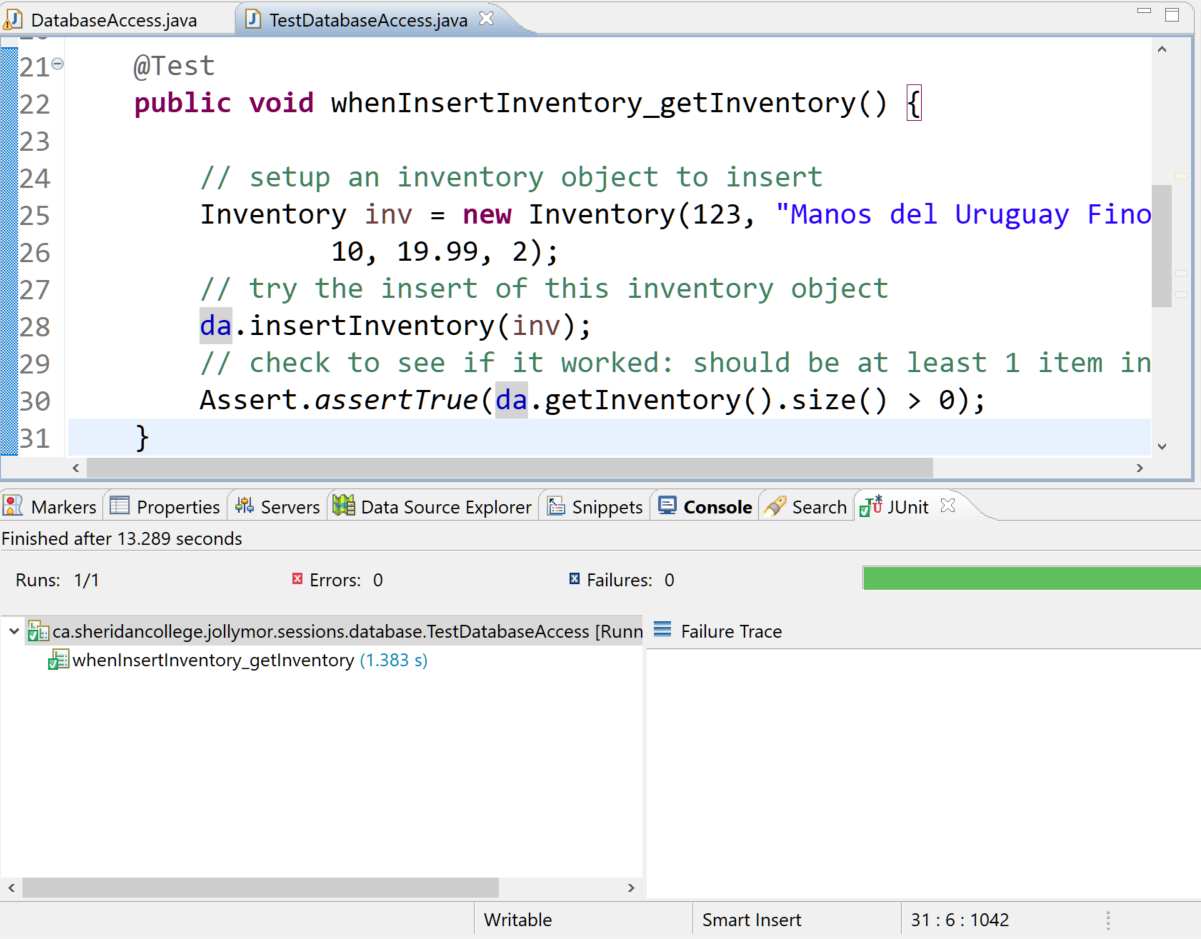
Now let's add a method to test our inventory insert method:
@Test
public void testInsertInventory_getInventory() {

    // setup an inventory object to insert
    Inventory inv = new Inventory(123, "Manos del Uruguay Fino Storm Glass",
            10, 19.99, 2);
    // try the insert of this inventory object
    da.insertInventory(inv);
    // check to see if it worked: should be at least 1 item in returned map
    Assert.assertTrue(da.getInventory().size() > 0);
}
@Test
public void testInsertInventory_getInventory() {

    // setup an inventory object to insert
    Inventory inv = new Inventory(123, "Manos del Uruguay Fino Storm Glass", 10, 19.99, 2);
    // try the insert of this inventory object
    da.insertInventory(inv);

    // check to see if it worked: should be at least 1 item in returned map
    Assertions.assertTrue(da.getInventory().size() > 0);
}
This example constructs a new Inventory object and then
attempts to insert it using our database access method
insertInventory(). We're also testing our getInventory()
method too, since we're using it in our assertion:
after performing an insert, the size of the inventory list
we retrieve must be greater than 0, otherwise the test
fails.
Give it a try: Run your tests by right-clicking the project
and selecting Run As > JUnit Test. It will take a bit
longer than usual, but when it's done, check the JUnit
tab near the bottom part of the Eclipse window and you
should see if the tests succeeded or failed.
Running a test that passes
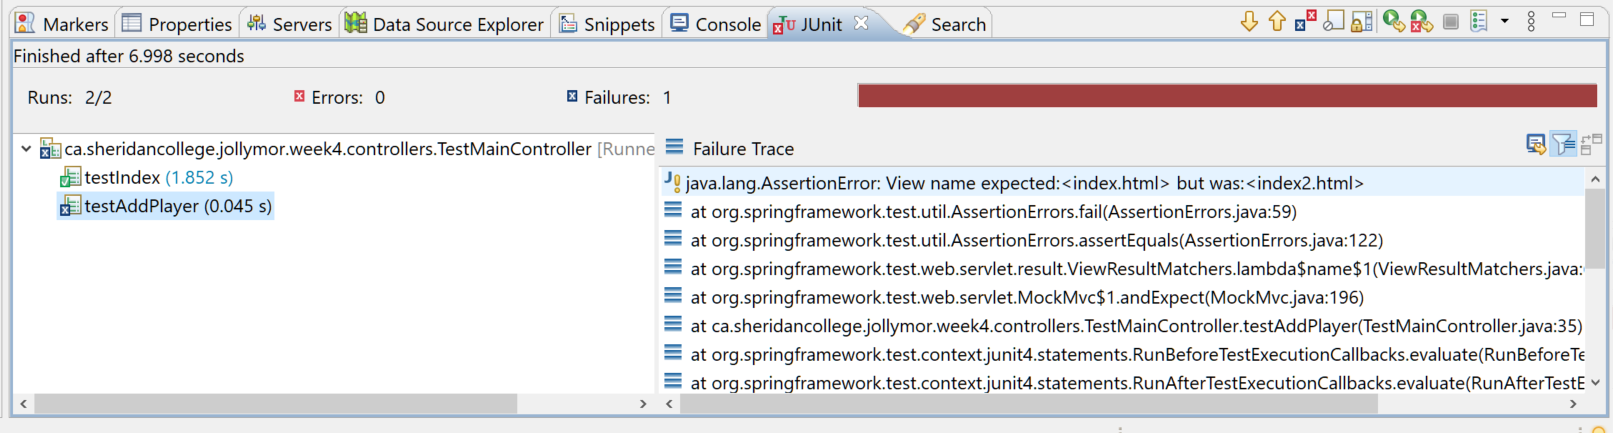
If any of the tests failed, it will be obvious because
they'll be marked. Check the test results to find out
why they failed and fix the problems.
Running a test that fails
If you've already got some inventory records
in your inventory table, this test doesn't really tell
us much at all. Perhaps a better test might be to
check how many records we have, attempt the insert, and
then make sure that the new number of records is one
more than it was before:
@Test
public void testInsertInventory_getInventory() {

    // setup an inventory object to insert
    Inventory inv = new Inventory(123, "Manos del Uruguay Fino Storm Glass",
            10, 19.99, 2);

    // get # of records
    int origNumRecs = da.getInventory().size();

    // try the insert of this inventory object
    da.insertInventory(inv);

    // get the new # of records
    int newNumRecs = da.getInventory().size();


    // JUnit4: ------------
    Assert.assertTrue(origNumRecs + 1 == newNumRecs);
    // or this works too:
    //Assert.assertEquals(origNumRecs + 1, newNumRecs);
    // --------------------

    // JUnit5: ------------
    Assertions.assertTrue(origNumRecs + 1 == newNumRecs);
    // or this works too:
    //Assertions.assertEquals(origNumRecs + 1, newNumRecs);
    // --------------------
}
In this code, we find out how many records there are, do the
insert, and then get the number of records again. Then
we perform an assertion that tests to see if the original
number of records plus 1 is equal to the new number of
records.
You could test a delete in the same way: just get the number
of records before and after a delete query, and make
sure that the original number of records is one less
than the new number of records.
Another way to test insert, delete, and update queries is
to test the number of rows affected. For example,
I created an update method in my application that returned
the number of rows affected after an update query:
public int updateInventory(Inventory i) {
String sql = "UPDATE inventory SET itemName=:name, "
    + "quantity=:qty, price=:price, category=:cat"
    + " WHERE itemId=:id;";
.. etc etc...
return jdbc.update(sql, params);  // update() returns # of rows affected
}
I could now write a JUnit test to test the update method:
In this test I'm first creating an inventory object for
one of the actual inventory items I've already added to
my inventory table via the data.sql file. If you prefer,
you can always do an insert of a valid item and then
retrieve that item and edit it, but that would then
be testing 3 different methods, and it's better to
ensure your unit tests are testing one specific thing
where possible. Regardless, you must test the update on
an inventory item that actually exists, otherwise your
update will fail.
After creating the inventory object, I write some code to edit
the values, then I attempt to perform the update and perform
an assertion that checks to make sure the update method
returns a 1, for "1 row(s) affected".
Good, Bad, and Boundary Tests
Recall that you must always perform a good test, a bad test, and a
boundary test. There isn't much we need to worry about for
boundary tests with our database methods, but we can definitely
add some bad tests to our good tests.
First, I'm going to change the methods names to reflect
that we're doing a good insert test and a bad insert test,
and a good update test and a bad update test:
@Test
public void testInsertInventory_getInventoryPass() {
...
}

@Test
public void testUpdateInventoryPass() {
...
}
Exercise
Add a test method testUpdateInventoryFail().
testUpdateInventoryFail() should perform an update that
should fail (e.g. update a record with an ID that doesn't
exist in the inventory table or change a field value to
something invalid). The method itself should pass,
but your test should be checking to make sure that the update
failed.
Testing for Exceptions
What if we want to test code that might throw an exception?
For example, testing the insertInventory() with a duplicate
primary key will throw a org.springframework.dao.DuplicateKeyException.
We can write a @Test method to test the failure of the insertInventory()
method to make sure it throws a DuplicateKeyException when it's supposed
to.
If you're using JUnit4, you do this by adding the expected
parameter to the @Test attribute:
@Test(expected = DuplicateKeyException.class)
public void testInsertInventory_getInventoryFail() {

    // setup an inventory object to insert with a duplicate primary key
    Inventory inv = new Inventory(77633, "Manos del Uruguay Fino Storm Glass",
             10, 19.99, 2);

    // try the insert of this inventory object (will fail)
    da.insertInventory(inv);

}
If you're using JUnit5, you can use the assertThrows() method.
This method accepts the type of exception you're expecting
and a lambda (like a callback) of the method you want to test:
@Test
public void testInsertInventory_getInventoryFail() {

    // setup an inventory object to insert with a duplicate primary key
    Inventory inv = new Inventory(77633, "Manos del Uruguay Fino Storm Glass",
	        10, 19.99, 2);

    // make sure method throws DuplicateKeyException when we insert
    assertThrows(DuplicateKeyException.class,
	        () -> da.insertInventory(inv));

	}
This test will attempt to perform the insert on an
inventory item with a duplicate key, and that will
result in the DuplicateKeyException. The
test method is watching for this and will let you
know that it occurred.
assertThrows() returns an Exception object so if you want,
you can also do an assertion to test that the exception's getMessagse()
contains a certain message.
Exception ex =  assertThrows(DuplicateKeyException.class,
        () -> da.insertInventory(inv));
    assertTrue(ex.getMessage().contains("primary key violation"));
Controller Tests
You should also test controller methods. When testing controller
methods, we're really testing to see if they execute as we
expect them to when HTTP requests are made to certain
URLs. Usually we want to make sure that they load the right
resource, but sometimes we also might want to make
sure they also get certain results from other methods
and/or have certain things in the model.
But how can we write code to create an HTTP request
to test out a controller method? We actually use
a "mock MVC" environment with "mock requests". We
just create a fake or pretend MVC environment and
tell it to send fake or pretend requests to
our handler methods! Try it!
Add a new class to your src/main/test directory called
TestMainController
(or Test, followed by the name of your
main controller class) and make sure it's in the .controllers
package.
For this part of the demonstration, I'm going to test the
very basic handler method that loaded the index page from
the very first inventory demonstration in the lesson
on Sessions (it loaded the
inventory index page with a blank Inventory object that
we bound to the form):
@GetMapping("/")
public String index(Model model, HttpSession session) {

    model.addAttribute("inv", new Inventory());
    return "index.html";
}
If you're using JUnit4, add the annotation for @RunWith(SpringRunner.class).
If you're using JUnit4 or JUnit5, add the annotation
@SpringBootTest. Add the @AutoConfigureTestDatabase
annotation, also: even though we're not using the database class
directly, the controller autowires the same database access class we're
autowiring in the other test class. If we don't include this annotation,
the program will try to set up the database twice and you'll get errors when
it tries to create tables that already exist.
@AutoConfigureMockMvc creates a fake MVC server environment
for us to test in. This allows our HTTP requests to be called
without the cost of starting (or re-starting) the server every time.
It runs our tests on a full Spring application context without
wasting server resources. This means that it's only testing
the layer below the server where Spring handles any incoming
HTTP requests: it hands these requests off to the controller
so we can test our controller methods cheaply. So basically,
it allows us to create "fake requests" from a "fake view"
to our controller so that we can test the controller
methods.
Adding the @AutoConfigureMockMvc also automatically
injects an instance of the
MockMvc class
so that we can use it to perform test HTTP requests
as if they were real requests. This means we'll want
to @Autowired a MockMvc inside our test class:
@RunWith(SpringRunner.class) // only if you have JUnit4
@SpringBootTest
@AutoConfigureTestDatabase
@AutoConfigureMockMvc
public class TestMainController {

    @Autowired
    private MockMvc mockMvc;

}
Now let's add a method to test the loading of the inventory
index page:
Note that these methods that test controller handlers will
all include the throws Exception
clause in the method header.
Some of the test methods you'll be calling could throw
unchecked exceptions, so we must include this clause,
since there's no point in using a try-catch.
This code is going to prompt several static imports, and
that's fine:
The testLoadingIndexPass()
method uses the MockMvc class's
perform() method to perform a GET
request (you can probably guess that if we were doing a POST
request, you would use mockMvc.perform(post(...))
instead).
The perform() method accepts a
RequestBuilder object, which models
a specific (fake) HTTP request. In this case, get()
returns an HTTP GET request. If you used post(),
that would return an HTTP POST request.
These methods create "fake requests" that
we can test our handler methods with: we're sending our fake request
to the controller to see what the controller does with this
request. Hopefully the controller executes the correct handler
method successfully!
The perform() method returns a
ResultsAction object, which models
a specific action we are expecting, and we can use assertions
to test the ResultsAction to see if everything is as we
expect it to be.
One method we might invoke upon a ResultsAction is the
andExpect() method.
This is how we perform an assertion: we give andExpect()
a ResultsMatcher object, which models the of assertions
we want to match. Confused yet? Don't worry - once you see
how it works, it's super easy.
Once we invoke mockMvc.perform(get("/"))
to create our fake GET request, we then want to take the ResultsAction
and perform assertion on it. So we then invoke andExpect()
twice to check 2 assertion
andExpect(status().isOk())
checks that the status of
the request is 200/OK. status().isOk()
is a ResultsMatcher and it will assert true if the fake request returns 200/OK
as its status.
andExpect(view().name("index.html"))
checks that the method successfully loads the view called "index.html".
view().name() is also a ResultsMatcher
and it will assert true if the fake request results in the index.html page
being loaded as the response.
So this whole statement just says, "Perform a fake GET request to the
application root and assert that it returns a 200/OK status
and successfully loads the index.html page."
What would a fail test look like for this handler method?
If the request URL didn't match the pattern, then
the handler method wouldn't successfully load the
index page:
@Test
public void testLoadingIndexFail() throws Exception {
    this.mockMvc.perform(get("/foo"))
        .andExpect(status().isNotFound());
}
In this test, we expect that we get a status code of
404 (Not Found) if we request the URL with the pattern
"/foo"
Another method you could invoke on a ResultsAction is the
andDo() method. You give
andDo() a
ResultsHandler object,
which models a generic action you might perform on a
response. It's not that exciting, we usually only use it
for logging. For example, andDo(print())
will print a log of the results of the request to
standard output. It's worth trying just to see what
kind of helpful information it prints:
Note that this will cause the editor to prompt you to import
org.springframework.test.web.servlet.result.MockMvcResultHandlers.print.
Run a JUnit test and see what this testLoadingIndex() does!
Check the console so you can see the output that andDo(print())
produces!
Here's sample output that mine showed, in case you don't want to try
it yourself:
MockHttpServletRequest:
HTTP Method = GET
Request URI = /
Parameters = {}
Headers = []
Body = null
Session Attrs = {}
Handler:
Type = ca.sheridancollege.jollymor.sessions.controllers.MainController
Method = ca.sheridancollege.jollymor.sessions.controllers.MainController#index(Model, HttpSession)
Async:
Async started = false
Async result = null
Resolved Exception:
Type = null
ModelAndView:
View name = index.html
View = null
Attribute = inv
value = Inventory(itemId=0, itemName=null, quantity=0, price=0.0, category=0)
errors = []
FlashMap:
Attributes = null
MockHttpServletResponse:
Status = 200
Error message = null
Headers = [Content-Language:"en", Content-Type:"text/html;charset=UTF-8"]
Content type = text/html;charset=UTF-8
Body = [this is where it spewed out the HTML code for the index page
but I didn't feel like manually escaping all the < and > symbols into
< and > so just imagine all the HTML code for that here]
Forwarded URL = null
Redirected URL = null
Cookies = []
Another thing you might want to check in the test method is
whether or not the model attribute "inv" was successfully
added to the model. We can do this using the
model().attributeExists(key)
method, which is also a ResultsMatcher
that asserts true if a model attribute with the key "key"
exists. For example, we can update our test method as:
What if we wanted to test the method that adds the
new Inventory object to the CopyOnWriteArrayList?
Recall that we had a method in our handler in the
Sessions exercises that retrieved a bound inventory
object from the input form and added it to an array
list:
@PostMapping("/addItem")
public String addItem(Model model, @ModelAttribute Inventory inv,
        HttpSession session) {

    Object o = session.getAttribute("inventory");
    List<Inventory> list = null;

    if (o == null) {
        list = new CopyOnWriteArrayList<Inventory>();
    } else {
        list = (CopyOnWriteArrayList<Inventory>)o;
    }
    list.add(inv);
    session.setAttribute("inventory", list);

    return "inventory.html";
}
This handler requires a model attribute (the inventory
object to add) and a
session attribute (the list of inventory objects).
How do we test this handler
method and give it the values it needs in order
to work? We use flash attributes
and session attributes.
The flashAttr()
method is one of the RequestBuilder methods and
it allows you to simulate parameter inputs
that your handler method needs (such as @RequestParam params,
@ModelAttribute params, etc.)
The sessionAttr() method
is also a RequestBuilder method and it
allows you to simulate session attributes that
your handler method relies on.
Both of these methods belong to RequestBuilder objects,
so you invoke them by chaining them onto
the get()
or post() method
(e.g. get(...).flashAttr(...)).
Both methods accept a key and value pair representing
the parameters you're assigning values to.
For example,
our handler method needs a @ModelAttribute
Inventory inv.
So we can set this using the following code:
Inventory testInventory = new Inventory(32165, "Manos del Uruguay Fino Storm Glass",
    10, 19.99, 2);
this.mockMvc.perform( post("/addItem").flashAttr("inv", testInventory)) ...
I added an extra space inside the perform( ) parentheses to
make it clear that both flashAttr() is
invoked on the return value from post().
So we can now start creating a test method to test the
functionality of the addItem() method:
@Test
public void testAddItem() throws Exception {

    Inventory testInventory = new Inventory(32165, "Manos del Uruguay Fino Storm Glass",
            10, 19.99, 2);
    this.mockMvc.perform( post("/addItem").flashAttr("inv", testInventory) )
        .andExpect(status().isOk())
        .andExpect(view().name("inventory.html"));
}
Here we're saying, "perform a POST request to /addItem and
include a parameter for the inventory object we constructed,
and then assert that the status was 200/OK and the inventory.html
page loaded successfully".
If you want to test with session attributes, you can use sessionAttr().
For example, say we want to test this handler method from the
database version of the inventory program:
In this handler, we're relying on a session attribute called
"edit": if it contains the boolean value false,
we assume we're doing an update,
but if it contains the value true, we assume we're doing an add/insert.
How can we write unit tests for add and update?
We can test a post request to "/doInsert" and make sure we
add a flash attribute for the inventory model attribute
and also a session attribute for the "edit" session
value:
@Test
public void testDoInsert() throws Exception {

    Inventory newItem = new Inventory(32165, "Manos del Uruguay Fino Storm Glass",
        10, 19.99, 2);

    // test add
    this.mockMvc.perform( post("/doInsert").flashAttr("inv", newItem)
        .sessionAttr("edit", false) )
        .andExpect(status().isOk())
        .andExpect(view().name("invOutput.html"));

    // test edit
    newItem.setCategory(3);
    newItem.setItemName("Bar");
    newItem.setPrice(12.0);
    newItem.setQuantity(15);
    this.mockMvc.perform( post("/doInsert").flashAttr("inv", newItem)
        .sessionAttr("edit", true) )
        .andExpect(status().isOk())
        .andExpect(view().name("invOutput.html"));
}
In the first segment of code, we add the model attribute
and the session attribute, and make sure the output page
is loaded successfully after the insert is performed.
In the second segment, we add the model attribute and
session attribute and make sure the output page is loaded
successfully after the update is performed.
Tests with Path Variables
In the database version of the Inventory application we have
a handler method that process a click on an EDIT link
for a particular inventory item:
@GetMapping("/edit/{id}")
public String edit(HttpSession session, Model model, @PathVariable int id) {

    // could also grab from inventory list but it's more work
    Inventory i = da.getInventoryById(id);
    model.addAttribute("inv", i);
    session.setAttribute("edit", true);
    return "invIndex.html";
}
This handler expects a path variable for the record ID
of the inventory object that we want to load into the
form. Including the path variable value in a test
is super easy, just include the parameter in the URL
in the get()
or post() method, and
add an extra argument for the value you want to assign it:
this.mockMvc.perform(get("/edit/{id}", "77633"))
Here we're testing a get request to "/edit/" and using
the value 77633 as the {id} @PathVariable value.
All together, it might look like this:
This will test a GET request to /edit/77633 and assert
that it returns a status of 200/OK and successfully loads
the invIndex.html file.
There are lots of other things you might want to do in your
JUnit tests, so make sure you have a look at the API
documentation for the various classes linked above
and see what else you might want to do!
Exercises
1. Add the following methods to your database unit tests
in your inventory database exercise:
testGetCategories()
asserts that running the database
access method that retrieves all the categories returns
the right number (e.g. in my data.sql file I added 7
records, so I would assert that invoking da.getCategories()
returns the value 7).
testGetInventoryByIdPass()
asserts that invoking your
database access method that retrieves an inventory object
by its ID returns a valid object and not null.
Tip: you can use Assert.assertNotEquals() to check and
see if the method doesn't return the null object.
testGetInventoryByIdFail()
asserts that invoking your
database access method that retrieves an inventory object
by its ID returns the value null.
2. In Session 4.1 you did the Players form-binding exercise.
Add JUnit tests to test the following controller methods
(note that this program had no database access so you don't need
to worry about auto configuring the database in your test
class):
The handler method that loaded the player form page.
Assert that the page loads successfully and with a status
of 200/OK. Also make sure that the dream team model
attribute and the new player attribute are added to the
model.
Then handler method that loaded the player output: assert
that the page loads successfully with status 200/OK and
that the model attributes for the player and the dream
team list exist.
TIP: Look through the
ResultsMatcher API and look for something that lets
you perform assertions on stuff related to the model.
For example, how can we tell if a model attribute exists?)