Refresh
this page because I am probably still making changes
to it.
In the previous lesson we did an overview of
web application security concepts and terminology,
including the different kinds of authentication
available in Java web application. We wrote a very
simple application that used Basic Authentication
that included a SecurityWebApplicationInitializer class
and a SecurityConfig class. Recall the following
method we added to the SecurityConfig, which changed
a few of the default security settings:
This method set the in-memory authentication's password
encoding to NO password encoding at all (remember, this
is something you would NEVER do, we only did it for
demonstration purposes; we should always use a password
encoder) and then we added one user to the in-memory
security realm: that user has the user name "Foo",
a password of 4444 and was added to the USER role
(which Spring stores as ROLE_USER).
In this lesson, we'll learn about form authentication
by using our own custom login form. We'll also set
aside some parts of our application to be accessed only
by authenticated users and we'll create a "permission
denied" error page.
We're going to see some new methods and some cool new
things that Spring does automatically when handling
authentication and authorization!
So let's get right into it. First, we'll start a new project
and add a custom form to it.
Start up a new project and add Spring Web, Dev Tools,
Thymeleaf, and Spring Security.
Add an index page in the root of your templates directory.
Give it a title and heading (e.g. Main Index) and add a
link to "/secure" using href and th:href. For example:
Add a login.html form to your /templates. Set
the title and give it an appropriate heading.
Add a login form to the page. The form must have
the following characteristics/elements:
It must perform a POST to the URL /login
The field for user name must be given the
name="" attribute value "username".
Emails are commonly used as user names these days, so we'll use an
email field.
The field for password must be given the
name="" attribute value "password"
In addition to the form on your login page, add a link
(inside a block element, of course) back to a main index
page at the root (/).
Add 2 block elements above the form. These are going to
display certain messages in specific circumstances:
<div th:if="${param.error}" class="error">Invalid user name or password.</div>
<div th:if="${param.logout}">You have been logged out.</div>
There is a lot of cool functionality built into this
form:
When invalid credentials are entered, Spring passes
a parameter called "error" along with the request
(e.g. http://localhost:8080/login?error).
So in our login page we can add a DIV with the content
"Invalid user name or password" that renders only
if ${param.error} exists. This will work automatically!
If the "error" parameter exists, we can display an error message.
When the user logs out, Spring passes a parameter called
"logout" along with the request (e.g.
http://localhost:8080/login?logout).
So in the login page you can add a DIV with the
content "You have logged out" that renders only if ${param.logout}
exists. This will also work automatically!
If the "logout" parameter exists, we can display a custom message.
Now let's add some content to our project that only
certain authenticated users can access:
Create a directory called /secure in your templates root.
Add an index.html page to the /secure directory:
Give it a meaningful title and heading.
Add a link back to the index page (fallback and thymeleaf)
and a log out link (fallback and thymeleaf, goes to /logout).
Since we're restricting access to some pages, we should create
an "Access Denied" page:
Add an /error directory in the templates root.
Add a page inside /error called "permissionDenied.html"
(or something similar)
Add a meaningful title and heading.
Add links back to the main index page and a log out
link, as on the secure page.
Now we need controller methods to load each of our pages:
Get mapping to / for the index.html page.
Get mapping to /secure for the secure/index.html page.
Get mapping to /login for the login.html page.
Get mapping to /permissionDenied for the error/permissionDenied.html page.
Here's how our program is going to work:
User visits the main index page and clicks the link to the
secure pages.
When the server receives the request to /secure, it will notice
that the contents of /secure are restricted to the
USER role only, so it will require the user to log in, first.
The response will be sent back with the login screen so the
user can enter their credentials. Once the user fills in
their credentials and submits the form, a new request for
the /secure contents is sent to the server with the user's credentials.
The server examines the credentials and sees if they match
one of two users/roles we're going to add to our in-memory
security realm:
If the credentials are for a user in the GUEST role,
access is denied and the user will be redirected to
the "permission denied" page. Furthermore, we're
going to log this request.
If the credentials are for a user in the USER role,
we permit them access to all the content inside
the /secure directory, and load that directory's
index page.
When the user clicks the Log Out link, they will be logged
out and be directed to the login form page.
We already know how to do some of these things, but not others.
For example, how do we log a "permission denied" request
and send the user to the /error page we created? In the next sections,
we'll look at how to perform each of these tasks.
Handling Access Denied
First, let's look at how to deal with a user who is
denied access to the application's secure pages.
There is an interface called the
AccessDeniedHandler interface which
handles an AccessDeniedException (this exception
is thrown when authorization fails on a requested
resource). When our GUEST user logs in upon requesting
/secure resources, they will not be authorized, so the AccessDeniedException
will occur. The AccessDeniedHandler has a handle() method where we
can put code that should execute when the AccessDeniedException occurs.
We will create a class of our own that implements this AccessDeniedHandler.
This class should go in our .security package and it needs to
include the @Component interface because we're going to @Autowired
it into our SecurityConfig class later:
// NOTE: in .security package
@Component
public class LogAccessDeniedHandler implements AccessDeniedHandler {

    @Override
    public void handle(HttpServletRequest request, HttpServletResponse response,
            AccessDeniedException accessDeniedException) throws IOException, ServletException {

        // log access-denied exceptions and redirect to permission denied page
    }
}
As you saw from reading the documentation for the handle()
method, there are parameters for the request that was being
made and the response that is going to be sent back. We'll
use both of these in our method's code.
So, we need to ensure that there is in fact an authenticated
user, or we won't be able to log their details. We can
retrieve this information from the current
SecurityContext. A Security Context
contains security information about the current thread
of execution (in this case, the current request being processed).
It's getAuthentication() method
gets the currently authenticated principal (recall from the
previous lesson that the principal = currently logged-in user).
If there is no authentication instance, then there is no authenticated
user. We need to make sure there is an instance so we don't end
up with null pointer exceptions when we try to invoke methods
on the authentication object (such as .getName()).
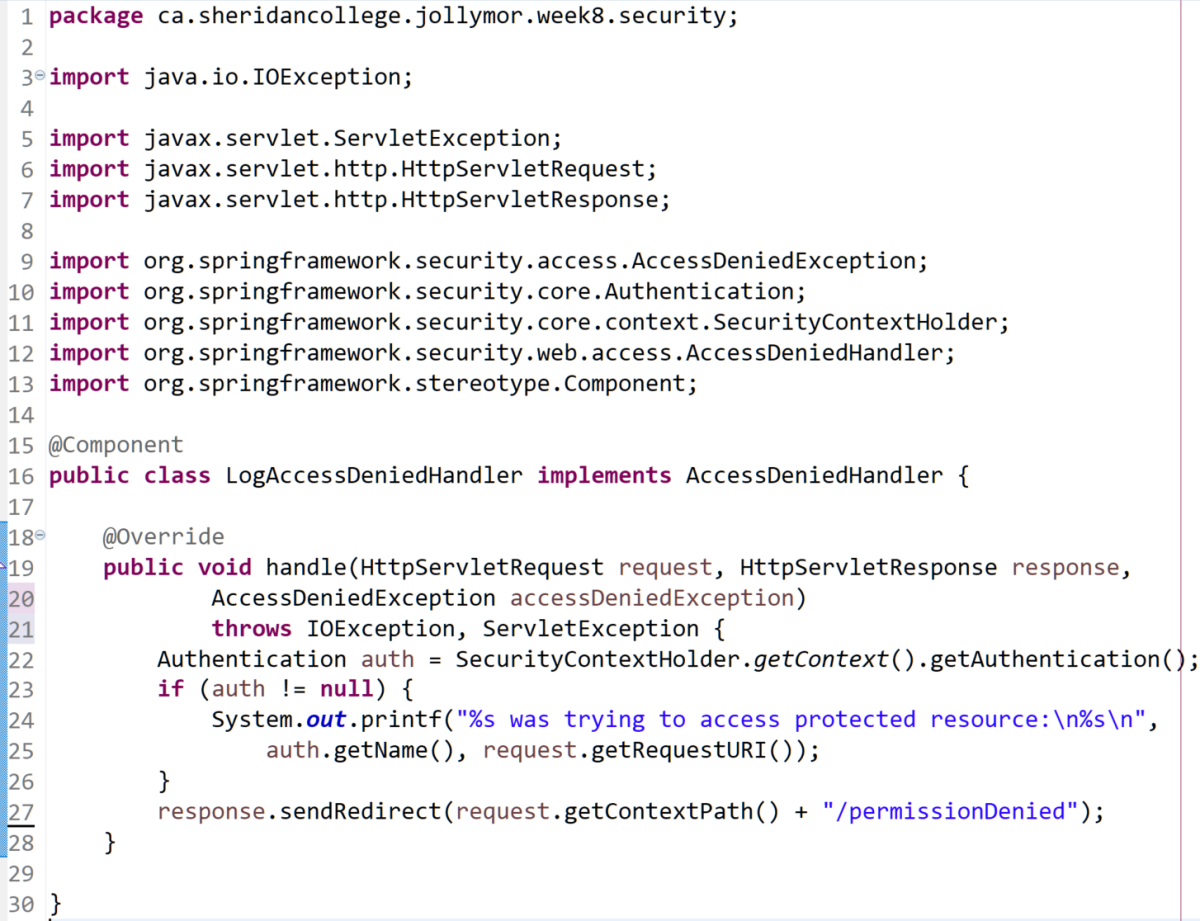
If there is an instance, log
the user's name and the resource they were trying to access
to the console:
if (auth != null) {
System.out.printf("%s was trying to access protected resource\n%s\n",
        auth.getName(), request.getRequestURI());
}
The request.getRequestURI() retrieves
the URI/URL that was requested when the exception occurred.
In a more sophisticated program, you would probably log these
details to a file or even a database table, but this is ok for now.
Lastly, we want to redirect the user to the permission denied page
we added to the /error directory:
Here, we are using the response object's sendRedirect() method,
which you can probably guess redirects the request to a different
page or resource. In this case, we're retrieving the context path
(in this case, that would be localhost:8080) and concatenating
the string literal for our "permission denied" mapping. The literal
should match the @GetMapping you used to load the permissionDenied.html
page in the /error directory.
That's it for now. We'll use this class in our SecurityConfig when
we want to configure what should happen when an exception
occurs during authorization.
The LogAccessDeniedHandler class
Configuring Security
The next task in our development of this application is
to add our SecurityConfig class. It will be a bit different
this time because even though it still needs the @EnableWebSecurity
annoation, it's also going to extend
WebSecurityConfigurerAdapter.
Creating our SecurityConfig as a child of WebSecurityConfigurerAdapter
is going to allow us to add even more security configurations
than we did before, and we'll be able to do it in a very
convenient way (it may not seem convenient at first, but trust
me that this is going to be much easier than it was before
we had Spring!) We're also going to Autowire in an instance
of the LogAccessDeniedHandler component we just created.
@EnableWebSecurity
public class SecurityConfig extends WebSecurityConfigurerAdapter {
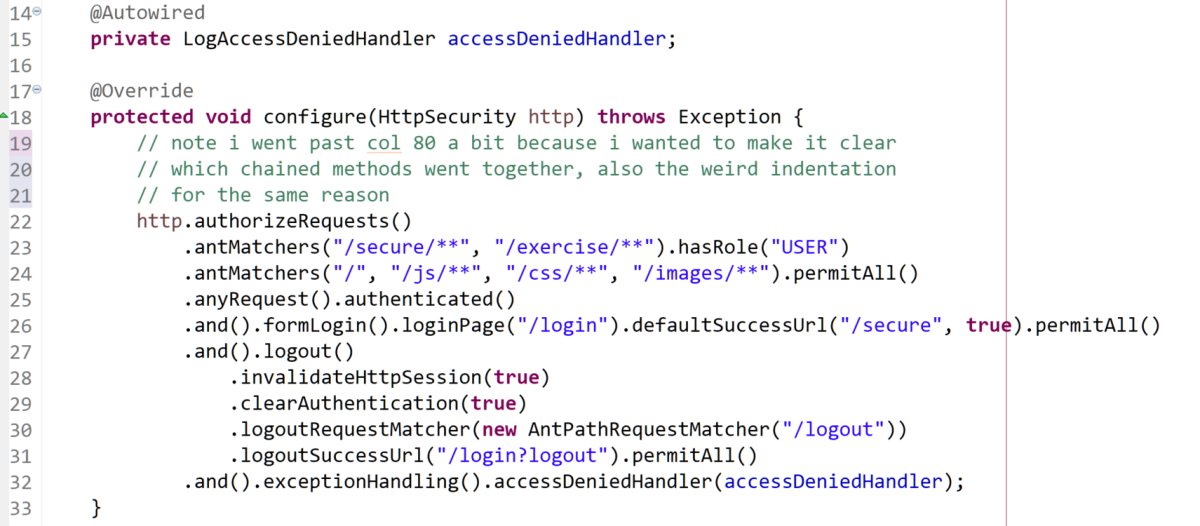
@Autowired
private LogAccessDeniedHandler accessDeniedHandler;
}
WebSecurityConfigureAdapter has a series of overloaded
configure() methods that allow us to configure several
different sets of security properties. Here's what we're going
to set up:
Setup up some authorization:
Only members of the USER role can access any content
of the /secure directory.
The root (and therefore main index page because it's
mapped to root), and everything in
/js, /css, and /images can be accessed by everyone.
Everything not mentioned above can only be accessed
by authenticated users
We want to use our custom login.html page for logging
in, and that page is accessible to everyone.
When a user logs out, it will be triggered by the pattern
"/logout".
When a user logs out, we want to invalidate the session
and clear all authentication data for the current session.
When logout is successful, we want to go to make a request to
the /login?logout pattern so that the user ends up back
at our login form with the logout parameter (remember that
will show that second DIV we added). /login?logout pattern
also needs to be accessible to everyone.
Set up in-memory authentication with no password encoding (for
now) and a couple of sample users (one USER role, one GUEST role)
to play with. We've actually done this before in the previous
lesson so this will be the easier part.
For the first set of tasks, we're going to override one
of the configure() methods that takes an
HttpSecurity parameter. HttpSecurity allows
to you configure security settings that are specific to
HTTP requests. For example, we can use it to set up
authorization for specific requests (like requests for anything
in the /secure directory).
The HttpSecurity class has a method called
.authorizeRequests() that allows you to
set up constraints for specific resources. We can set up
authorization for pages and files, or groups of pages and files,
by using an AntMatcher.
An AntMatcher pattern is just like a URL Pattern and they share the same
syntax, for the most part:
? matches one character
* matches 0 or more characters
** matches zero or more path segments
We can set up ant matchers using the .antMatchers()
method chained to the authorizeRequests() method (feel free
to have a look at the authorizeRequests() method in the docs
if you want to learn more about what this method returns).
For example, we can restrict the /secure resources to only users in the
USER role by writing code such as:
This code says that when a request is made to anything in the
/secure directory, make sure that the authenticated user
is a member of the USER role.
The antMatcher() method accepts a variable-length arument list
of Strings representing the patterns that you want to apply
a constraint to. These apply to either the GET or POST
method. It ignores any query string in the URL when it matches
the patterns, just like a GetMapping or PostMapping does.
Any other methods you chain to antMatchers() applies to
requests that match the pattern. Therefore, in the example
above, hasRole("USER") applies to the antMatcher("/secure/**").
You can add additional constraints by adding more antMatcher()
methods. For example, we also want to permit access to all
other parts of our application to everyone, even if they're not
authenticated:
This permits all users (even visitors that aren't logged in)
access to the root (and therefore the index page),
the /js directory and its contents, the
/css directory and its contents, and the /images directory and
its contents.
The permitAll() method is a
convenient way to say "grant access to everyone".
In case we missed any part of our application, or in case
we add more directories and files at a later date, we'll
ensure that anything not mentioned above can only be
accessed by authenticated users:
You might not always want to use anyRequest().authenticated().
If you wanted the opposite (all other resources freely available
to all, then you would leave this out and add "/**" to the
second ant matcher that defines which resources are accessible
to all visitors, even unauthenticated ones.
The next thing we want to do is to tell Spring that we want to
use our own custom login page, where our custom login page is,
and that everyone is allowed to access it:
We can attach this to the existing authorization rules using the
and() method just like we did
in the previous lesson.
The .formLogin()
method is invoked on the HttpSecurity object and it indicates
that we want to use form-based authentication.
If you don't use the loginPage() method, it will use the
default login page.
We do have our own custom login page, so we chain the
.loginPage() onto the .formLogin() method to
specify where our login page is located and what the file
name or mapping is. This is how Spring knows where to go or
what handler to execute when a login is required (in our case, the
handler mapped to /login).
The defaultSuccessUrl("/secure", true) states that
when a user successfully logs in, go to the /secure index page.
If you don't include this, your user will automatically go back to the page
they requested *before* they requested whatever got them to the login page
(so an authorized user will end up back on the main index page, for example).
This isn't required, but when I was playing with this example I found it
annoying, so I added it in!
To configure how we want the /logout to work, we attach
another rule using the logout() method.
This tells Spring that we want it to automatically log out a user when we
map to the /logout URL pattern. This method returns a
LogoutConfigurer, which contains methods we can use
to configure what we want to happen when a user logs out.
.and().logout()....
Recall that we want to clear the authentication data for this user and
invalide their current session:
We also want to define the ant matcher pattern that triggers
the logout process. We can do this by adding on the method
.logoutRequestMatcher(new AntPathRequestMatcher("/logout")).
And lastly, we want to specify what URL should be requested when
a successful logout occurs:
.logoutSuccessUrl("/login?logout").permitAll().
Remember that the ?logout parameter added to the /login URL will
load our login.html form and show that extra DIV with the "You are logged
out" message. We also want to make sure that this specific pattern
is allowed to be accessed by everyone.
The last thing we want to do is indicate that we want to
log any access to our /secure resources that fail
because of an access denied exception and redirect the user
to the "permission denied" page. This was all done in our
LogAccessDeniedHandler, which we've already autowired:
The exceptionHandling() method
returns an instance of ExceptionHandlingConfigurer, which
allows you to configure how you want things to
work when exceptions occur
The accessDeniedHandler() method
in the ExceptionHandlingConfigurer allows you to specify what object
should handle any Access Denied exceptions. In our case, we're
passing it a reference to our LogAccessDeniedHandler object that
we autowired in this SecurityConfig class.
If you simply wanted the user to go to a specific page only,
you could use the accessDeniedPage() method, instead.
That's the whole configure(HttpSecurity) method! Here it
in in its entirety in case you got stuck:
One of the configure() methods in the SecurityConfig class
All that's left is to add another method that configures our in-memory
security realm. We can override the configure() method that accepts
an AuthenticationManagerBuilder. Set up in-memory authentication to use
no password encoder, and add 2 users: one in the USER role and one in the
GUEST role. Use email addresses as the user names. You've done this
before, so this shouldn't be too hard.
The configure() method that sets up the users
Your SecurityConfig class is done!
Now add your SecurityWebApplicationInitializer class. See the
previous lesson if you need help with creating it.
You should now be able to run your application!
Running and Testing The Application
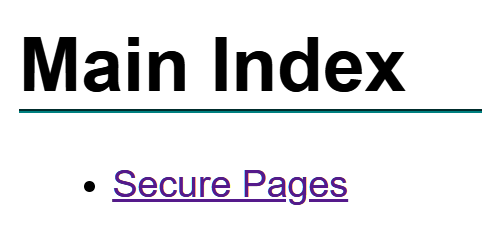
Load up localhost:8080/. This should make your index page appear.
The Main Index Page
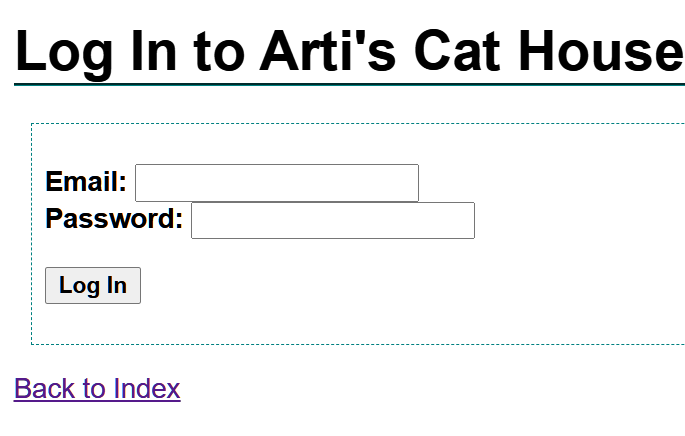
Click on the link: you should see the login form. Look at the URL!
you should see http://localhost:8080/login?error The Login Form
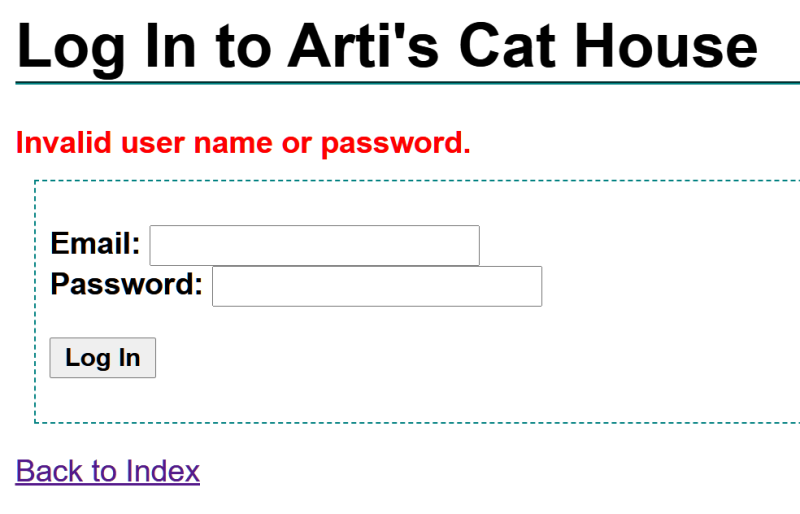
Enter invalid credentials (invalid username and/or password).
You should be back on the Login Form but the
"invalid username/password" message should be
visible.
Invalid user name or password was entered
Now enter the credentials for the GUEST user. This should
cause the Permission Denied page to appear.
Valid credentials but user is unauthorized to view requested page
Notice that if you click the link to the main page, the main
page appears fine. If you then click the secure link on the
main page, you're back at the Permission Denied page!
Log out this user by clicking the Log Out link.
You should be back on the login form page and the message
that you have logged out should be visible.
http://localhost:8080/login?logout The user has logged out.
Now log in as the user in the USER
role. This should cause the secure index page to appear.
The user is authorized to view the secure pages.
Those are the basics. Feel free to explore the different classes and
see what else you can do. For example, you can create a LoginSuccessHandler
(much like your access denied handler) to have authorized users redirect
to one location and unauthorized users to a different location.
You could also find a way to redirect a user who fails to authenticate
to a page other than the form login page.
Exercises
Add an /images directory to your demo project's static resources
and put an image from your camera roll inside it (or a public domain picture you
downloaded from the internet, if you prefer, but don't choose the
same picture as someone else).
Add the image on your project's main index page. Don't forget to
include fallback code.
Add a directory /exercises
to your demonstration project and put
an index.html file inside it. Add a header to your page that
contains the content "Exercise Page". Use whatever structure
you like - a HEADER containing/or a series of level-x heading elements, whatever.
Style them to your liking as long as they're easy to read (no dark-on-dark
or light-on-light!)
Then add a block element that contains your first and last name as
the content.
Add the your same picture to this index page and make sure you also
include the fallback code.
Add a link to the exercises index page to both the main index page
and the secure index page.
Configure the security settings so that only members of the USER
role can view the pages inside the /exercises directory.
Restart the application and make sure it works: you should see
the image on the main index page even if you're not logged in.
You should only be able to get to the exercises index page
when you're logged in as the user with the USER role.
Make sure you've included external CSS in your application!