Refresh
this page because I am probably still making changes
to it.
Security is an important part of developing web applications. This
lesson gives you an overview of important terms and concepts relating
to web application security, and gives a quick demo of basic
authentication in a Spring Boot application.
Spring
Security Architecture contains an
overview of the different classes and components and how they work
together.
Spring Security with
Thymeleaf
shows you how to work with security stuff in a Thymeleaf
page, and there's a few extra things in there that we
won't play with in this lesson, but in a later lesson.
Spring Security Reference in case you want
to explore more things you can do. Section 10.10.2 talks specifically
about Basic Authentication and how it works in more detail.
I'm sure we don't need to go into great detail about why the
security of your web application is so important: it's a subject
you hear a lot about on the news and social media, especially
when some big company gets hacked. But just in case you've been hiding in a cave
for the last 20 years, the advent of computers, internet, and
cloud storage have gradually made application/web security
an issue over the years. When I first started working with
computers, it wasn't a huge concern. There were some viruses
but you could only get them if you used a computer disk that
was from a "questionable" source. We weren't even downloading
software back then because there was no where to download it from.
Eventually, the BBS (electronic Bulletin Board System) became
popular: we could log into another computer (that was open and
welcome to users, but only one person at a time could log in)
and leave public and private messages for each other (again, this
was before regular households had internet, so there was no MySpace
or Facebook, this was a huge deal). Some of these BBS systems
had file repositories where people could share files with each
other. You had to be careful though, because some of those files
might contain viruses!
Then the internet became popular with every-day computer users
and now it was not only about viruses but also about hackers being
able to access your own personal computer system via the internet
and the data that was being transmitted.
Then came online accounts and online shopping, and cloud computing
and cloud storage, and with it the danger of your stored personal
data being seen and copied and sold!
I've seen the issue of application and web security grow from
something only people who weren't careful about where their
programs came from to something we all have to worry about
in our day-to-day life. In the past, if you took a disk from
someone you didn't know very well or downloaded a file from a
BBS, you ran the risk of getting a virus on your computer (and usually
those viruses were more a nuisance or inconvenience than anything).
But now, you could be doing your normal banking or shopping for
groceries and have your entire livelihood compromised.
Web application security involves four major steps or
components:
Authentication: Asking a user for their credentials
and verifying that they're valid.
Who are you? Are you a user
I recognize (e.g. are you in our database)?
Authentication occurs when you're asked for your login
information (credentials), and the server verifies that your
credentials match the records they have for your account.
Authorization: Verifying whether or not a user is allowed
to access a certain resource.
You've requested this page, I need
to check and see if you're allowed to see it or not.
Authorization allows you to define which users are allowed to access
which pages/files. You can restrict pages/files
so that they can only be accessed by certain roles or
groups of users.
Confidentiality: Keeping transmitted data private.
No one else can see this data (password, credit
card number) while it's being transmitted!
Secure connections (HTTPS) allow you to transmit data
securely so that it's protected from
eavesdroppers.
Data Integrity: The data that arrives is the exact same
data that was sent.
No one can manipulate this data while it's being
transmitted from client to server or server to
client.
Secure connections keep the integrity of the
data being transmitted: they prevent the data
from being changed while in transit from sender
to receiver.
A user in the context of a secure application is a person using
your application that has credentials. Credentials are the values the
user uses to authenticate themselves, such as a username or email
address and a password. A user of a secure application would typically
have to provide their credentials in order to log in. For example, when
you go to the SLATE home page, you are asked to log in with a form
that asks for your Sheridan user name and password. Your user name
and password are your credentials. When you provide your credentials
and submit the form, the server authenticates you (assuming you've
entered the correct credentials).
A role is just a name you make up for
a particular group of users. For example, SLATE probably has roles
for administrators, teachers, and students. Members of the administrator
role maintain the SLATE system: they are the ones who set up
our courses and run the scripts to add the students and teachers
to each course. Members of the teachers role teach the courses and have permissions
to add/edit/remove course objects like quizzes and content items, see
student grades and activity data, etc. Members of the student role
are enrolled in the course and have the ability to access all the
course's objects that are made accessible by the teachers.
Another example: say you have a web
application where people can purchase vinyl records you've collected.
You might have an Admin role for
users that are allowed to access pages used for
adding/editing records in the collection and
adding/editing customer accounts. You might also have a
Manager role that is allowed
to edit prices of records and create new promotions and discounts.
Users can be assigned to multiple roles. For example, all members
of the teacher role are also enrolled in certain courses (like mandatory
training courses from human resources on health & safety,
diversity & inclusion, etc.) Therefore, members of the teacher
role would also be members of the student role.
The things we are worried about the most (but not exclusively)
in our web applications are:
Encryption of passwords and other sensitive data, to
ensure that this data can't be seen or read in its
raw form by anyone before, during, or after transmission.
Cross-Site Request Forgery (CSRF or XSRF) where
a user is tricked into clicking a link that performs
a transaction (money, game credits, etc) or state change
(such as changing email address or password). The hacker
who created the link then benefits if the user clicks
the link while they are authenticated.
Example: Say you play a game that you purchase game
credits for. A hacker can send you an email that looks
legitimate and includes what looks like a legitimate
link from the game saying, "click this to receive free credits!" but the link
actually ends up sending a request that transfers credits from you to
the hacker. If you're already logged into the game or have an active
session, the server assumes the request is from you and that it's also
legitimate.
The fault is generally with the web site for being vulnerable to such attacks,
but also users should never click any links from inside an email without first
verifying that everything really is legitimate.
I once received a link
in a work email like this, and it was asking me to change my password because
my account was compromised.
I phoned our IT department to verify that my account had in fact been compromised,
and it turned out that the email I received was in fact a test sent by the college
to find out which employees needed training in spotting scam emails!
Session Fixation attacks occur when
a hacker hijacks a session.
It happens when an application
re-uses session IDs: if the hacker can retrieve
the session ID, they can create links that trick the user into
authenticating. Then the hacker can hijack that valid session.
This is actually a big reason why we no longer
encode a session ID in the URL when a user's browser refuses session cookies,
but it can also happen when a session id is stored in a hidden form field:
The hacker creates the form and then tricks the user into using it to
log in, and now the hacker has a valid session AND the user's credentials.
When the hacker has access to valid session, they can use it to perform
transactions, read private data, etc. The server has no way of knowing the
session is being used by someone other than the user it belongs to.
We need to make sure our applications keep data secure and
protect it from hackers.
Security in a Java Web App
In a Java web application you can restrict or constrain certain
resources (pages, files, etc) by telling the server. It's
actually a part of the server called the container
(you might recall I mentioned the container before in the
sessions lesson) that performs
this task: the container has several jobs such as managing sessions,
running Java code, and handling security and making sure that
certain resources can only be accessed by certain people.
Container-managed security requires users to identify themselves
before allowing access to restricted resources. A typical
conversation might take place as follows:
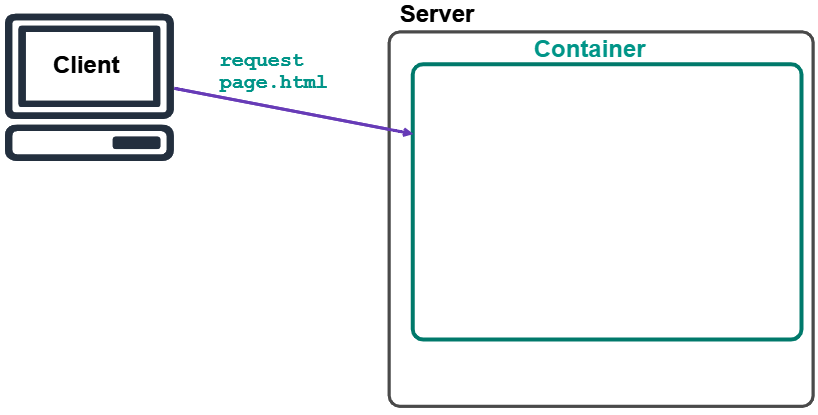
The client requests a restricted resource.
The client requests a restricted page
The Authentication process occurs:
The container sees that the requested resource is
restricted, so it sends a response back to the browser
asking for credentials.
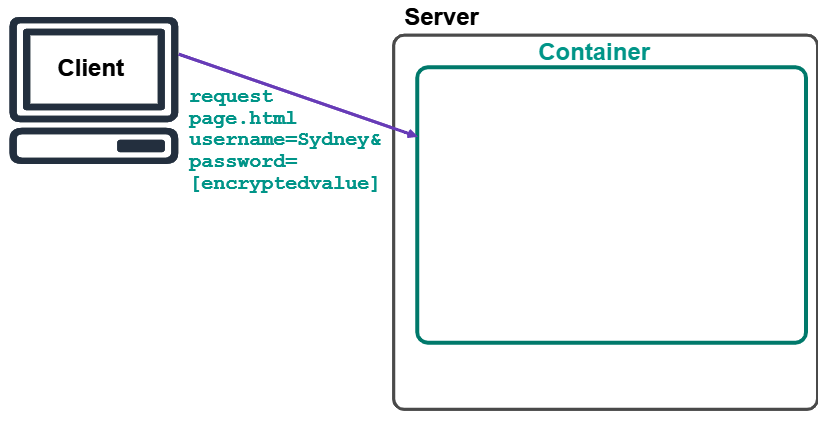
The server response asks for credentials
The browser retrieves the credentials from the user (e.g.
user name and password) and then sends a new request
to the server with the credentials included.
The client requests a restricted page again but includes credentials
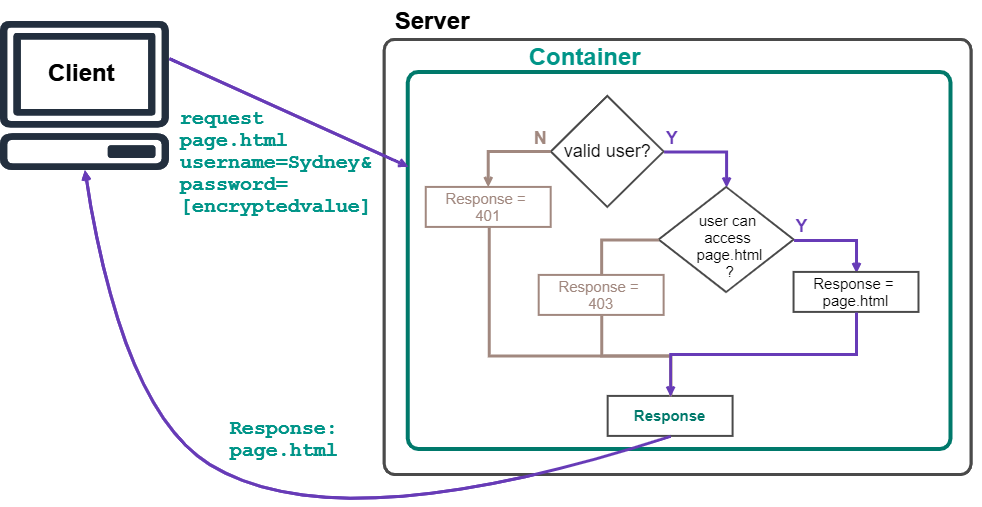
The container then examines the credentials and checks to see
if they're valid.
Then the Authorization process occurs:
If the credentials
are valid, the container then checks to see if that user
is allowed to access the restricted resources.
If the user is authorized, the container sends the requested
resource(s) to the client.
The server validates the user's credentials, then verifies that user
is authorized to view the requested file
With Spring Boot, a lot of the security tasks are already
set up and configured, you only need to customize the existing
configuration to the security settings you want with the
specific users and roles that you want.
Authentication
Authentication is the process of determining who a user
is by taking their credentials and matching them up
with the users and roles that are allowed to access
secure resources in the application.
Information about users and roles and what resources are
restricted are part of a security realm. This is
just a way to store security information: how this is done
depends on the kind of server (vendor).
There are four types of authentication you can use in a
Java Web Application:
Basic Authentication
Uses a browser's built-in login dialog to obtain
credentials. You have no control over the
appearance of this dialog.
In a Spring Boot application, there's a different
default login form - it's a bit nicer than a browser dialog.
Login credentials are transmitted in an encoded
format, but not encrypted.
Uses the common Base64 encoding, so this is not
secure at all.
Digest Authentication
Also uses a browser's built-in login dialog.
Login credentials are transmitted in encrypted
format, but it's not the most secure encryption
and it's not widely supported.
Certificates have to be purchased and they're expensive.
This method is typically used by large businesses.
We can create a fake certificate for testing so we can test our
application using Client Certificate Authentication, and
we'll do that in a later lesson.
Form Authentication
Allows the developer to create their own customized
login form to obtain users' credentials.
Login credentials are transmitted with no encryption
so this is not secure at all.
You would typically use this method along with HTTPS
(secure HTTP - SSL/TLS) so that your credentials
are transmitted securely.
We'll focus on basic authentication
in this lesson, then form authentication in the next lesson,
and then client-certificate authentication in a later lesson.
We won't be covering digest authentication since it's
not used very much.
Authorization
Authorization is the process of determining whether or not
an authenticated user is permitted to access the resource
that they requested. Authorization can't be performed
if the user is not already authenticated, since you can
only determine if someone is authorized to access a resource
if you know they already have valid credentials.
Authorization is performed by setting security constraints
on resources. Security constraints specify what users and/or
roles are permitted to access a resource or set of resources.
For example, you might specify that all users/roles are
permitted to access everything in the /css and /scripts
directory, but only admin
users are permitted to access any file in the /inventory/management
directory of the application.
Secure HTTP (HTTPS)
Confidentiality and Data Integrity occur on a secure HTTP
connection, or HTTPS. Secure HTTP (recall that HTTP stands for
Hypertext Transfer Protocol)
is the regular HTTP protocol with SSL or TLS on top of it. SSL
(Secure Sockets Layer) and TLS (Transport Layer Security) are
additional protocols that add a level of security to HTTP.
We'll talk more about SSL and TLS in an upcoming lesson on
how to use HTTPS.
HTTPS transmits data that is encrypted: the sender encrypts the data
before its sent and the receiver decrypts it when the data is
received. Special keys are used to encrypt and decrypt the data
and only the sender and receiver know these keys. Therefore,
an eavesdropper only sees the encrypted data
being transmitted and can't do anything with it. This keeps
the transmitted data confidential.
HTTPS is also able to determine if data was tampered with while
being transmitted, with strengthens the data integrity.
HTTPS uses certificates to determine that
the sender/receiver is who they say they are. When we
get to the lesson on HTTPS, we'll be able to create "pretend"
certificates so that we can test our applications on HTTPS.
Now that we have a general idea of some of the basic concepts,
let's start implementing some of these things in a Spring
Boot application.
Demonstration of Authentication in a Spring Boot App
We'll start off by creating a very basic application
that introduces you to authentication. We'll
talk more about authentication in later lessons when
we also talk more about authorization and secure
HTTP connections.
Creating a web application with authentication and
authorization requires some extra components.
We'll talk about the major ones we'll start with
but I'll introduce a few more as we learn more in
the next few lessons.
Spring Security Dependency
When you create a project, you'll need to include
the Spring Security dependency. This dependency allows
you to easily perform certain security tasks
in your application such as configuration and setup
of users, roles, and resource constraints. It also
allows you to use several objects that are already
created and set up by Spring and injected into the
Inversion of Control container.
If you want to add Spring Security dependency to an
exsting project, just add the following two items
to your POM file's dependencies:
This dependency allows you to perform certain security
operations in your Thymeleaf pages, such as accessing
the name of the currently logged in user.
If you see this dependency, then you're fine and
don't have to worry about it.
If you don't see this dependency, you'll have to add
it manually in the POM for each project you create
from now on if you want to use Spring Security in your
Thymeleaf pages (obviously if you're not using
any of the security operations in your Thymeleaf
pages, there's no point in adding this dependency).
A SecurityConfig Class
A security config class defines various settings for your
application such as how you want to encrypt passwords,
what roles/users you want to use (or where the security
realm data is stored), where the login page is (if you
created your own), what resources are restricted to
which users/roles, etc.
The Security Config class always goes into the .security
package of your application.
@EnableWebSecurity
public class SecurityConfig {

}
The Security Config class is annotated with
the @EnableWebSecurity annotation,
which is in the org.springframework.security.config.annotation.web.configuration
package.
This annotation switches off the default web application security
configuration set by Spring so you can add custom features.
This is achieved by adding one or more configuration methods
that set the properties and preferences you want.
One of the greatest things about a security config
class annotated with @EnableWebSecurity is that it
automatically prevents Cross-Site Request Forgery and
Session Fixation attacks.
SecurityWebApplicationInitializer Class
The Security Web Application Initializer creates a filter
chain. Every request that goes to the server
for your application is filtered to make sure it meets
your authentication requirements. A filter
is an object that the request has to travel "through"
on its way to the application: A filter reads the
request and the request data and can perform actions
based on the data it sees. For example, if a request
doesn't contain authentication credentials, the filter
can send a redirect, causing the request to change
to a login.html page instead of the page it was
originally requesting. The initializer
uses your security config class to determine how
authentication should work for the requests so that
it knows what to do when the requests are filtered.
This class is generally very basic and is always
stored in your application's root package along with the
main Application class.
public class SecurityWebApplicationInitializer extends AbstractSecurityWebApplicationInitializer {

    public SecurityWebApplicationInitializer() {
        super(SecurityConfig.class);
    }
}
The class extends AbstractSecurityWebApplicationInitializer.
I know these class names are getting really long, but that's
quite normal: remember that class names need to be self documenting!
AbstractSecurityWebApplicationInitializer is the abstract class
that models the filter chain for a secure web application. We
extend it to create our own version so that we can configure it
with the settings we are going to define in the Security Config
class mentioned in the previous section.
Demonstration
Start a new project and add dependencies for Spring Web, Dev
Tools, Lombok, Thymeleaf, and Spring Security. Make sure
the "thymeleaf extras" appears in the POM, and if not, add it.
SecurityConfig Class
Add a new class called SecurityConfig
to a .security package in your
application. This class should be annotated with
@EnableWebSecurity as
described earlier.
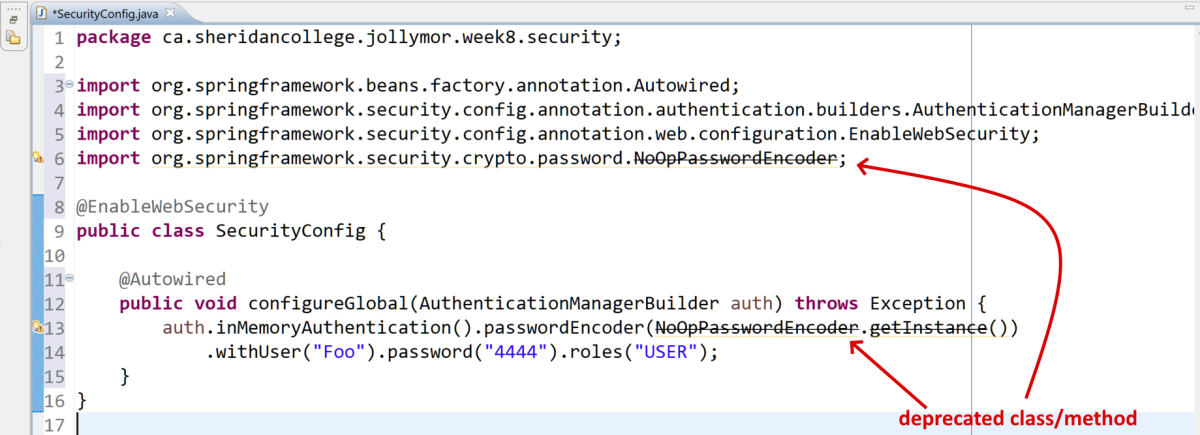
We'll start off with something really basic. Add a method to
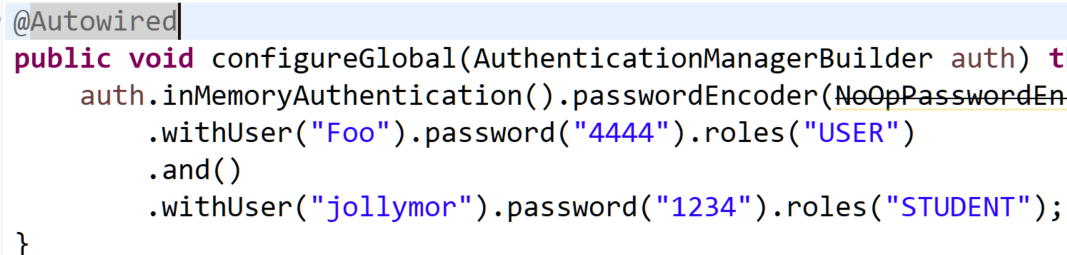
the SecurityConfig class and Autowire it:
A configureGlobal() method in the SecurityConfig class
The actual method name "configureGlobal()" doesn't actually
matter: you can use any method name here but it must be
self-documenting and conform to other rules and industry
standards. I chose the name "configureGlobal" because
it configures the security options for the entire application.
There are several classes and methods used here that we haven't
seen before:
The AuthenticationManagerBuilder class
helps you to build the authentication settings you want.
This object is already in the inversion of control container
(because you used @EnableWebSecurity on your class) so it
is injected by Spring (thanks to @Autowired).
AuthenticationManagerBuilder is used for in-memory authentication,
so your authentication settings, users, roles, etc. are stored and
managed in-memory (as opposed to in a database or a file).
Its method inMemoryAuthentication()
returns an InMemoryUserDetailsManagerConfigurer that, as you
can guess, allows to to configure the details of users and roles.
On the details manager configurer we invoke passwordEncoder(),
which allows you to set the password encoding (a
PasswordEncoder
instance) for your in-memory authentication.
NoOpPasswordEncoder is used for demonstration
purposes only: this is actually a deprecated class and it is NOT
SECURE. In a later lesson we'll learn to properly
encrypt passwords with an actual password encoder. We are required
to specify some kind of password encoder however, so we'll use this one
for now.
We also set a user with the user name of "Foo", the password of "4444",
and in the "USER" role via the withUser(),
password(), and roles()
methods. The withUser() creates
the user and the password() and
roles() methods are invoked on
the user that is created to set the user's password and role.
So in summary, the single statement inside the configureGlobal()
method says, "Set up in-memory authentication using no specific
password encoder and a user named "Foo" in the USER role with
a password of "4444", and restrict all the application's
resources to only this user." We didn't actually specify
which resources are restricted, but the default is everything.
What's really nice is that all this will automatically prevent CSRF
and session fixation attacks - it's all built-in!
SecurityWebApplicationInitializer class
Now go into the root package of your project, where your
Application class is (we looked at this class in our
very first
project, in case you aren't sure or can't remember)
and add the SecurityWebApplicationInitializer that extends the
AbstractSecurityWebApplicationInitializer class. I showed you
the code for this class earlier, in case you want to copy and
paste it.
NOTE: when prompted to import the SecurityConfig class,
make sure you import your own SecurityConfig,
not one of the other ones!
Index Page
Now add an index.html page to your /templates. Add the regular
thymeleaf namespace, but you'll also need to add an extra name
space that allows us to use the thymeleaf sec
tags:
Inside the body of the page, add a heading (e.g. Testing Spring
Security) and a DIV element:
<div sec:authorize="isAuthenticated()"></div>
Here, we use the sec:authorize
attribute that's part of the Thymeleaf "security extras".
It will render the element its a part of ONLY if the expression
it is assigned is true (therefore, it must be assigned a
boolean expression).
The isAuthenticated() method
(and you don't have to include the () when you write that in
Thymeleaf, but you probably figured that out already)
is from the Authentication interface, which
models the authentication information for an authenticated
user. It contains a few other methods you might find useful
in a Thymeleaf page, and we'll explore some of this in this lesson
and in future lessons. The isAuthenticated()
method returns true if the user is authenticated, and false if
they're not authenticated.
Therefore, our DIV element is only rendered if the user that
requested this page is currently authenticated. If they
are not authenticated, this element is not rendered at all.
We want to display a bit of information about the authenticated
user, so let's put some code inside the DIV to display it:
The sec:authentication attribute
displays specific content from the current authenticated
user. For example, sec:authentication="name" invokes
the Authentication.getName() method (getName() is actually
inherited from java.security.Principal),
which returns the name of this user (e.g.
"Foo") as a String.
The sec:authentication="principal.authorities"
invokes the getPrincipal() method and retrieves the roles.
A "Principal" is simply any kind of entity with a name, and it's
used often in authentication to model the person/thing being
authenticated.
So this DIV contains code that displays the name of the user
and the roles the user belongs to, but only if the user is
authenticated, otherwise it displays nothing (except the
header at the top, if you added one)
Note that I didn't put in fallback code for our SPAN elements:
the user wont see any of this if they're not authenticated,
so it doesn't matter that much. Also note that even though
we might often want to display the name of the currently
authenticated user, we will probably never display the roles
the user belongs to (except maybe in a back-end administrative
interface you created) - we only do it here for demonstration
purposes and to show you what you can do, and so you'll be
intrigued enough to explore more on your own.
We'll add one last cool thing to this page before we
try it all out. Add a small form with a single "Log Out"
button. This code should go inside the DIV and below the
paragraph element that displays the authentication data:
I'm using the th:action and setting action="#" because
I want the form to be processed by the handler method
only when Thymeleaf is working/active.
To do the actual logging out functionality, you only need a
handler method mapped to /logout - as long as you use
"/logout" - this is built-in and the application will
perform a log out automatically! Furthermore:
If your form method is set to GET, the user will be
asked to confirm log out using the browser's default
confirmation dialog/form.
If your form method is set to POST, there will be no
confirmation and the user will be logged out, no
questions asked.
Add a controller to the .controllers package. Add two
handler methods:
A getLogout() method get-mapped to "/logout" that
returns the index page.
A postLogout() method post-mapped to "/logout" that
returns the index page.
Add a third handler that loads the index page when
the user goes to http://localhost:8080/.
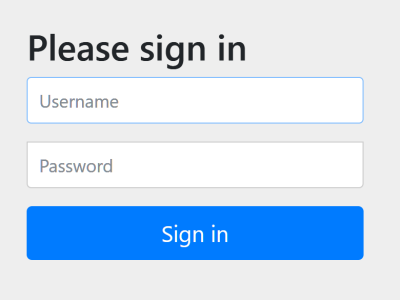
Now run your application like you normally would and load
your index page. You should see a form that asks for credentials,
although it might not look exactly like mine (I'm using Chrome):
The default login form in Chrome
The reason you see the form is because we set up security
constraints for ALL files in our application: this means
we can't access *anything* in our project unless we meet
the criteria (we must be authenticated as the user "Foo").
The HTML for this form is created by Spring Boot, but in
a later lesson I'll show you how you can create and customize
your own login form. Have a look at the form's source code:
look at the code for the form and its input fields. We'll
find this interesting in an upcoming lesson, so take some
time to examine it and how it's all created.
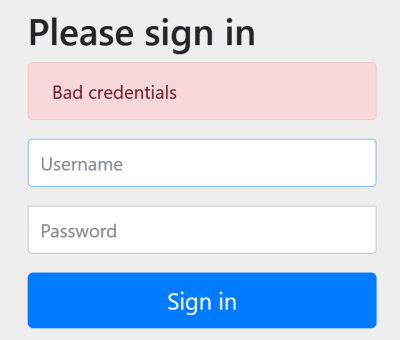
When you're done examining the form source code,
enter credentials that are incorrect and see what happens.
Error appears if the credentials aren't valid
Notice that the message only says "bad credentials" - there is no
mention of whether it was the login or password that was incorrect,
nor does it fill the form with the values that the user
entered previously, or display those values anywhere. This is
exactly what should happen. NEVER give a potential hacker any
help: if you say the login name is in valid or the password
is invalid, you're giving them way too much information.
If they know the user name is valid but they messed up the
password, they're halfway to breaking into the account.
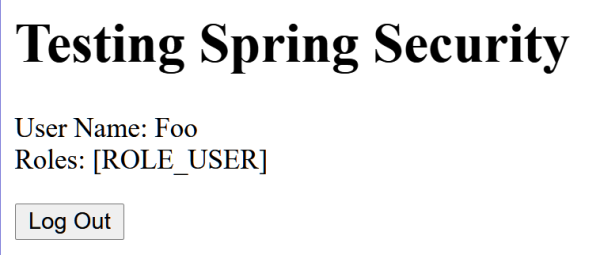
Now try the valid credentials you set in the configureGlobal()
method. You should now see the index page with the
user name and role you defined, because the DIV's
sec:authorize="isAuthenticated()" is now true.
Using valid credentials shows the user information
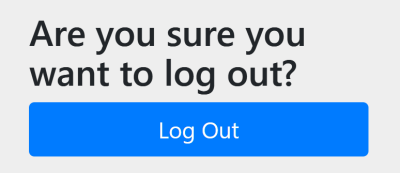
Click the Log Out button. Since we're using the GET
method on our log out form, we recieve a confirmation first:
GET method on the form triggers confirmation
Go ahead and click the Log Out button on the confirmation
screen. The login form appears again because you are
now logged out and trying to access the index page.
Is there a way to display certain content to authenticated
users and different content for non-authenticated users?
Yes! We'll learn this in an upcoming lesson.
Go to your index page and change the form method to
POST, and then try the program again. Notice that when
you log out, you don't get the confirmation screen.
Those are the basics! In the next lesson we'll do a bit
more: we'll create our own custom login form, and we'll
refine our security configuration to allow access to some
parts of our application but not others.
Exercises
Add a new Thymeleaf page called yourname.html where
"yourname" is your Sheridan user name. On your
page, add a HEADER element that is only visible
to authenticated users. It should display a level-1
heading that says, "Welcome " followed by the name
of the currently authenticated user. Add a handler
method to your controller that loads the page (the
mapping should be /yourname where "yourname" is your
Sheridan user name.
Add another user to your security config. The user should
have your Sheridan login name, a role of "STUDENT", and
a made-up password (DO NOT use your actual password!)
You can do this
with the and() method chained to the previous user methods
and then attach another set of methods to the and():
GET method on the form triggers confirmation
Save your changes and make sure you're logged out
before you refresh the browser, or restart your application,
after saving your changes. Load the page
with your name on it, log in, etc. Test it all out, including
the index page.