Refresh
this page because I am probably still making changes
to it.
You've learned how to create web services, the next step is to
learn to consume web services. Consuming
web services is how we use web services in an application.
In the previous lesson we created web services in a @RestController
and tested them using Postman. In this lesson, we'll learn how
to consume web services in a Spring application.
To consume a web service, you need to make a request for the
web service method using the appropriate HTTP verb (GET, POST,
PUT, DELETE, etc.) We can invoke ReST web service methods in our
Java Spring applications by using the
RestTemplate class. This class contains methods
that allow you to make requests to a ReST service using standard
HTTP verbs:
RestTemplate.getForObject(), RestTemplate.getForEntity()
methods allow you to make a GET request to a particular web service method.
RestTemplate.postForObject(), RestTemplate.postForEntity()
methods allow you to make a POST request to a particular web service method.
RestTemplate.put()
methods allow you to make a PUT request to a particular web service method.
RestTemplate.delete()
methods allow you to make a DELETE request to a particular web service method.
Notice that you have 2 options for GET and POST requests:
getForObject() and
postForObject() return an object (e.g. a String,
an instance of a bean, or a primitive type boxed into an object such
as Integer or Double) or a collection of objects. This return value
is what's inside the body of the response that's returned by the
server after processing the request.
Use these when you are only interested in the value in the
response body.
getForEntity() and
postForEntity() return a
ResponseEntity, which models/contains
the entire Reponse object that the server returned after processing
the request.
Use these when your are interested in more than just the
response body, such as the status code, response headers,
etc.
Additionally, all of these different methods are overloaded so that they can be
invoked with different information:
getForObject(URL, ClassType),
getForEntity(URL, ClassType) will perform
a GET request to a specific URL and will return an object of ClassType.
getForObject(URL, ClassType, variables),
getForEntity(URL, ClassType, variables) will perform
a GET request to a specific URL and a comma-delimited list of path variables,
and will return an object of ClassType.
Example: Assuming you have a web service method defined as @GetMapping("/foo/{bar}")
that returns an Inventory object,
you could invoke this method with the statement
restTemplate.getForObject("http://localhost:8080/foo/{bar}", Inventory.class, "abc")
Example: Assuming you have a web service method defined as @GetMapping("/foo/{bar}/{moo}")
that returns an Inventory object,
you could invoke this method with the statement
restTemplate.getForObject("http://localhost:8080/foo/{bar}/{moo}", Inventory.class, "abc", 123)
You can also do the 2 examples above using a Map<> instead of a variable-length
argument list:
All of the examples above also apply to postForObject()
and postForEntity()
The getForEntity() and postForEntity() methods return a
ResponseEntity object instead of just
the response body. ResponseEntity models/contains the entire response,
which includes the response headers and the response status code.
ResponseEntity is a child of a class called
HttpEntity. HttpEntity is actually the
parent of both ResponseEntity and
RequestEntity, which models the entire request
that was sent. So if you feel adventurous, have a look at the documentation
for RequestEntity: you will see that you can add/change the request headers
and request body.
Using the methods that return a ResponseEntity means you can access different
elements of the response object using ResponseEntity methods, such as:
getBody() retrieves the body of the response
as type <T> where the concrete type <T> is defined when you retrieve the
ResponseEntity object. For example:
put(URL, Object, variables) calls a PUT
request at the specified URL with the specified path variable(s),
and updates/puts the specified object. The method does not return anything.
delete(URL, Map<String, ?>) works as
above, but with a Map of path variables instead of a variable-length
argument list.
Demonstration
Let's try consuming our web services from the previous lesson with
a demonstration.
If you wish, make a copy of your previous project where we created
a Rest Controller for operating on our collection of Container objects.
Let's start off with a fun demonstration. In the previous lesson you
tried the Dog API
web service: it generated a random picture of a dog.
This service is a ReSTful service and it returns JSON data.
The easiest way to be able to use the JSON data is to just
create a bean that models the response. If you look at the
Dog API page, you'll see the mention that a sample response
is in the format:
{
    "message" : "the URL to the image",
    "status" : "success"
}
The status value "success" is sent when the request is
successful. We are unable to test for an unsuccessful
response, but we can probably assume that a failed request
will not include the value "success" as the status.
Therefore, we can make a quick DogResponse bean using Lombok:
@Data
@AllArgsConstructor
@NoArgsConstructor
public class DogResponse {

    private String message;
    private String status;
}
Go ahead and add that to the .beans package of your project.
Next, add a @Controller to your project.
Let's add a handler method that performs a request to the
Dog API service:
In this handler method, we're adding both a Model parameter
and a RestTemplate parameter. Recall that RestTemplate
contains methods that allow you to create requests to
web services. It's automatically injected by Spring from
the inversion of control container.
Inside the handler, we invoke the getForEntity() method: we
pass it the web service endpoint URL, and the type for our
DogResponse bean (DogResponse.class returns a class instance
for the DogResponse bean). This tells getForEntity() that we
want to take the JSON response and convert or parse it into
a DogResponse object. And this will happen automatically
as long as you used the right names for the data members inside
DogResponse!
The getForEntity() method returns the JSON response, parses it
into a DogResponse object, and puts that object into the response
body of a ResponseEntity instance.
For testing purposes (and for our own interest), we print
the response status and also the collection of response
headers to the console. To print the collection of headers
I'm using a forEach() lambda (you may or may not have learned
this somewhere in Java 2, but even if you didn't, it should
be self-explanatory at this point).
Lastly, we take the body of the response (responseEntity.getBody())
and add it to the Model as the attribute "dogResponse"
before we load the view "dog.html".
Add the dog.html file to your project templates (make sure you include
the thymeleaf namespace) and add the code
that displays the dog image, if the request was successful:
Now save and run your application and browse to
http://localhost:8080/dog
If all goes well, you should see a random image of a dog!
Using the Rest Controller as a Service Layer
In an earlier lesson we referred briefly to an application's
Service Layer. Other parts of your application,
such as the model, view, controller, and database access components,
often share different interactions with each other. In order to
maintain modularity and adhere to SOLID principles, the service
layer is created to act as the coordinator of communications
between other components and layers. This ensures that when
one component is modified, it doesn't affect any of the other
layers. For example, you wrote an application earlier where the
controller and the user details service both needed to use
the database access layer. If you changed the database access
logic significantly, you might have to also update every other
class that used it. Instead, we use the service layer to
access the data layer and pass data/information on to the other
components that need it. That way, only the service layer
needs to worry about changes to the data layer.
This is where a Rest Controller comes in handy: it's a set of web
service methods that act as the service layer of our application
between the database access layer and everything else.
Let's modify our program by consuming our container web
service methods.
Consuming GET Services
In your controller, let's add two handler methods that consume
both our GET web service methods (remember there are two: one
to get all the containers and one to get a single container by
the container name). All of these handler methods will use
@GetMapping, unless stated otherwise.
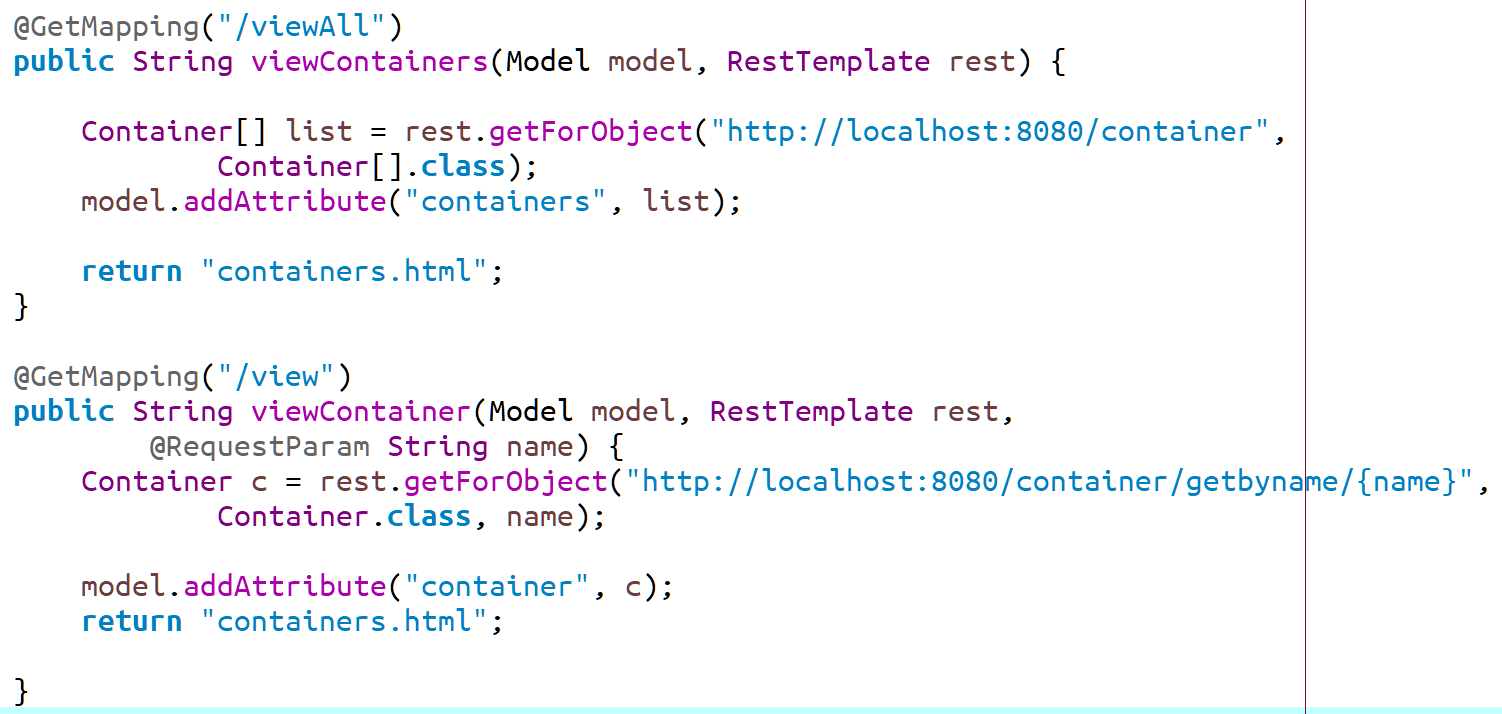
First, create the handler method viewContainers mapped to
"/viewAll" that performs a GET request to http://localhost:8080/container
and retrieves the response as a collection of Container objects:
The method needs Model and RestTemplate parameters.
Invoke the rest template method getForObject()
(we don't need any other part of the response for now, but
feel free to use getForEntity() instead so you can
try other things!) and get the result as a Container
collection, e.g. Container[].
Notice this is an array, not a List<Container>: we can't say
"List<Container>.class" so this is easier.
Also, make sure you use the URL pattern you set up in your
Rest Controller in the previous lesson.
Add the containers collection (or request body if you used ResponseEntity)
to the model.
Load the view containers.html
Now create the second handler method getContainer()
that maps to "/view":
The method needs a Model parameter, RestTemplate parameter,
and a request parameter for a form input field called "name".
Invoke the rest template method getForObject() and get
the result as a single Container object. The request URL
needs the request parameter variable!
Make sure you use the URL pattern you set up in your
Rest Controller in the previous lesson.
Add the container returned to the model and load the
view containers.html
Now add the containers.html page to your templates, and make
sure you add the thymeleaf namespace to it:
If there's a container object in the model, display
it in a DIV.
If there's a container collection in the model, display
the containers in a table with a column for the names
and a column for the volumes.
Lastly, add an index.html page with links
to /viewAll and a form with an input field where the user
can enter a container name to search for. The form only
needs a text input field called "name" where the user types
the container name.
Save all the changes and run your program: Load your index page and
try the View All link, then go back to the index page and try
finding a container by the container name!
Solution: Handler methods
Consuming a POST Service
Now let's try consuming the POST web service - remember we only
had the one - that added a new container to the existing set of
containers. But there's an issue we have to solve: when
we use a handler in our main controller to use the POST
request web service method, it's unable to handle the
container's default ID of 0 because it uses the All-Args
Container constructor. This constructor requires that the ID
be greater than 0. We can fix this with one
of two solutions:
Edit the Container bean and go to the mutator method for the
container ID. Modify the if statement to test if
the id is greater than or equal to 0.
This way, the Container all-args constructor will permit a
0 ID.
However, this may not be appropriate for all programs: perhaps
you don't want to allow a 0-value ID! In this case, a
second solution is available:
Set the ID of the container to a "dummy" value before you
send it to the web service. The value won't be added to
this container's database record, because your database
access method only creates the new container record using
the name and volume; the ID value is an auto-increment field.
Either of these solutions will work, you can do whatever is
appropriate for your program. For this one, we'll use the
second solution.
Now we can try a POST request:
Add a form page new.html with a form that allows a user
to add a new container. The form is bound to a container object:
Add a handler method to your main controller
that loads the new.html form page. Make sure you add an
empty container to the model so that it can be bound to the form.
Add a handler method to your main controller
mapped to "/post" (the form's action attribute value).
The handler method needs the model parameter, a container
model attribute, and the rest template parameter.
Set the container's ID to whatever valid value you
want, it doesn't matter since it won't be used.
Add a statement to invoke a POST request to the appropriate
URL. Remember that the POST service in our rest controller
returns the new record's ID as an integer (check your code to
see if you used Integer or Long)! Store the
returned record ID in the model so we can display it on the
containers page.
Remember that after we do an insert (or update or delete) we
should refresh the containers list. Add the code to invoke
the appropriate web service method to refresh the list of
containers (hint: you can copy and paste this from one of the
methods you wrote earlier!)
Load the containers.html page.
Modify the containers page: add a DIV that displays the record number
(if there is one in the model).
<div th:if="${newId}" th:text="|New Record #${newId} added.|">new record added</div>
Now give it a try: restart the application and load the new.html
page via its handler method. The form will be filled with
the default container data, so don't panic. Just replace it
with new data (remember that container name has to be unique).
Then submit the form - you should see the new container, the
new container's record number, and the list of containers (which includes
your new one)!
Solution
Consuming PUT Services
Let's try one more: let's try the PUT service that replaces
the entire list of containers.
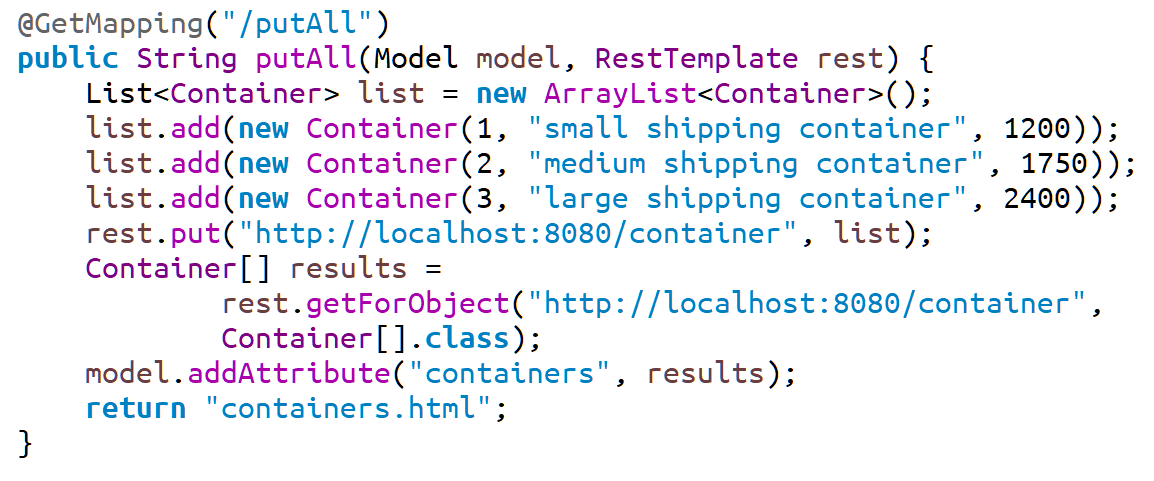
In your main controller, add a handler method that tests our PUT service method that replaces
the entire collection. Note that this handler uses a @GetMapping
because it's handling a Get-Request to a URL e.g.
http://localhost:8080/putAll.
I'm not going to bother with an input form,
that will be way too much effort at this point. We'll just hard-code
a List of container objects to replace the current containers with:
Create the handler method, map it to "/putAll" and make sure it
has the Model and RestTemplate parameters.
Create a new List of containers and add 3 containers to it
(note that the IDs aren't necessarily going to be the
primary key values since the database auto-increments
the primary key field):
Use the rest template's put() method to request the appropriate
URL. Pass it the list that you just hard-coded.
Add the statements to get a fresh list of containers and
add it to the model.
Load the containers.html page.
You can test your handler method by going to
http://localhost:8080/putAll.
You should see the 3 containers that you hard-coded: you replaced
the original set of containers with these 3.
Solution: Handler method
At this point you should be comfortable consuming the web services
you wrote in the previous lesson. The rest are going to be left
as exercises.
Next, we'll learn how to consume these web services using JavaScript and
AJAX!
Exercises
Add the handler methods that consume your two DELETE web service
methods:
Delete One Item By ID:
In your containers.html page, add a column to the
containers table with a DELETE link for each container item.
Create a handler method that is invoked when a DELETE link
is clicked:
Request the appropriate URL with the ID of the
record to be deleted.
Refresh the list of containers.
Load the containers.html page.
Delete All Containers:
Add the handler method to request the appropriate
URL to delete all the containers.
Refresh the list of containers (ideally, it's going to
be empty, but we will try anyway just to make sure).