There are hundreds of elements in HTML, so it can be daunting
to imagine them all, or even imagine having to learn them all.
It helps if you are able to classify all the different elements
into types and categories: there are actually several ways
to categorize elements, and understanding this will help you
learn and remember the different HTML elements that are
available. Let's start off with discussing two different
"Types" of HTML elements: Block vs. Inline
and Semantic vs. Non-Semantic.
In HTML, some elements like paragraphs, are block
elements. Block elements begin on a new line and end with a line break.
They will take up the full width of the screen
(unless you've defined otherwise with CSS).
Other elements are in-line elements. In-Line
elements don't start on a new line and don't contain a line break
at the end: In-line elements follow the regular flow of the
document. They will only take up as much space as they
need.
To understand the difference, open up this CodePen in a new tab or
window by clicking on the top-right corner where it says
"Edit on CodePen".
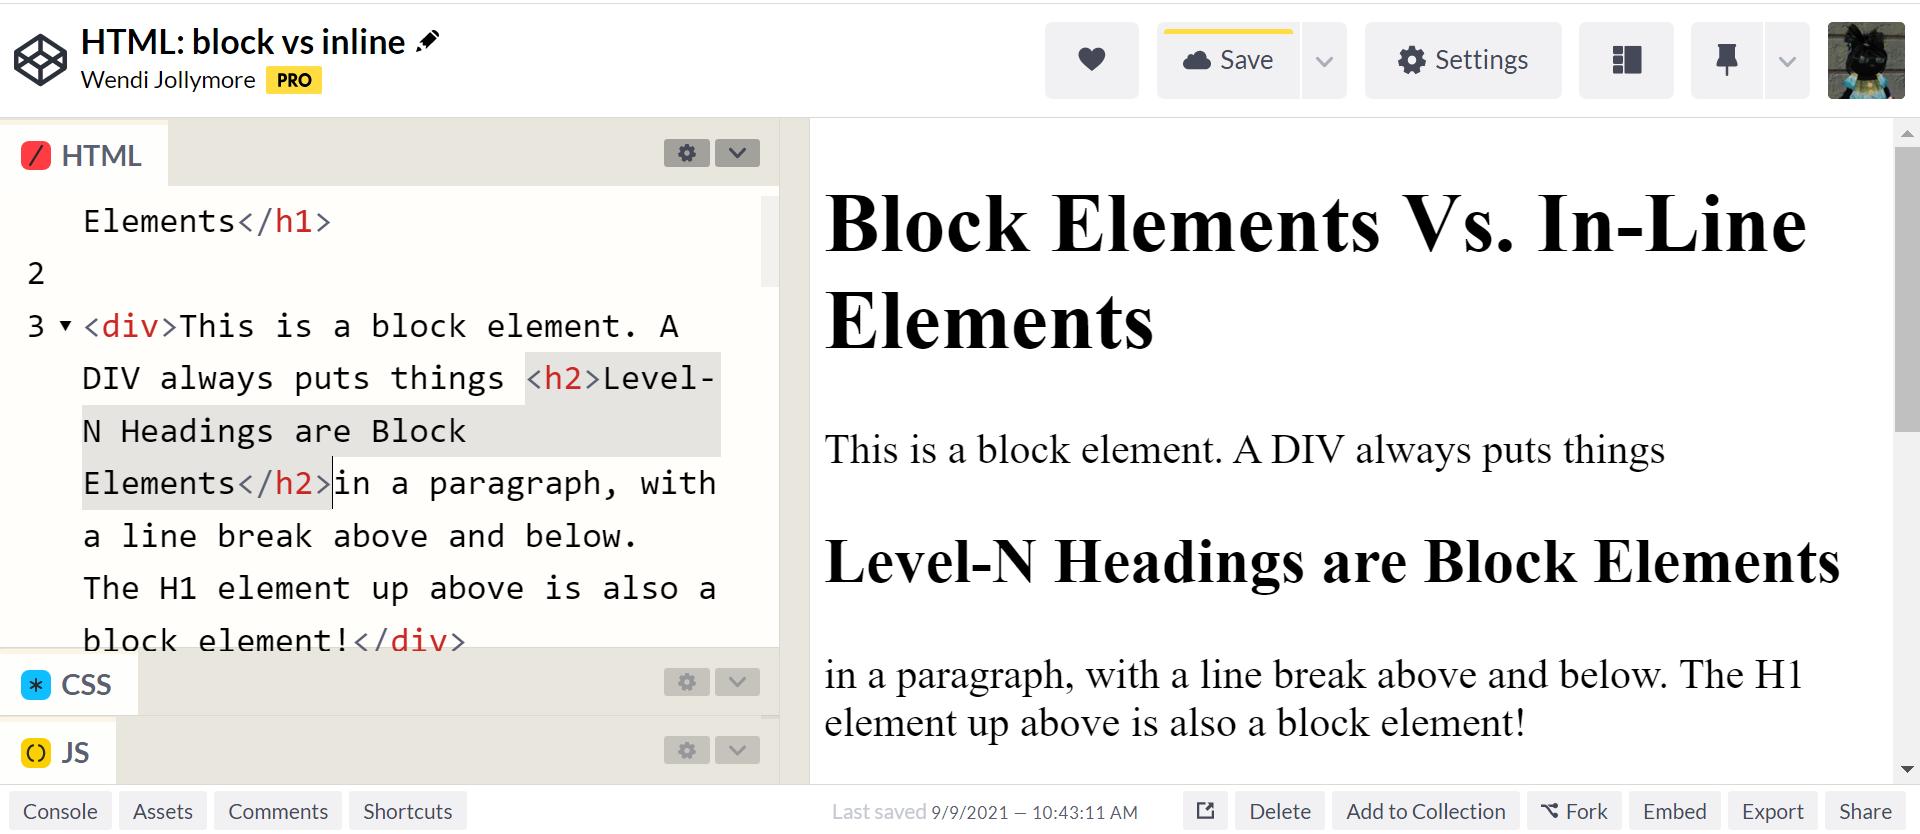
In this CodePen, you can see in the HTML tab that I've added a <h1>
element (this is called a "level-1 heading") followed by several
<div> elements (div elements are just containers that contain
text and other elements) and a single <p> element (paragraph element,
which is used for a paragraph of text content).
Inside the third block of text (the second <div> element) is an
<img> element: <img> elements are used to display images
(graphics files). The sample image comes from within CodePen, so
don't worry about it's URL/location.
When you view the page results, you'll see that the image appears
in the middle of the paragraph of text (it's a little cat
silhouette). Load the results into Full Page or Live view so
you can resize your screen. You'll notice that the
image wraps with the text. That's how in-line elements work:
they always flow within the block of content they're defined in,
they flow with the rest of the content and wrap with the content if
necessary.
The image is in-line: it acts like a single
word inside the paragraph.
On the other hand, the <h1>, <div>, and <p> are all
block elements: they always start and end with a newline.
Test this out: put your cursor inside the first <div> element
and paste the following code anywhere inside it, anywhere
between the <div> and </div> tags:
<h2>Level-N Headings are Block Elements</h2>
In the Results area, you'll notice that your <div> text is
now split up with your level-2 heading in between: the new
<h2> and its content appears in its own "block" with a
line break before and after.
The <h2> is a block: it displays with a
line break before and after, so that it's on its own
line, in its own "block".
In summary, block elements appear as "blocks" in a document: they
start and end with a new-line or line break. Inline elements do
not behave in the same way: they don't break before/after, but instead
they go with the flow of the document.
Semantic vs. Non-Semantic
In older versions of HTML, most of the elements were non-semantic:
they had meaning but could be used for many different purposes.
When HTML5 was released in 2014, it included a set of new
semantic
elements, which add more meaning to a web document.
Most of these elements fall under the
Sectioning Content category.
Semantic Elements
Semantic elements are HTML elements whose element or tag name
clearly defines the purpose of the element or
what kind of content the element contains.
For example, the element named NAV contains the page's
navigation (links to other pages on the site/application)
and the element FOOTER contains the footer text for a
page.
It's important to use semantic elements where appropriate, because
it can optimize search engine searches for the page's content, they're
more accessible to screen readers, and it makes it much easier for
other developers on your team (or yourself) to understand the
page content and structure and find specific blocks of code for
editing.
For example, when you use a <header> element, a screen reader will read
it as a document header, and when use a <footer> element,
a screen reader will read it as the document footer. It's
important to always use the semantic element that is
most appropriate and not use generic, non-semantic elements that have no
meaning (unless the meaning isn't important). Also, you should
never use a semantic element for any purpose other than the one
it's intended for (this is actually
ARIA Rule #1, if you're interested in
WAI-ARIA). For example, you shouldn't use a list element
to provide indentation and you shouldn't use a <header> element
for anything other than a document, section, or article
header.
Examples of Semantic Elements
Here are a few of the more common semantic elements you'll encounter,
but you'll learn more about these and others in the lesson on
Elements for Document Sectioning.
<header>
-
the document header, but can also be
used for an article/section header
<footer>
-
the document footer, but can also be
used for an article/section footer
<article>
- to contain an article (news, blog, tutorial, etc.
for example, each section of these tutorials is contained within an
<article> element)
Non-Semantic Elements
Non-semantic elements have names that don't clearly identify
their contents. For example the <div> element is just a
block element that can contain any content, and it's often used
as a container for other elements. A <span> element is
an in-line element that can contain any text. Niether <div>
nor <span> identify the context of any content they might contain.
We still use non-semantic elements for some parts of a page
or application. For example, we still use <div> and
<span> elements to contain content that we want to
style a certain way or that doesn't really fit with any
of the semantic elements. It's important that you don't
use semantic elements for any purpose other than the
purpose for which they were intended.
For example, it's bad design to use a <section> element
for a document footer or a <footer> element for anything
that's NOT a footer.
As you begin to learn the HTML elements, you'll see that some
elements are clearly semantic and some are clearly non-semantic.
If you can guess what an element is for by seeing it's name,
it's most likely a semantic element, although there are
exceptions. For example, the <table> element is for a
table of data (i.e. with headers, rows, and columns),
but the purpose of the <p> element is not
as obvious (it's actually a semantic element used for
paragraphs of text). You'll gradually learn
when and where to use all the different elements as you learn
and practice HTML.
Summary
We use semantic elements to more clearly define a document's
structure. This could be helpful for anyone maintaining the
document, or it could also be used by applications that read in
segments of a document for use in other programs. For example,
a program might want to read the main content of a document
for use somewhere else, but not be interested in the header, footer,
or navigation areas of the document. Proper use of semantic
elements also makes web documents more accessible and abides
by Web Content Accessibility Guidelines.
Exercise
Here are some additional HTML elements you'll learn
in these tutorials. See if you can guess what they're for,
just by the element name:
<form>
<table>
<figure>, <figcaption>
<input>
<button>
<details>
<nav>
<summary>
<time>
<menu>
<abbr>
<audio>, <video>
<picture>, <img>
<dialog>
<address>
Some Common Basic Elements
In later lessons we're going to go over the various categories
of elements in detail and discuss the different sets of elements.
After all, there are hundreds of elements to learn! But it's much
easier to learn the various categories and how they fit together
after you are comfortable with some basics.
Displaying Blocks of Text
There are several ways to display blocks of text, but the most
basic and common way is to use the <p> or paragraph
element. In fact, most of the blocks of text in these tutorials
are in paragraph elements.
The <p> element is a block element, so it has a new-line
above and below: the block always starts on a new line and
it ends with a newline. In most browsers, there is a bit of
margin space above and below the content inside the paragraph,
and if you learn CSS, you
can change how much margin space there is.
Here is a codepen that demonstrates the P or paragraph element:
Often you'll want to display lines of text with line breaks in between,
such as when displaying an address or a poem:
Office of the Prime Minister of Canada
80 Wellington Street
Ottawa, ON K1A 0A2
So how did I write the code to display the above address?
I didn't use indvidual paragraph elements, that would appear as:
Office of the Prime Minister
80 Wellington Street
Ottawa, ON
K1A 0A2
<!-- code for the example -->
<p>Office of the Prime Minister</p>
<p>80 Wellington Street</p>
<p>Ottawa, ON<
<p>K1A 0A2</p>
Instead, we can use the line break element, which some coders
call the "new-line" element. The <br> element adds a line break or a new-line
to the content. Note that the <br> element does not have a closing tag!
You simply type <br> where you want the line break to go, there is
no such thing as </br>
Office of the Prime Minister of Canada
80 Wellington Street
Ottawa, ON K1A 0A2
<p>Office of the Prime Minister of Canada<br>
80 Wellington Street<br>
Ottawa, ON <br>K1A 0A2</p>
Notice on the MDN page for the <br> element it clearly says
in a yellow box: "Do not use <br> to create margins
between paragraphs; wrap them in <p> elements and use
the CSS margin property to control their size."
You won't start to learn CSS properties in these tutorials (that's
a completely different course) but don't
worry too much about that part for now. The important part
is that you should NEVER use the <br> element
as a break between paragraphs. That's what the <p>
tag is for!
<!-- DO NOT DO THIS !!!! -->
<p>Don't use the <br> element to create blank lines between
blocks of text like I'm going to do right here:
<br><br>
DO NOT do that!! Instead, wrap your blocks of text inside individual
<p> or <div> elements like this:<p>
<!-- Do it this way, instead! -->
<p>This is a paragraph of text and I'd like to insert something
interesting after this paragraph on its own line, and then start a
new paragraph. But I'd like to do it correctly. Not the way I did it
up there in the previous example.</p>
<p>I love chocolate!</p>
<p>Like that! That's much better!  This is more structural and
is also more accessible for screen readers.  A screen reader will
recognize 3 paragraphs of text and make that clear to the listener.</p>
Not only that, but the <br> element causes problems
for most screen readers: they completely ignore the BR element,
so a user with a screen reader doesn't know it exists. When
the BR element is used properly this is not a problem, but when
not used correctly, it means the meaning of your content might
be lost to those of users. In the example above, the first part
that uses the 2 BR elements would be read out to a user with a
screen reader as if there was a single paragraph of text. The second
part with the 3 P elements is read with a clear division between
the 3 paragraphs. Also, users often navigate from paragraph to paragraph
using the keyboard: if you're using BR elements, there is no way for
the user to navigate to the next segment of text.
Instead, the <br> should be used only when you're
inside another block element and require a line break
in order to express the meaning or where the line break
is necessary. Examples:
When displaying a poem, to break between the lines
of the poem. Stanzas should use a block element such
as <p> or <blockquote> (you'll learn about
the <blockquote> element in the lesson on
Quotes and Code).
You'll notice I did exactly that in
the song lyrics example earlier using the <p> element.
When displaying an address: put the different lines
of the address inside a block element and add <br>
to break the lines.
When displaying program code or program output, you
can use the <br> element to break lines in some
circumstances. We'll talk more about this in the
lesson on Quotes and Code.
When you want a particular line to stand out in the
middle of a paragraph.
Like this.
I put a <br> after "paragraph." and after "this.".
Bold and Italics
Normally, text formatting like bold, italics, colour, and fonts
are done using CSS. However,
you can use elements to create bold and italic text in certain
circumstances.
Bold Text
Aside from using CSS (that's a different course, entirely)
there are two ways to show text in bold using HTML:
you can use the <b> (bold)
element or you can use the <strong> element. STRONG is a semantic
element and B is a non-semantic element. The difference is that when you
want to show that a word or phrase should be given importantce
in a sentence, you would use STRONG. If you just want to
bold something to make it look nice, you would use B.
For example, say you have the following sentence:
The exam is on Monday at 9am not Tuesday at 10am.
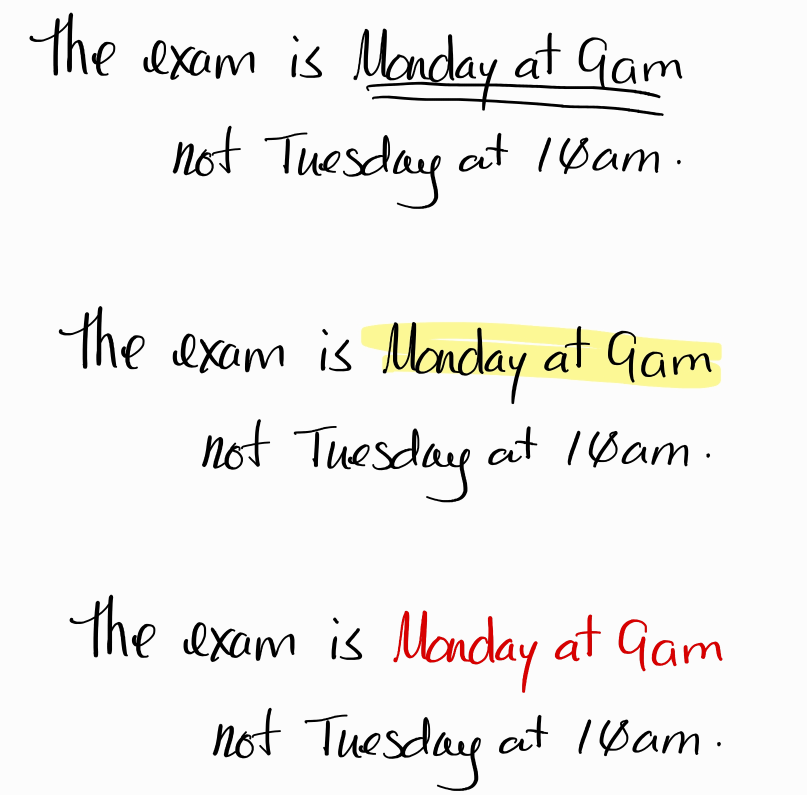
If you were writing this sentence on a piece of paper, you
might want to give the phrase "Monday at 9am" some importance,
to draw attention to it: "Hey!!! The exam is Monday at 9am!!!
Not Tuesday at 10am like you originally thought!" You might do
this by adding an underline or two, or highlighting the phrase
with a highligher, or maybe even using a different ink colour.
The sample phrase written 3 different ways:
underline, yellow highlight, in red.
The <strong> element should be used around the text that has
the added importance. By default, this will show the text in bold:
<p>The exam is on <strong>Monday at 9am</strong>
  not Tuesday at 10am.</p>
The B or <b> element is not semantic, so it has no meaning,
it simply displays its content in bold:
<p>The exam is on <b>Monday at 9am</b>
  not Tuesday at 10am.</p>
In both of these above examples, you may be wondering, what's
the difference and why is this important? (and FYI, I
used the <strong> element to bold that text)
When a user is using a screen reader to
view your page, the screen reader interprets semantic elements
to the user in a different way than non-semantic elements.
In the case of the STRONG element, the screen reader will add an audial
tone of importance or an emphasis to the content, so that the
listening user understands that the content is important. If you use the B
element instead, the screen reader will read the content in the same tone
as all the rest of the text.
Additionally, as we saw in the written example above, someone might
want important text in bold, but another might want it underlined or
highlighted or in a different colour. If you use the STRONG element,
you can use
CSS to style
how you want the content of STRONG elements to look. You can't do this
with the B element: content of the <b></b> tags always appears
in bold text.
So when should you use STRONG and when should you use B? Here
are some guidelines:
Use STRONG when you want to show the importance of a word or
phrase within a sentence, as if you were going to underline
it, highlight it, or use other written markings to draw attention
to the word or phrase.
Use STRONG if you want to make the content of the important
text a different style than simply bolded.
Use <b> when you simply want to make text appear bold and
don't wish to change the importantance of the text in context
with the rest of the sentence.
If you're familiar with CSS, you will rarely use the <b> tag,
since it's better to format text for appearances-only using
CSS.
Italic Text
As with bold text, we have a similar pair of elements for italic text:
The <em> (emphasis) element is a semantic element and the <i> (italics)
element is a non-semantic element. The EM element is used to give emphasis
to a word or phrase so that it stands out more than the rest of the sentence.
The <i> element simply displays its content in italics. As with the STRONG
semantic element, EM has meaning so it's read differently by a screen reader and
also supports styling with CSS.
Emphasis allows you to place a vocal emphasis on a word or phrase in a sentence.
The easiest way to understand is with an example:
Read each of these sentences out loud with the
emphasis shown (put a stress on the word in italics),
and you'll find that each sentence actually means something
different (note that I added the colouring of the words inside
the EM element for this example):
I didn't say she stole the money.
I didn't say she stole the money.
I didn't say she stole the money.
I didn't say she stole the money.
I didn't say she stole the money.
I didn't say she stole the money.
Using the EM element for italics, a screen reader would read one of those
sentences differently (try it!).
If you use the <i> element instead of <em>, many screen readers will
read them all the same.
Some developers find the difference between EM and STRONG a bit confusing at
first: what's the difference? I think of strong/importance as something that
is written. If I were hand-writing something and I have some content that
I would underline, highlight, write in a different colour, circle, or
put some * asterisks beside it, I would be doing that to show the importance
of that content. In a web document, that's where I'd use STRONG. If I were
reading something out loud or speaking, and I want to put a verbal stress on
a word or phrase, that's emphasis (e.g. I didn't say she stole the
money!). In a web document, that's where I'd put the EM element.
So I use STRONG where I'd have written importance and EM where I'd have
verbal emphasis. But to be honest, it doesn't really matter that much: there are lots
of times when you could use STRONG and EM interchangeably, and even use
both at the same time.
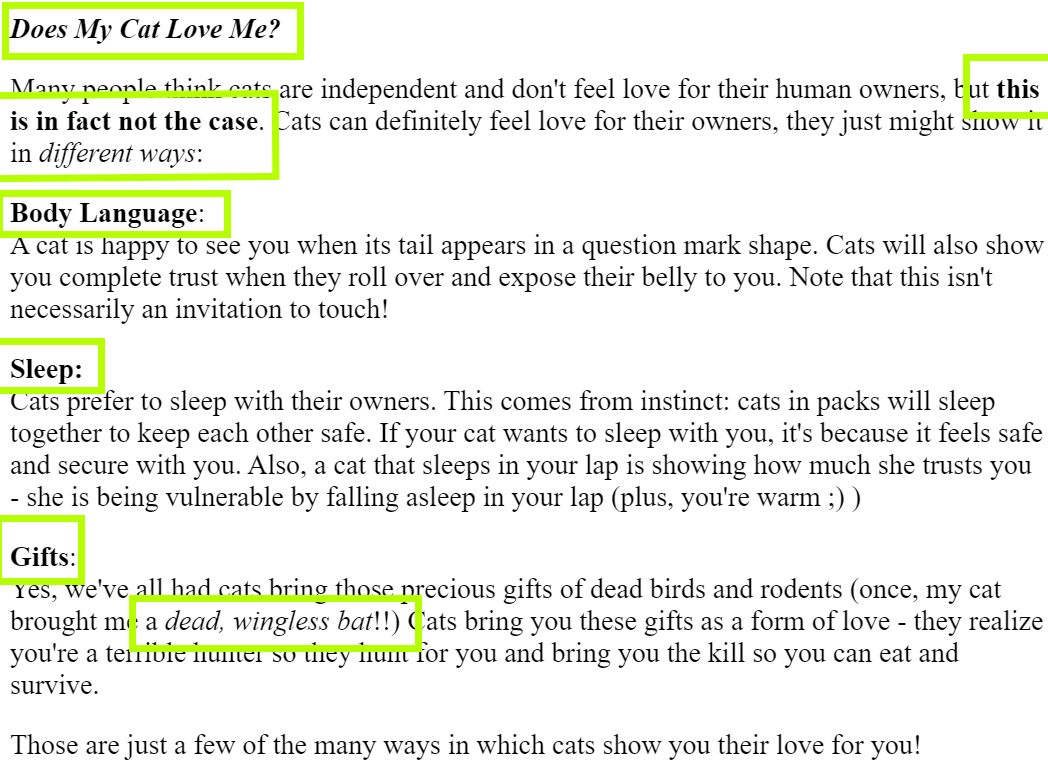
The final result should look like the image (except I outlined all the bold/italic
parts so you can find them more easily.)
The title "Does My Cat Love Me?" is in bold and italics.
The phrase "this is in fact not the case" is in bold.
The phrase "different ways" is in italics.
The sub headings "Body Language", "Sleep", and "Gifts" are bold.
The phrase "dead, wingless bat" is in italics.
Hyperlinks (we usually just say "links") are what the World Wide Web
was all about back in the early days! The ability to navigate your
way from one document to another by clicking links with a mouse was much
easier than the old way (locating and opening up different files
individually). This was revolutionary at the time!
A hyperlink, or link, is a bit of text that is clickable
with a mouse. Clicking the link usually requests a different
document (the name and location of the document is part of the
link's information): your browser will receive the requested
document and load it in the viewing area for you. If the
requested document is not found on the server, the server will
send back that oh-so-familiar 404 NOT FOUND error page
we're all familiar with.
Links can do more than just request a new document: they
can also trigger scripts (such as JavaScript). This is an
advanced topic covered in another course.
We can create links on a page with the <a> element, or
Anchor element. The anchor element defines both the clickable
text that will appear to the user, and also the location of the
page/file to request. The clickable text is part of the anchor
element's content, so it goes between the <a> and </a> tags.
The name and location of the page/file is actually defined in the
anchor element's href attribute. There
are other attributes you an read about in the
MDN: Anchor
Element page, but we'll actually cover those in detail
in the lesson on hyperlinks.
Here's a basic example with two different anchor elements that
create links to the MDN:
<p>You can read more about
<a href="https://developer.mozilla.org/en-US/docs/Web/HTML/Element/a">the Anchor element</a>
at <a href="https://developer.mozilla.org/en-US/">Mozilla Developer's Network</a>.</p>
There's so much more you can do with links in HTML, and there are
other attributes to discover, but we'll cover that in
lesson on links.
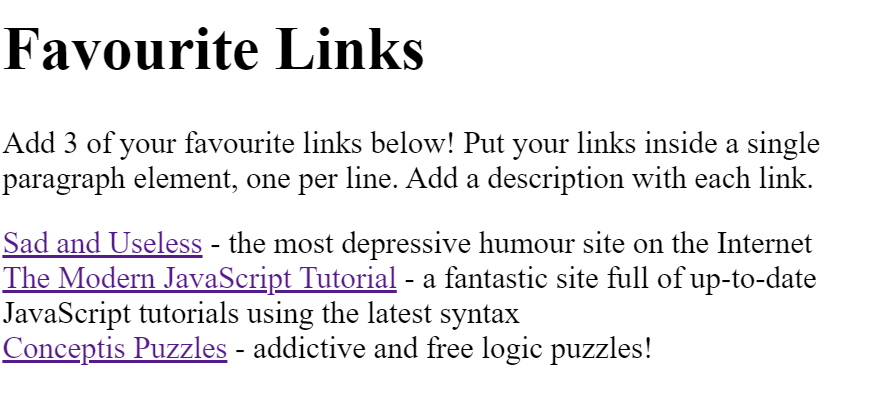
Exercise
Choose three of your favourite web sites. Copy the URLS and use them
to create three links inside a single paragraph element, one per line.
Include a description for each link. Example shown in the photo:
Three Links, each followed by a dash and then a description, one per line.
Images are a big part of most web pages and web applications, so
it's natural that you have a desire to learn how to display images
right away. Note that I can't really teach you how to create your
own custom images (I can follow Gimp or Photoshop tutorials, and
that's about it, I'm not very good with creating images beyond
using a flowcharting tool), I can only teach you how to display
images on a page or application using HTML.
Like links, this is a much larger topic and even with this short
tutorial, it's important that you've read over the lesson on
web site structure.
You will need some small-to-medium-sized images to play with
for the demonstration and exercises below, but if you don't have
any, you can do a Google Image Search for whatever images you're
interested in. Note that if you are going to use any images you
find online, you will need to follow all usage and copyright
laws. If that's a worry for you, there are several places where you
can find public domain images that are free to use with no or
very few concessions:
Wikimedia
Commons - public domain images, but be sure to double-check the image
info before you use, some require attribution or have other restrictions
Flickr Commons
- Flickr's database of public domain images, from contributors around the
world.
Magdeline -
another collection of images (make sure you stay within the "CC0" category and
be sure to check each image you choose to see what restrictions it might have; this
is a cool site because you can search for images by colour!
The Noun Project
- photos and icons; requires account to download; for free you can download
and use icons/photos (must attribute author of image per Creative Commons
license) but not edit, but there are options to purchase rights to a single image
or to get a yearly account for around $40US.
There are many other sites, just search for "public domain images"
and you'll find lots of repositories, and some are very
specific (I've been eagerly awaiting for an opportunity to use
an image from Old Book
Illustratoins!)
I hope you reached this point after having some fun searching for
a couple of images you want to use for this tutorial! If you're
using an editor or IDE for your web development, save your images
in your web project's /images folder.
In HTML, we display images using the <img> element. <img>
is an in-line element, so it will flow with the rest of the document,
it will not show up on a line by itself if you surround it
with text or other in-line elements (such as anchor elements).
If you want an image to display like a block element, put it
inside a block element (such as a <p> or <div>). In fact,
images are often placed inside the semantic <figure> element,
which we'll learn about in the images
lesson, but for now, you can just use the P or DIV elements.
To identify which image you'd like to display, you use the
<img> element's src attribute ("src" is short form
for "source", as in, the source of this image). Assuming your
image is in your project's /images directory, you can use a
relative path to your image, such as:
<img src="images/myImage.jpg">
The second thing you need to define is the "alternative text":
this is useful when:
The image can't be loaded for whatever reason (network issues,
image file missing, user has a text-based browser, browser
doesn't support image type, etc):
the alternative text is displayed, instead.
A user is using a screen reader: the alternative text
will be read out loud to the user.
We use the alt attribute to define the alternative text:
<img src="images/myImage.jpg" alt="photo of a thing with a thing">
If you omit the alt attribute, that indicates to the user
with a screen reader that no description is available or that the
image is decorative. If the
image were important and added meaning to the document, the person using
a screen reader perceive the image at all. If you include the
alt attribute but assign it an empty value e.g. alt=""
then this tells the browser that the image is decorative, and if there is a problem
loading the image, the browser will not show the broken image icon in its place.
Have a look at the CodePen below: I've added the same image twice:
The first <img> element has the src and
alt attributes set. Images are inline, so you'll
notice that the text inside the paragraph element with the image appears
on the same line.
The second <img> element also has both src and
alt but this time I used alt="". This indicates
that the image is only decorative so a description is not required. If the
image failed to load, the browser will not display the broken image icon it
would usually display.
Try this demonstration to see how the empty alt attribute works:
go into the URL for both <img> elements and change the name of the
file to something else e.g. cat-friend.png. You should notice in
the results area that the first image appears as a broken image icon
but you'll see the alternative text displayed. The second image
displays nothing because the alternative text is empty.
When you're hosting your own images on your server (or wheverver
your page/application is being hosted), don't forget to:
Keep your images in the /images directory.
Upload the images in addition to your HTML source
files to the server. I know that sounds silly to some people,
but sometimes we forget, and not everyone is experienced enough to
consider this common knowledge.
Absolute and Relative URLs/Paths
In our link examples from earlier, we used absolute URLs.
An absolute path or URL will work from anywhere. For example, if you want to
create a link to this specific page from your own web site,
you'd have to use the absolute URL
https://terminallearning.com/devHtml/elsLinks.html. If your web
site was https://yourwebsite.com/index.html
and I wanted to create a
link to it, I'd also have to use the absolute URL.
Similarly, if you wanted to add an image to your page and that image
lived in the images/ directory off your server root and the file
was called foo.jpg, you would use the absolute URL
https://your.server.name.com/images/foo.jpg.
However, when you wish to refer to a resource in the same project or
even on the same server, you don't necessarily need an absolute URL:
you can use a relative URL.
A relative URL
or relative path is a URL/path in relation to your
current location.
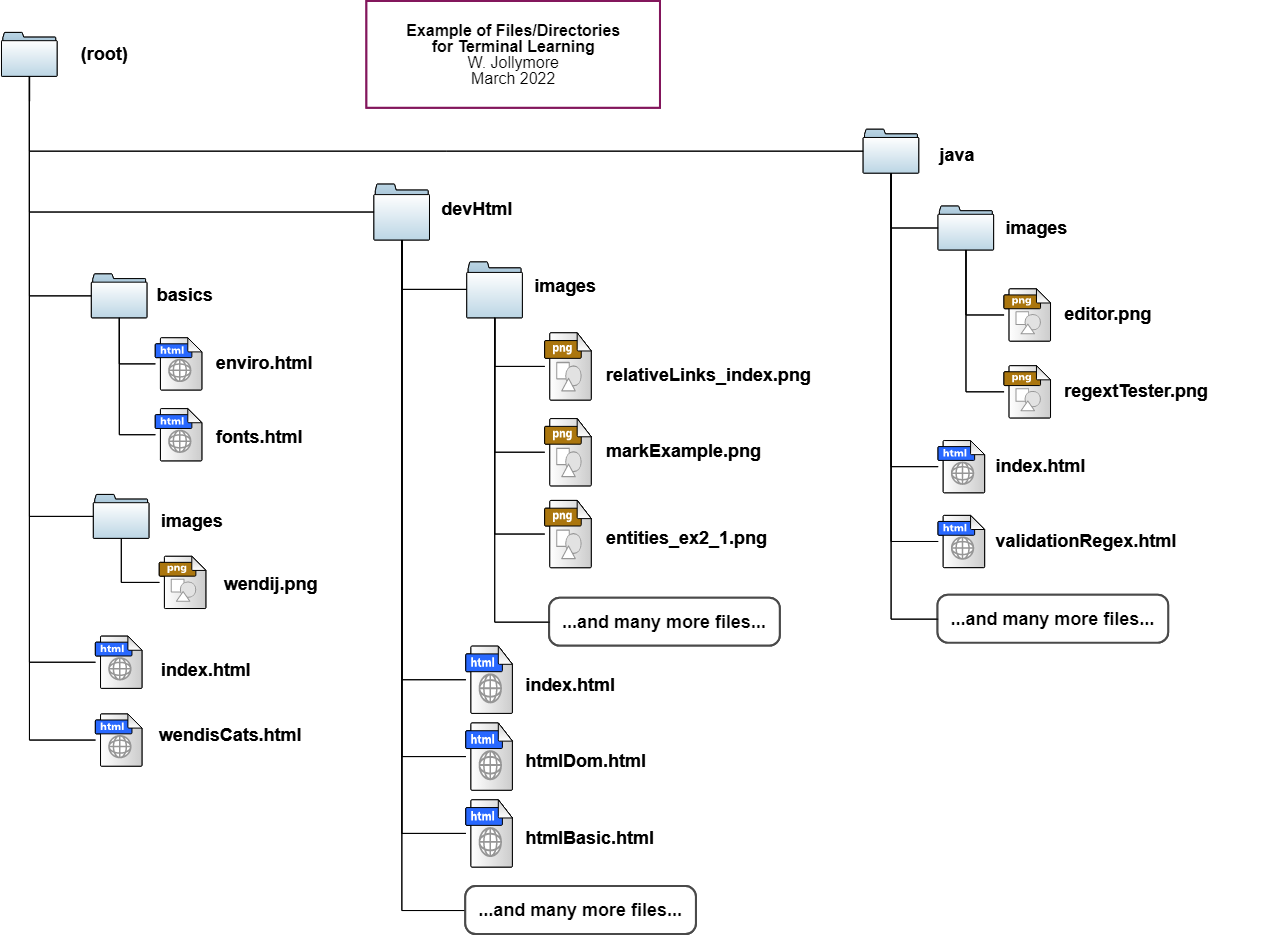
Here's an example of some of the directories and files in the Terminal
Learning web site:
Figure 1: Some of the directories and files in the structure of the Terminal Learning site
For example, this document you're reading now is located at
https://terminallearning.com/devHtml/.
Inside the /devHtml directory
are many other files, for example there is also one
called index.html,
which is the main index page for the HTML tutorials. To create a link
to the index.html file, I can use an absolute URL, which contains the
complete path/location to the index.html file:
<a href="https://terminallearning.com/devHtml/index.html">Main HTML Index</a>
Or I can use a relative URL:
<a href="index.html">Main HTML Index</a>
In the above example, I didn't specify any path information at all; I didn't
need to because index.html is inside the same directory as this page that
contains the link.
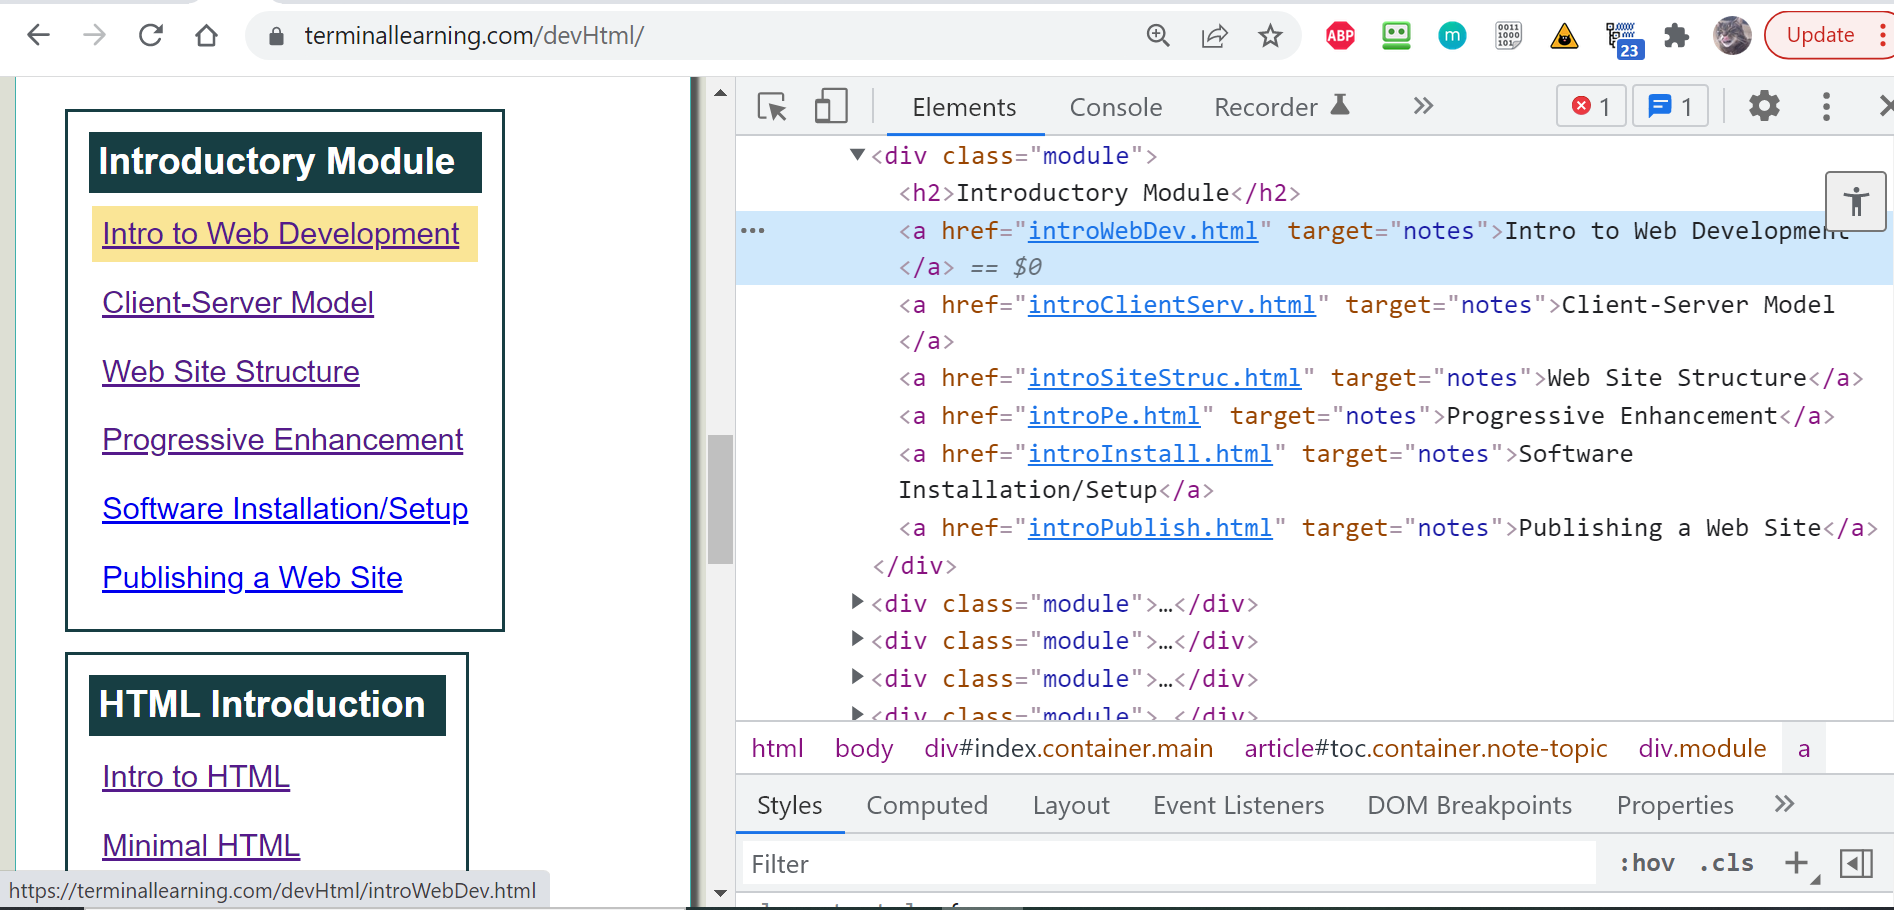
In fact, if you go now to that index page
(right-click the link and open it in a new tab so you don't lose
your spot in this tutorial!) and then right-click/Inspect
the various links in the main part of the page, you'll notice that they
all reference their respective files directly, with no path information at all.
they're all using relative URLS.
Right-click/Inspect the index page and notice how each link in the modules are relative
links
Note that all these links only work because all of the files are in the
same directory as the index.html file. If your files were in a different
directory, you'd have to include that information in your relative link.
For example, the image up above is in a sub-directory of the devHtml directory
called /images. So the absolute path to that image is
https://terminallearning.com/devHtml/images/relativeLinks_index.png.
So when I added that image file to this page, I could have done it
with an absolute URL, like the one in the above paragraph, or I could
use a relative URL. A relative URL to that image would be
<img src="images/relativeLinks_index.png" alt="a list of relative links in the Inspector">
Notice in the example that the relative URL starts with images/
which is a reference to the sub-directory called "images" that's inside the
same directory as this page. Then it's followed by the name of the image file.
Again, this only works because the <img> element
is on a page that's in the same directory
as the images/ directory. That relative URL would not work from any other location on
my server, or any server. The path images/relativeLinks_index.png
is relative to the location of THIS page.
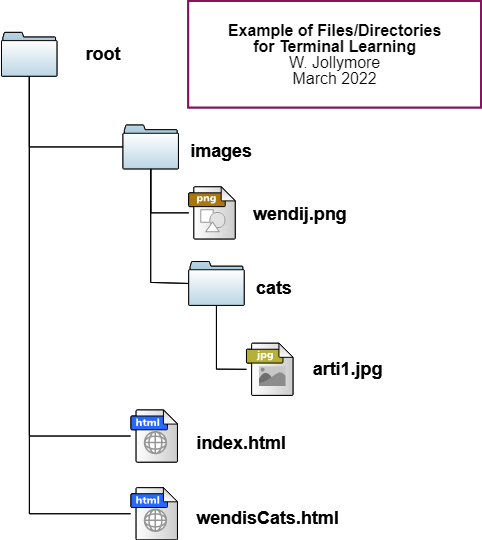
What if I wanted to refer to a file in a sub-directory's sub-directory?
For example, in Figure 1 up above, there's a file inside the project
root directory called wendisCats.html: what if I added a cats/ sub-directory
to the images directory and wanted to reference an image inside the
images/cats/ directory arti1.jpg (see Figure 2, below)
with an <img> element in the
wendisCats.html file? I wouldn't be able to write code such
as:
<img src="arti1.jpg" alt="a picture of Arti">
Figure 2: I've added a cats/ sub-directory inside the images/ directory
That would result in a link that doesn't work (it will return a 404 NOT FOUND
error from the server). That's because using that relative link is the equivalent
of the URL https://terminallearning.com/arti1.jpg which doesn't exist.
Instead, I need a relative URL that says "go into the images/ directory and then
into the cats/ directory, and then get the arti1.jpg file":
<img src="images/cats/arti1.jpg" alt="a picture of Arti">
To specify more than one directory or sub-directory, you just add each sub-directory
name, separated by the forward slash (note that on file systems on
your computer you might see this as a back-slash instead, and
that's fine).
Of course, you can also use an absolute URL such as:
<img src="https://terminallearning.com/images/cats/arti1.jpg" alt="A picture of Arti">
You can also reference a file in another directory
that's not a sub-directory of the current directory, as long as
it's on the same server/account. For example, looking back at
Figure 1, perhaps inside this page you're reading now
(which has an absolute URL of https://terminallearning.com/devHtml/htmlBasic.html)
I would like to create a link to my Java tutorial on Regular Expressions.
The regular expressions page is located at the absolute URL
https://terminallearning.com/java/validationRegex.html. Since
this page you're reading now is on the same server as my Java Regular
Expressions page (but inside a different directory), I can refer to
it using a relative URL:
The above code will appear as:
Regular Expressions (if you want
to try the link, make sure you right-click it and open it in a new tab so you
don't lose your place).
Here you see an extra set of characters: ../ which is
a way of saying "the parent directory". Every directory has a parent directory:
the parent of the icons/ directory is the images/ directory. The parent of
the images/ directory is the devHtml/ directory. The parent of the devHtml/
directory is the root directory of my web server. The root directory
doesn't have a parent, it's the parent of everything on this server.
This might sound familiar: we talked about the parent-child relationship
with DOM Nodes when we learned about the
HTML Document Object Model. The concept
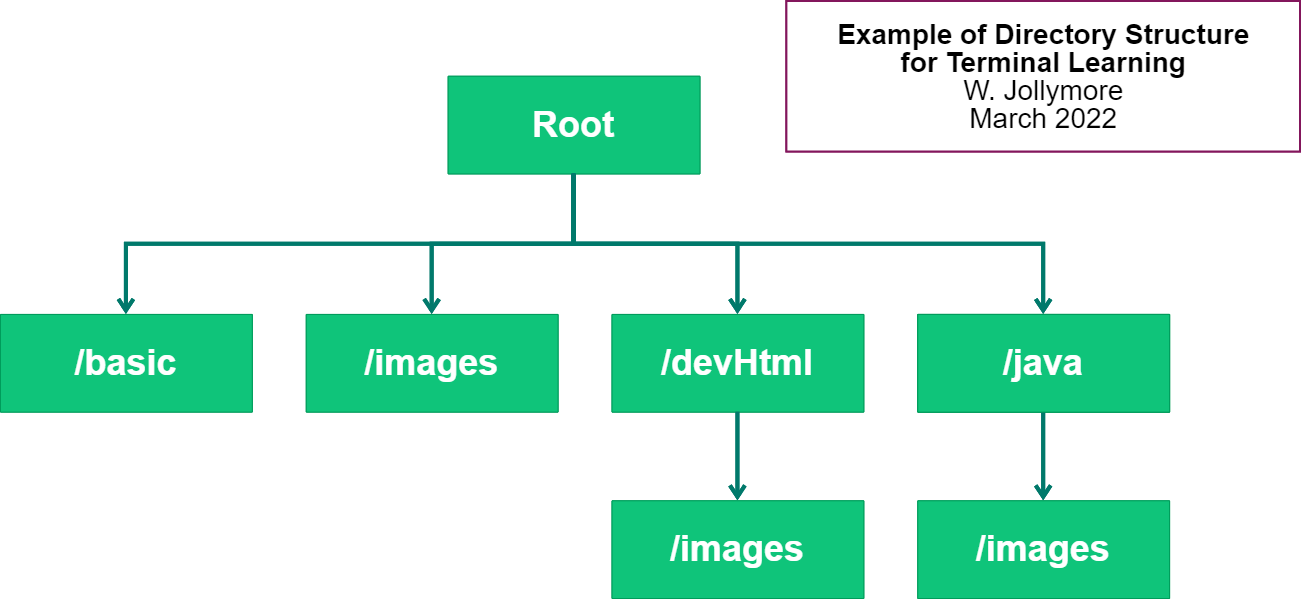
is exactly the same! Here is a hierarchy chart of some of the structure
of the TerminalLearning web site in hierarchical form:
Figure 3: Some of the directories in the structure of the Terminal Learning site
Notice that my devHtml/ directory and java/ directory
are at the same level - they're both inside the root
directory (which is just https://terminallearning.com)
This means that to access the validationRegex.html file
from inside the htmlBasic.html file, I have to go back up
one directory to to the root (../), and then go inside the java/
directory.
You can use ../ more than once if you want to go up to a
parent's parent. For example, ../../foo means go up the
hierarchy 2 directories (the current directory's parent, and then
up again to the parent directory's parent),
and then into the foo/ directory.
You can use this technique to create links or reference
images in other directories all over your server, as long
as the files you want to reference or link to are all
within the same account (for example, if you're sharing your
hosting site or server with other users, you will only be
able to access files in your own account).
Other Notes About Relative URLs
Here are a few other things to note about relative URLS:
The relative URL "/" will always lead back to the root of
your web server. For example, https://your.domain/ will
always go to the root directory of the your.domain server.
You don't even need the slash at the end: https://your.domain
will do the same thing.
Navigating to a directory will always load that directory's main
index file, if it exists. The file name is usually index.html or
index.htm but your server probably also has other names configured
such as index.php or even default.htm. If such a page does not
exist in the directory:
If the server allows, it will return
a directory listing of hyperlinks (a clickable list of all the files
and sub-directories inside the directory).
If the server doesn't allow a directory listing, it will show
an error or message that the directory can't be listed or that
the index page is not found.
For example, http://terminallearning.com/devHtml will
load the http://terminallearning.com/devHtml/index.html file.
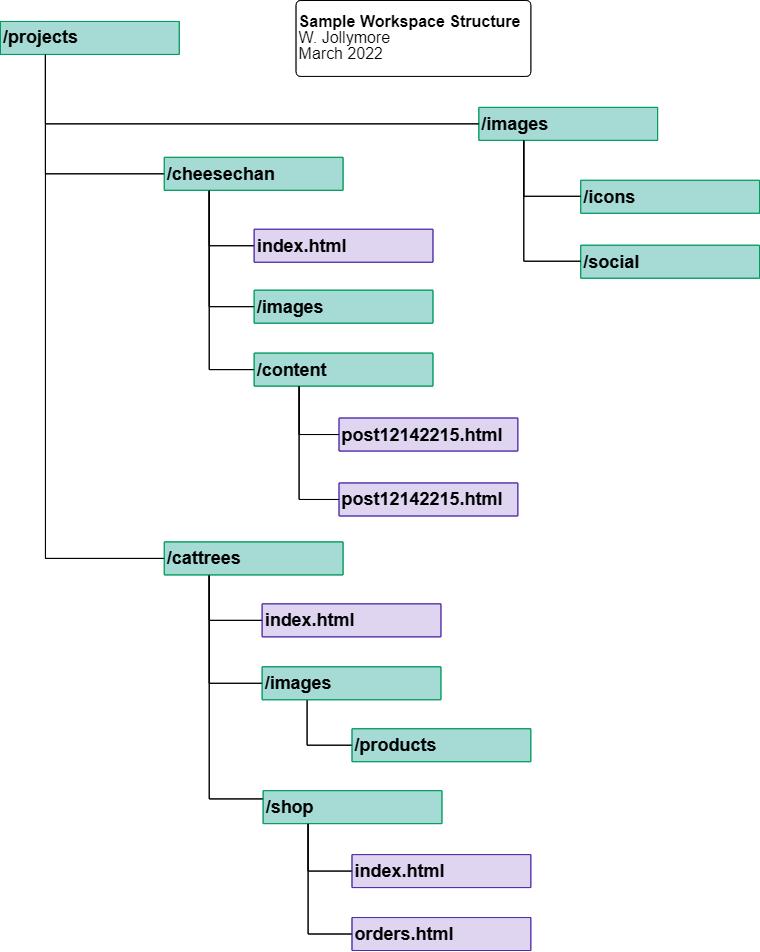
Exercises
You're a developer with a few projects that you have written
and maintain for clients. the image below shows the directory
structure (with a few sample files) of your local workspace,
including two projects: one for "The Cheese Channel", a
blog about cheese (/cheesechan), and one for "Sydney's
Cat Trees", a company that sells custom cat trees (/cattrees).
You also have a directory /images that contains various
images you use in all of your projects such as decorative
icons and graphics for various social media platforms.
Sample project directories
You need to add some links and images to some of the pages
in both of the projects:
On the main index page of the Cheese Channel blog,
add a link using a relative URL to the page
post12142215.html inside the /content directory.
On the Sydney's Cat Trees main index page, add an
image feature.jpg that is stored in the /products
sub-directory of the cat trees /images directory, using a
relative URL.
On the page post12142215.html in the cheese blog
project, add an image camembert.png, which is
stored in the cheese blog's /images directory.
Use a relative URL.
On the Sydney's Cat Trees /shop index page,
add a link to the main Sydney's Cat Trees index page.
On the Sydney's Cat Trees /shop index page,
add an image support.png, which is in the main /images
directory off your /projects root, in the /icons
sub-directory.
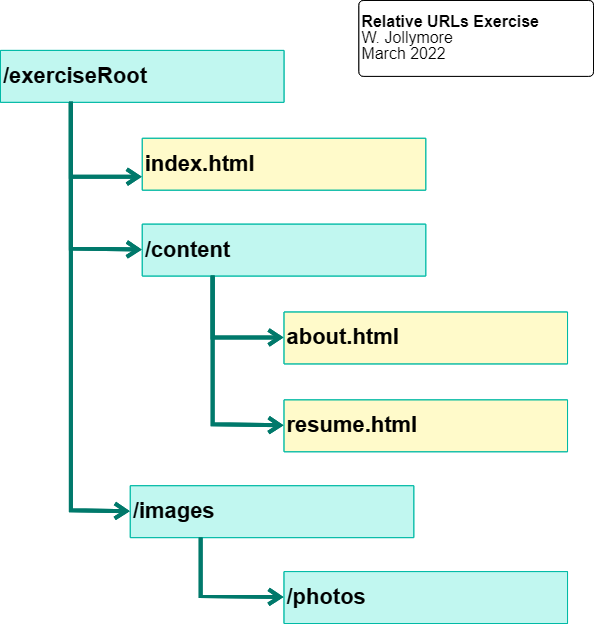
Create a directory on your file system or your web server
for this exercise. Call it whatever you like. I'll refer to
this drectory as your "exercise root" directory.
Inside your exercise root, create the following
directory structure:
Create this Directory Structure
Add an image to the /images directory (I'll call this "the first image" but
the actual file name can be anything). Add another image to the /photos
directory (I'll call this "the second image"). Add the three HTML pages
index.html (in the exercise root) and about.html and resume.html (both in the
/content sub-directory). Make sure both have the
minimal HTML. Add some appropriate headings
and whatever other content you want to each page.
On the main index page, add links to the about.html and resume.html
pages, using relative URLs.
On the main index page, add the second image using a relative URL.
On both the about.html and resume.html pages, add a link back to the
main index page using a relative URL.