Overview of Password Encryption and Storage in Spring
So far we've looked at web application security
for a small group of users that we hard-coded using
an in-memory security realm. What if we want to allow
users to log into our application using a login name
and password that is saved somewhere else?
We would need to store each user's password
into a file or database table. When a user wants to log in,
we would ask them for their credentials, then we would
authenticate those credentials
by checking them against the database data. For example,
we'd compare the user-entered login name and password
against the user's record in our Users table. Then, if
the data matched, we'd send a response back to the user
letting them know they've been authenticated.
Storage of User Details and SALTS
How do we store user passwords in the database?
Your user table would need to have either a login name
or email address field (something that will be unique
for each user account), and you would also need a password
field. You could add other fields as well if you wanted
to: birth date, last login date, account creation date,
whatever your application needs.
Storing Passwords: Security Issues
It should be obvious by now that you would NEVER store
a user's password in plain text. You should only store
a password in its encrypted form. There are several
different encryption algorithms available, and a good
course in network security would teach you about password
encryption in more detail. We'll keep it simple here
and use what's easily available to us, but make sure
you read any provided references to learn more about
password encryption.
Passwords should use one-way
encryption. This works like so:
When user creates the account:
Have user choose a password.
Encrypt the user's password.
Store the encrypted value in the user table.
When user logs into the account:
Ask the user for their password.
Encrypt the user-entered password.
Compare the user-entered encrypted value to
the stored encrypted value inside the user table.
If both encrypted values match, the user is
authenticated.
We call this one-way encryption because the password
is always encrypted and never decrypted (e.g. we never
take the encrypted value and translate it back into plain
text). Encrypting a password in this way is called
password hashing and the encrypted value is often
called a password hash. Hash algorithms are meant
to be one-way and can't be decrypted.
There are several
cryptographic hash
functions that
you can use to hash passwords. We'll be using one called
BCrypt to hash our passwords.
Once you hash a password, you need to store that hashed
value in a database. You'll need to know how many bytes
your hashed password will be so you can create a column
in your table of the correct size and type.
The BCrypt encoder we're using
will require a password field that is of type varchar(128).
Salts
But encrypting a password is not enough. Hashing is not
100% secure. For example, a brute-force attack is often
used to guess passwords: a file containing
various words and phrases, and even commonly-used passwords,
can be used by a simple computer program that hashes
each entry in the file and checks to see if those hashes match
any of the actual stored password hashes (this is why you're
always told not to use actual words and phrases as a password,
and why you should make very long passwords, since it takes
way more processing power to guess a very long password
in this manner!)
A brute-force attack takes up a lot of processing power, so
lookup tables are a common tool that hackers use:
These contain the words, phrases and common passwords along
with their hashes, so that the hashes don't need to be
computed while the hacking program is running.
Even worse, some hackers use something called a
Rainbow Table. A
rainbow table contains
a list of hashes for known passwords
and the password strings that correspond to those
hashes. Hackers steal hashed passwords when they break into
password databases on a site. With hashing algorithms, it's
possible for two completely different passwords to result
in the same stored hash value. It's also common for
multiple users to have the same passwords, and common for
a single user to use the same password over multiple sites.
So a hacker will take a stolen
list of hashes and compare those hashes to the ones in their
rainbow table. When they find matching hashes, they now know the
plain text password (or one of them) that could produce
that hash. This makes a brute-force attack, even one using
a lookup table, much more efficient (rainbow tables take up
a lot of storage space, but that's an acceptable trade-off
for any hacker).
How can you protect your users from such attacks?
You can implement something called a
SALT. A salt is a random
string value added
to a password before it's hashed. The password and the salt
are then concatenated and hashed together. Every user gets
a different salt each time they create/change their password,
so each stored hash becomes unique. This
means guesses won't work because no user will have the same
stored hash as any other.
This also means that brute force attacks, even with lookup tables
or rainbow tables, won't work because each password has some
unknown random value hashed into it.
If you're using a salt, you'll need to store it in the
user table along with your user's password, because when
a user logs in, you'll need to add that salt to the
user-entered password during authentication. This
may seem like a bad idea: if someone steals the data,
can't they figure out passwords if they have the salt?
No! You are storing a hash that contains both the
password and the salt together: that's never going to be
a match for any other account, even if the user used
the same password because the salt is always random.
Think of it like cookie or cake batter: you add flour
and blend the batter. Now, you know what flour looks
like, so go ahead and remove all the flour from the
batter. You can't, because it's all blended together
and you can't extract the flour from the rest of the
ingredients.
To implement salted passwords, you would do the following:
When user creates account:
Have user choose a password. For example,
say the user chooses the password "823k2siuu".
Generate a random salt. The user doesn't
know what the salt is and likely don't even
know there is such a thing. For example,
let's say the salt is "kgjai2842sldk" (which
is way too simple, but just an example).
Concatenate the salt and password together: you
can use salt + password or password + salt.
For example, we'd have "823k2siuukgjai2842sldk"
or "kgjai2842sldk823k2siuu"
Hash the concatenated string containing the
salt and the password. This is going to create
a long string of really weird characters.
Let's just say, for example, it results in the string
"adsl;kt73498j;(&al;33ds49-24%*al?dfg34:"
Store the hashed value in the user table.
Store the salt value in the user table.
When user logs into account:
Ask the user for their password.
Look up the user and get their stored salt value
and the stored hash.
Concatenate the user-entered password and the
stored salt and hash the concatenated string.
Compare the computed hash value to
the stored hash value from the table.
If both hashes match, the user is
authenticated.
If a user ever changes their password, you should generate
a new salt for that password. Never re-use a salt, not even for
the same user changing their password.
It's completely safe to store the salt in the database, you
don't even have to encrypt it. If a hacker is able to steal
the user table data, knowing the salt doesn't help them at all.
Rainbow tables and lookup tables are used to compare stolen
hashes with hashes in the table, so if your stored hash has
a random salt mixed into it, it's never going to match
any hash value stored in a lookup/rainbow table.
Make sure your salt is long. If you use short salts, they can be
guessed easily (if you use a 5 character salt, there are
815 or 3,486,784,401 possible combinations).
A hacker can build a lookup table with each possible salt
value and compare a single guessed password with each
salt in the table to obtain the right hash.
So how do we go about coding all of this? The
BCryptPasswordEncoder actually
does some of the necessary tasks for us, including the generation
and application of a SALT value.
It also includes the salt value in the encoded
return value, so there is no need to add an extra SALT column
to a database table. This means a lot of the processes described
above aren't going to be necessary in a Spring Boot application,
but it's good to be aware of those steps in case you write
similar programs with other technologies.
Services
Later in this course we'll learn about services, specifically
web services. But for this lesson, a brief overview of
services is necessary so that we can use a service called
the UserDetailsService.
A Service is an application component (i.e. it's another
type of @Component, just like @Respository and @Controller
are types of @Component) that perform tasks in the application's
service layer. Recall that the service
layer of an application sits between the data access layer
and other layers. In a Spring app we typically have a
service component in between our data access class and
our controller, so that if we have to change the data
access layer, we won't have to edit anything else.
The UserDetailsService interface is one such service,
and it allows us to manage the tasks dealing with a user's
details. It gives us a layer or interface between
the data access layer and the rest of the application.
So if we decide to change how we store user details,
we will only have to change the data access class,
and won't have to change anything else.
To create our own User Details Service, we create a class
that implements the UserDetailsService interface. Our class
will override the
UserDetailsService.loadUserByUsername(String username)
method to retrieve a UserDetails instance for a specific
user. The UserDetails interface provides an easy way to retrieve
information about a user such as their password, username, and whether
or not the user account is enabled.
For example, a typical use of UserDetailsService would
be to override the loadUserByUsername() method to retrieve
a user by calling a specific database access method:
@Override
public UserDetails loadUserByUsername(String username)
        throws UsernameNotFoundException {

//Find the user based on the user name
ca.sheridancollege.beans.User user = da.findUserAccount(username);
....
}
These are most of the things you will need to add a
database security realm in your secure application.
There are some more minor things, but we'll learn about
those by doing a demonstration.
Demonstration
For this demonstration, you can use your demo project from
the form authentication lesson but
you'll need to make sure you have the Lombok, H2, and Spring Data JDBC
dependencies added (see previous lessons on how to add them
manually if necessary). If you prefer, start a new project and add
the Spring Web, Dev Tools, Thymeleaf, Lombok, H2, Spring Data JDBC, and
Spring Security dependencies, and just copy over the following items:
Any /static resources such as CSS, images, etc.
The index.html and login.html pages, plus the entire
directories /secure and /error and their contents.
The contents of the .security package (SecurityConfig and
LogAccessDeniedHander)
The SecurityWebApplicationInitializer class in the package
root.
The main controller.
Database Tables and Data
Now we're going to create the database tables for users and roles.
The user table will have the following structure (you can
create the SQL for these if you want the extra practice
for your database class, but I'm going to give you some SQL
to copy if you prefer):
Table: users
Column Name
Type
Comments
userid
big integer
primary key, auto-increment
email
varchar(75)
required, unique
encrypted_password
varchar(128)
required
enabled
boolean
required (we never delete user accounts;
if someone wants to "delete" their account, we simply mark it as inactive)
We'll also create a roles table:
Table: roles
Column Name
Type
Comments
roleid
big integer
primary key, auto-increment
rolename
varchar(30)
required, unique
A user can belong to many roles and a role can contain many
users. As you know from your database class, we need a third
table to model the many-to-many relationship this creates.
The user_role table models one specific user with one specific
role, so if a user belonged to 2 roles, they would have
2 entries in the user_role table: one for each role. We'll
use an auto-increment primary key, but we'll also create a
unique composite index for the combination of user ID and role ID.
We'll also define 2 foreign keys for this table.
Table: user_role
Column Name
Type
Comments
id
big integer
primary key, auto-increment
userid
big integer
required, foreign key users.userid
roleid
big integer
required, foreign key roles.roleid
Here is some SQL you can copy and paste into your schema.sql,
or to use as a reference to check the correctness of your own:
CREATE TABLE users (
userid             BIGINT PRIMARY KEY AUTO_INCREMENT,
email              VARCHAR(75) NOT NULL UNIQUE,
encryptedpassword VARCHAR(128) NOT NULL,
enabled            BOOLEAN NOT NULL
);

CREATE TABLE roles (
roleid   BIGINT PRIMARY KEY AUTO_INCREMENT,
rolename VARCHAR(30) NOT NULL UNIQUE
);

CREATE TABLE user_role (
id     BIGINT PRIMARY KEY AUTO_INCREMENT,
userid BIGINT NOT NULL,
roleid BIGINT NOT NULL,
UNIQUE (userid, roleid),
FOREIGN KEY (userid) REFERENCES users(userid),
FOREIGN KEY (roleid) REFERENCES roles(roleid)
);
You should also add a data.sql to your project that adds some
roles to the roles table, a couple of sample users, and corresponding
entries into the user_role table (feel free to edit the emails):
INSERT INTO users (email, encryptedpassword, enabled)
VALUES ('foo@foo.com', '$2a$10$OpARYXO2pG2fqEU8H77A/eY5fZuWCaLUuVD.u37ArgpgC7YYCJIIS', 1);
INSERT INTO users (email, encryptedpassword, enabled)
VALUES ('bar@foo.com', '$2a$10$yXffyCCwmKEO74Tok1eiRehnkrkjqerlFdYNLUjwwaRHm5xOub1P.', 1);

INSERT INTO roles (rolename)
VALUES ('ROLE_USER');
INSERT INTO roles (rolename)
VALUES ('ROLE_GUEST');

INSERT INTO user_role (userid, roleid)
VALUES (1, 1);
INSERT INTO user_role (userid, roleid)
VALUES (1, 2);
INSERT INTO user_role (userid, roleid)
VALUES (2, 2);
Once you've added the tables and sample data, edit the
application properties of your project to connect
to an H2 database with an appropriate database URL and
driver, etc.
In order to be able to use the H2 console while we're working
on this demonstration, we'll have to make some TEMPORARY
changes to our SecurityConfig class: with the settings we have
now, we will not be permitted to access the H2 console
via http://localhost:8080/h2-console. Edit your SecurityConfig
and make the following edits:
At the top of the configure(HttpSecurity)
method (above the
http.authorizeRequests()... statement), add the following
statements that disable cross-site request forgery and the
X-Frame-Options header (which normally prevents click-jacking
attacks). We must disable this protection temporarily in order
to use h2-console. Note that you would NEVER do this
in an actual production application: we do it
now only so we can use h2-console, and it should be taken
out once we're done development.
Next, we need to add an antMatcher() to allow the h2-console pattern, so chain
an antMatchers()
method onto the last antMatchers(), before calling
.anyRequest()..
At this point you can run your program to test out your
SQL code. Run the program and then browse directly to
http://localhost:8080/h2-console. Check and make sure that
all 3 tables are there, all the indexes in place, and that
the sample data is there.
A User Bean
We'll now create a User bean to model a specific user
(an active or or inactive one) in our database. Your User
should match the following specification:
Use Lombok to create the accessor and mutator methods, equals/hashCode/toString,
and no-arg constructor. Set email and encryptedPassword to @NonNull
and generate a @RequiredArgsConstructor.
Database Classes
Next, add the standard database config and database access classes
to your project. Our database access class will contain 2
methods:
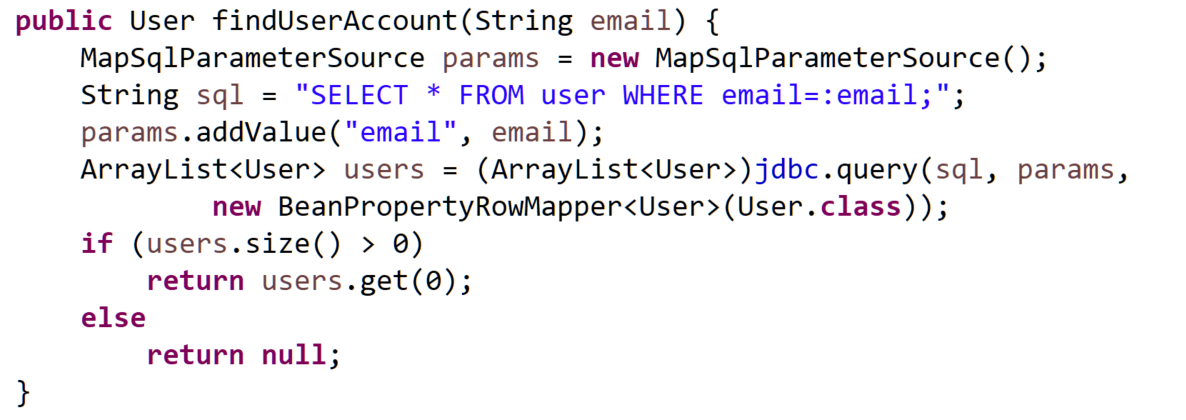
public User findUserAccount(String email)
will perform a query that searches for a specific user by
their email address, and return that User object.
We'll use this method to locate a user's record when
they attempt to log in with credentials. If the user
is found, we can compare the password hashes to
see if the user entered the right password.
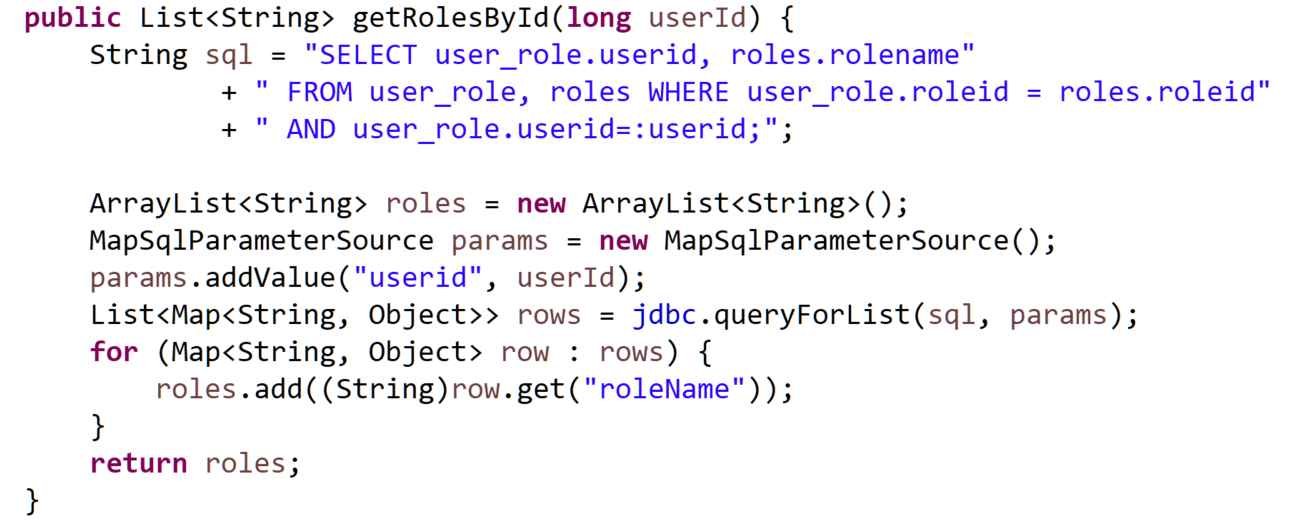
public List<String> getRolesById(long userId)
will retrieve all the role names for the roles that a specific user
belongs to.
Once a user is authenticated, we can find out what
roles they belong to.
Coding the first method findUserAccount(email) should be fairly
straight-foward for you by now:
Create the SQL query that selects all columns from users
where the user email matches the email parameter passed
into the method.
Create the parameter map object and map the email
parameter to the email named-parameter in the SQL statement.
Retrieve the List of User objects from running the
SELECT query.
If the array list contains an object, grab it as a User
object and return it, otherwise return null.
We've done this kind of method before in several other programs,
so check back with those if you need help.
The second method getRolesById(userid) is also simple. This
method will execute a query that takes a specific user record and
searches for all the records in user_role for that user's id
value (remember that a user could belong to more than one role,
so in that case, they'd have more than one record in the user_role
table).
Create the SQL SELECT query that selects the user_role.userid
and roles.rolename columns from the user_role
and roles tables
where the user_role.roleid matches the
role.roleid and the user_role.userid
matches the userid method parameter.
Map the query's user id parameter to the userId
method parameter.
Retrieve the rows using queryForList() and add each
roleName value to a List<String>
After all the matching records are read, return the list of strings.
Database access method that searches for a User by emailDatabase access method that gets the roles for a specific user
The User Details Service
As mentioned previously, we'll use a UserDetailsService implementation
to act as the service layer between our user table and the
rest of the application. All service classes should go inside
a .services package in your application.
Create a new class in the application's .services package called
UserDetailsServiceImpl and make sure it implements the
UserDetailsService interface (if you check the "inherits abstract
methods" box, it will automatically override the loadUserByUsername()
method).
As soon as the class loads, add the @Service annotation
to the class to make this a service component:
import org.springframework.security.core.userdetails.UserDetails;
import org.springframework.security.core.userdetails.UserDetailsService;
import org.springframework.security.core.userdetails.UsernameNotFoundException;
@Service
public class UserDetailsServiceImpl implements UserDetailsService {
@Override
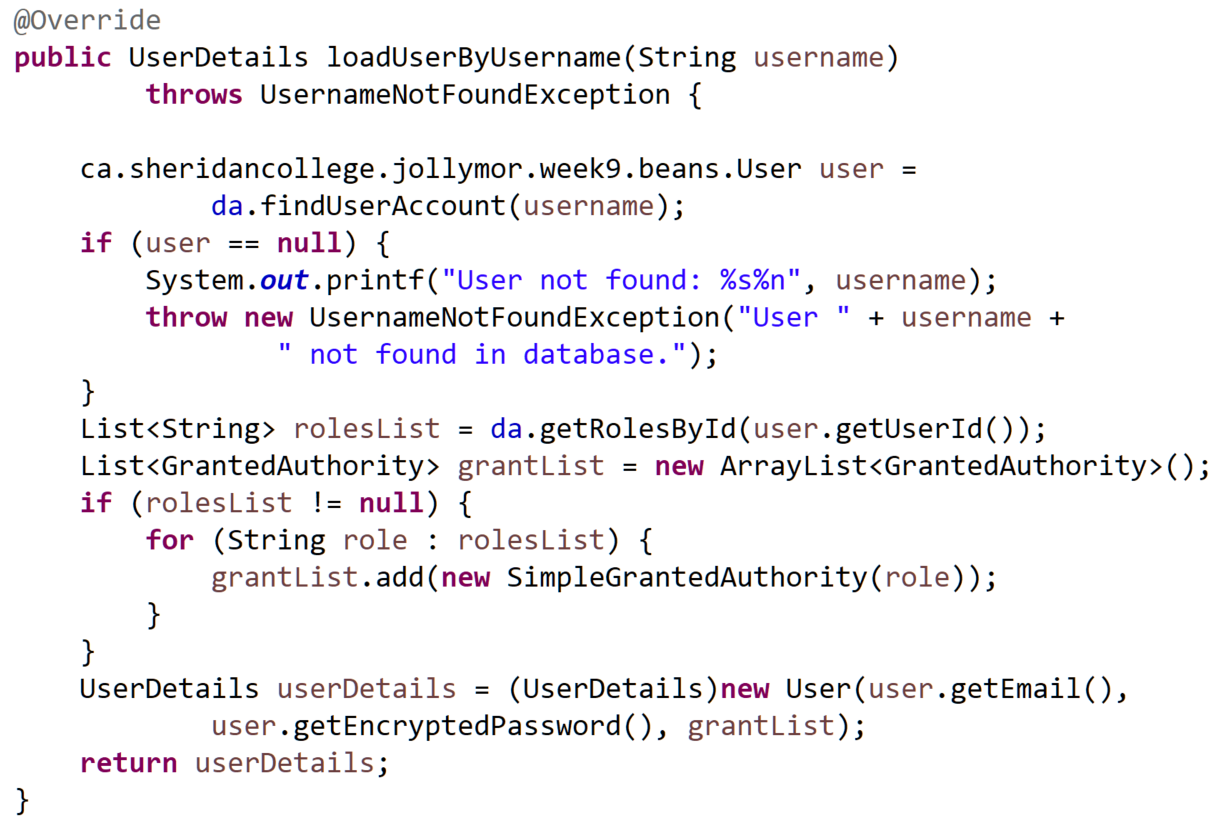
public UserDetails loadUserByUsername(String username) throws UsernameNotFoundException {
// TODO Auto-generated method stub
return null;
}
}
The first thing to do is to
autowire your database access class so that you have an instance
on which to call your database access methods.
Next, delete the default code inside the loadUserByUsername()
method body and add the code to do the following:
Invoke the database access method that searches for a user
by email address. Where do we get the email to pass to
the database access method? That's in the loadUserByUsername()'s
parameter called username:
ca.sheridancollege.jollymor.week9.beans.User user = da.findUserAccount(username);
Hopefully, our findUserAccount() method will locate and
return a specific User instance. But if it doesn't, we want
to log this in the console and throw a
UsernameNotFoundException.
If you know how, you can create an error page for this exception,
but for now, it's going to the console with a stack trace:
if (user == null) {
    System.out.printf("User not found: %s%n", username);
    throw new UsernameNotFoundException("User " + username + " not found in database.");
}
Now we can retrieve a list of roles for this user that we now know exists
in our database table:
So now we have a list of strings for the roles our user belongs to, but
a list of strings isn't going to mean anything to Spring. We need to convert
these Strings into some kind of object that Spring recognizes.
A GrantedAuthority is a specific privilege, right, or permission
that an authentication has granted to them. A role is sort of a container that
defines a list of privileges/rights/permissions that a set of users can
have. We want to take each of our strings and convert them into a
SimpleGrantedAuthority, which will model the role(s) that our user
belongs to. It's not exactly an inheritance relationship, but it helps to
think that "a role is a granted authority":
List<GrantedAuthority> grantList = new ArrayList<GrantedAuthority>();
if (rolesList != null) {
    for (String role : rolesList) {
        grantList.add(new SimpleGrantedAuthority(role));
    }
}
This code takes each role string in our list of roles that we retrieved from the
database and converts each one into a SimpleGrantedAuthority object.
Basically,
we're converting the list of strings into a list of role objects (and each role
is modeled as a SimpleGrantedAuthority).
And of course, we only do this if
the roles list exists, otherwise our for-each loop will crash with a null
pointer exception.
The last thing we need to do is convert our User instance
into a UserDetails object so that Spring can work with it:
This code converts our User instance (the one modeled by our own bean) into
a UserDetails object. A UserDetails object has a
user name (in this case, the
user's email address), the encrypted password, and a list of roles the user
belongs to.
The Spring User class is used to model a container that is used by the UserDetailsService
to hold a user's information. If you ever wanted to add more specific things to your user's
details, you could extend the User class and add the functionality you want.
We will use this UserDetailsServiceImpl class in our Security Config
class: we will configure user authentication to use our user details
service, which will cause it to authenticate users by invoking
the loadUserByUsername() method (which as you know, looks up users
in our database).
Open the SecurityConfig class: we're going to add and modify a couple
of things to make it work with our database and user details service
that we just created:
Add a @Bean method that creates a BCrypt password encoder.
We're now going to use this instead of NoOpPasswordEncoder!
@Bean
public BCryptPasswordEncoder passwordEncoder() {
    return new BCryptPasswordEncoder();
}
As you should be able to determine from your experience
in this course so far, when the program starts and it loads
the security configuration, it will create a BCryptPasswordEncoder
bean and store it in the inversion of control container so
that we can access it when we need to.
This is the magical part: locate your configure(AuthenticationManagerBuilder)
method, the one that manually creates the 2 users with no password
encoding. Replace the code body of that method with this
single statement:
First, it configures the user
authentication for this application to use our userDetailsService instance
(which we coded to look up users' credentials in our database tables).
This will automatically take the credentials entered by our user in
the login form and look up their record in our database table.
Furthermore, we set the password encoding to our BCrypt Password Encoder
(the @Bean method we created is being called in the passwordEncoder() method.
This causes the program to hash the user-entered password and match it
to the hash value in the users table for this user! It does the SALT
and everything!
Try your application: Run it and load the main index page, then click
the link to access the secure page(s). Log in with your user that has
access to the secure pages and it should work! You can also test out
the other user and an invalid user, too.
When you log in using the user that has the ROLE_USER role,
the following will occur:
The user enters their username (email) and password into
the login form. The /login process starts and it's all
automatic:
The SecurityConfig's settings in the configure(AuthenticationManagerBuilder)
method tell Spring to use the UserDetailsServiceImpl class to
authenticate users, so it does:
The UserDetailsServiceImpl.loadUserByUsername(String username) method
is invoked automatically, and Spring passes the user-entered
email address into the String username parameter.
The method calls the da.findUserAccount(username) which
searches the users table for a record where the email column
value matches the username string (the user-entered email)
When a record is found, it is returned as a User instance
(our User bean).
The loadUserByUsername() method then constructs a UserDetails
object for this user (includes the email/username, encrypted password
hash stored in the table for this user, and the list of roles
this user belongs to). This UserDetails object is returned by
the method.
The SecurityConfig's settings in the configure(AuthenticationManagerBuilder)
method tell Spring to use the BCryptPasswordEncoder to
now take that UserDetails object for our user and check
that the user-entered password matches the hash stored in
our database table (remember that the stored password has is now
part of the UserDetails object).
The password matches (assuming you typed it correctly when you
tested the app) and the user is now authenticated.
Then the authorization process occurs, etc, which we discussed
in the previous lesson.
That's it! It isn't that hard to figure out how you can modify things
a bit to customize the functionality if you wanted to. Now that
you know how to store user information in a database, the next
step is to allow users to register for accounts! We'll cover
that in the next lesson.
Exercises
In the next class we're going to be adding user registration, so you'll
need several programs to practice on. In fact, if you haven't already,
you should be adding the security techniques we've learned so
far to at least one of your other programs. If you have been doing
this, update your program(s) to include the users/roles/user_role
tables for authentication. If not, do that now! Start with
one of the previous programs we've done, for example:
The books program where only certain types of users can perform
certain tasks:
Only ADMIN users can add new genres to the genres
table.
Only ADMIN and MANAGER users can add new books to
the books table.
All users can view the main index page and a page
that lists all the books that are available.
The Players/Teams program where only ADMIN users can
add new players to the players table, but anyone
can view the current players and search for players.
The Inventory program where only ADMIN and MANAGER
users can add new inventory items, and only ADMIN users
can add new categories. Only authenticated users can
view inventory items and search for inventory items. Users
not logged in can only see the index page