Refresh
this page because I am probably still making changes
to it.
Thymeleaf fragments allow you to make re-usable segments of
Thymeleaf code. These are very similar to "includes" that
you might be familiar with in web development. In this lesson
we'll learn how to create and use fragments, and even how to
pass values into fragments and how do make fragments
appear conditionally.
Pre-Requisites
Before doing this lesson, make sure you've completed all the
Thymeleaf lessons:
How to use Thymeleaf
Fragments is a
quick tutorial that's almost exactly the same as the
one in the Thymeleaf tutorial, but the author has added
a bit more explanation and readability to the examples.
Why do We Need Thymeleaf Fragments?
If you've taken the web programming course, you've probably learned
how to use includes or some other technique to limit the amount of
repetitive code you have to write. Includes allow you to take a chunk
of HTML code that you want to use on multiple pages and store it in a
separate file, and then INCLUDE that file into each page. Then, if you
need to edit the code, you only have to edit one file and it updates all
of the pages automatically.
I actually have one of these for the topics menu in the top-left corner
of each tutorial page. Mine is done with AJAX functions that
retrieve a file with the menu content and then loads it into the
menu container. That way, when I want to add a new item to the
course, I simply add a link to that one menu file: I don't have
to update every single tutorial page.
Having repetitive code on two or more pages is not good design: it makes
your application more prone to error and it makes maintenance more tedious
and time-consuming. If you want to change something in a header, footer,
or menu, you have to make that change on every single page.
We can do "includes" in Thymeleaf by using Thymeleaf fragments.
A fragment is a chunk of HTML and Thymeleaf code that you assign a unique name
to, and then you can include that code by its name anywhere in any number
of HTML/Thymeleaf pages. You should use Thymeleaf fragments anywhere
you find yourself copying and pasting HTML/Thymeleaf code, even if
you end up changing the code a little bit on different pages: you
can pass values to a Thymeleaf fragment, too!
To create Thymeleaf fragments, you first have to create one or more
HTML/Thymeleaf pages/files with the blocks of code you want to re-use.
Unlike regular includes, you can actually place more than one fragment
of code in a single file! In fact, it's quite common to organize
fragments into different HTML files according to their content or purpose:
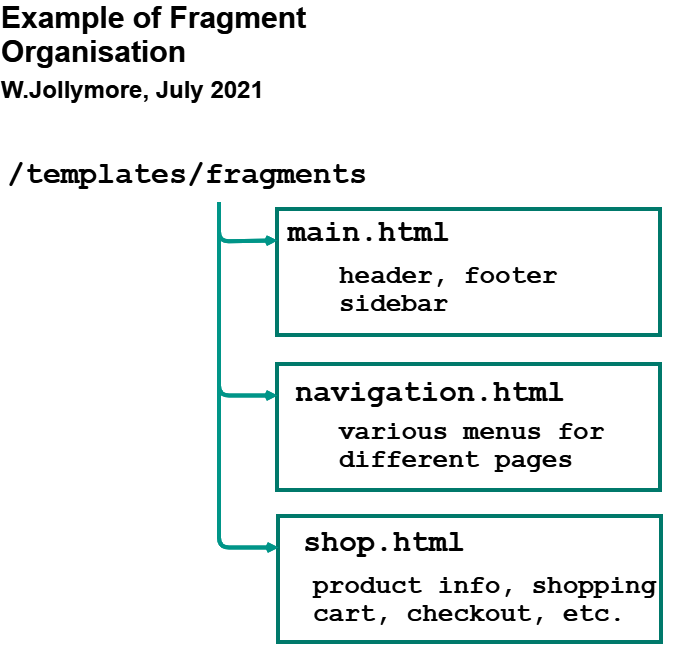
An example of how you might organise your Thymeleaf fragments
In this example, the main.html file contains fragments for the
various headers, footers, and sidebars
used on the application's pages and the navigation.html file contains fragments
for the different
menus, such as the product categories menu, the main menu displayed on each
page, the user account menu displayed on the user account pages, etc. Lastly,
the shop.html file contains fragments that are used in the online shop component
of the application, which might include fragments that display product information
or the user's shopping cart.
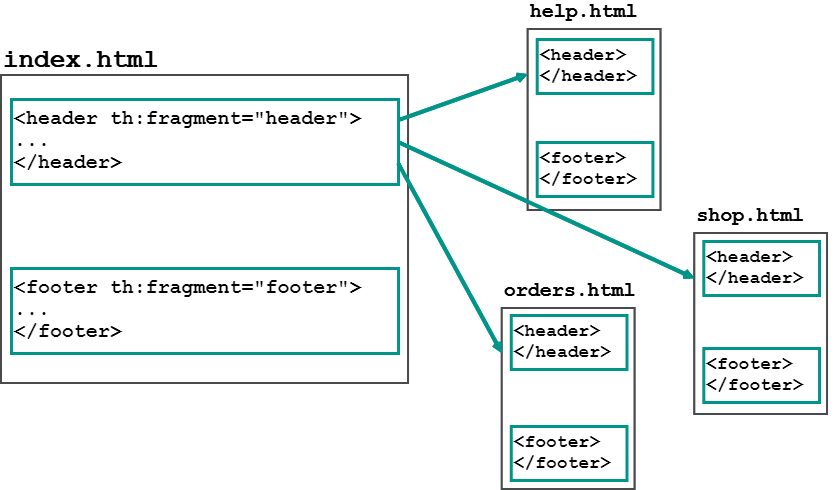
The cool thing about Thymeleaf that's different from other include technologies
is that the file or files that contain the re-usable fragments can still contain
the minimal HTML content like DOCTYPE, HTML, HEAD, BODY, etc. This means
you can use these fragment files as regular pages. For example, you could
use a main index page to contain the header and footer fragments that are used
on all your other pages, instead of creating a separate fragment page.
That can be handy with smaller projects, but with larger projects we do prefer
to place fragments in a separate directory in their own files to make it easier
to find specific fragments when they need to be edited.
You could define fragments in any page and re-use those fragments inside other pages
In our example projects, we'll be creating separate fragment pages to make
it easier to understand how fragments work.
Defining and Using Fragments
To define a block of code as a re-usable fragment, you use the
th:fragment attribute, and assign the attribute a unique name for this
fragment. The name is important, because later in your pages, you're
going to use this name to identify which fragment you want to insert.
The th:fragment attribute goes inside the main element
of the fragment. You assign th:fragment
the name you want to assign to this fragment. This defines a new
Thymeleaf fragment with a specific name. For example:
The code above defines a fragment with the name "header" and it
includes the HTML code for a level-1 heading element that contains
the content "My Header", which is nested inside a HEADER element.
To use a fragment, you have three options, although the third one is
deprecated: I only mention it in case you see it in older code, but
don't actually use it to create new code:
th:insert inserts a specific fragment
inside the host element's inner HTML
th:include like insert, but only inserts
the content of the fragment (this is deprecated and should not
be used in new code, I only mention it in case you
see it in older code).
The syntax for the th:replace and th:insert
value is as follows:
directory/filename :: fragmentName
OR
directory/filename.html :: fragmentName
For example, if you have a fragment file called main.html
inside the /fragments directory of your /templates, then you could
use any fragment inside main.html as:
fragments/main.html :: fragmentName
So if you had a fragment inside main.html defined as
Create a fragments directory inside /templates and add an HTML file inside
/fragments called main.html. Inside main.html, add two fragments:
A header fragment that contains a HEADER element with a level-1 heading
that contains your first and last name and a level-2 heading that
contains the page title (e.g. "Testing Thymeleaf Fragments").
A footer fragment that contains a FOOTER element with your name
and copyright information inside the ADDRESS element
(see your notes from Web 1 class)
Add an index.html page to your /templates and add both fragments: try using
both a th:insert and a th:replace
for each fragment so you can see the difference.
Add a handler method to a controller that loads your index page.
When you test your application, view the page source and
compare th:insert with th:replace.
Fragment Parameters
You can pass values to fragments, making your fragments much
more reusable. For example, perhaps you might want to use the header
fragment on several pages, but each page has a different title: you
would want to pass the title into the fragment and then use that title
value inside your level-2 heading.
First, you would need a parameter variable to hold the value you'd
like to pass into the fragment. This is very simple: you just create
a parameter and add it inside parentheses with the fragment name
(as if the fragment name were a method).
Inside the fragment, you use the parameter's value by using a normal
Thymeleaf variable expression:
You can control how/when fragments display by using assertions and expressions
in your fragments. For example, you can have a fragment display
when a certain set of conditions are true or you can display one of
a choice of fragments based on certain conditions.
th:assert
You can add th:assert to a fragment to
specify a comma-delimited list of boolean expressions that must be
true in order to render the fragment. If any one of the expressions
is false, then a TemplateAssertionException is thrown saying that the
assertion isn't valid.
In this example I had to put the divsion expression inside a SPAN
element instead of the div's th:text. The
th:text will evaluate
before the th:assert, so it will do the divide-by-0 before
it has a chance to test the assertion. You'll still get an
exception, but it will be the divide-by-0 exception, which isn't
what we want. By putting the actual division operation inside
a SPAN that's nested inside the DIV, the assertion will
execute first before any elements nested inside the DIV are
rendered (and therefor, before any of the nested elements'
expressions are evaluated).
You can separate multiple assertions with a comma, but they must all be
true, otherwise the exception is thrown.
In this example, the productTable fragment is used
only if the productList is not empty, otherwise the noProductsMsgs fragment
is displayed. The two fragments in this example don't even have to be
in the same file:
1. Create a navigation element that contains a set of
links that a web site might have as a menu
for the following pages (you can create basic html pages for
each link so you can test them out, just put an appropriate
heading on each one):
/ (root of the application)
goes to the main index page.
/shop goes to the shop/index.html page.
/help goes to the help/index.html page.
/contact goes to the contact/index.html page.
Create a single fragment that displays the
navigation menu so
that it can be used on each of the four pages.
Each page should display the same menu fragment
without it's own link.
For example, the main index page should not display the link to the main
index page, and the help/index.html page should not display
the link to the help page.
Use the navigation fragment in each of your four pages.
2. Add the Players and Teams beans to your project.
Add code in the handler method that instantiates a player object
and a team object for the team that they're on.
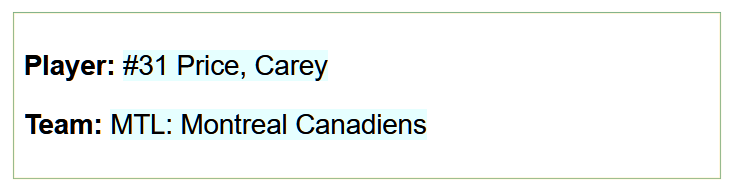
Create a fragment that displays all the player and team information
in a nicely formatted way. Pass the fragment the player object
and the team object you stored in the model.
Use the fragment in your main index page.
Formatted Player and Team Output
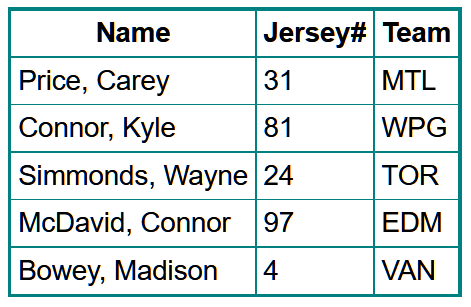
Modify the controller to add a list of players, and add another
fragment that accepts the list of players and
displays the list of player data in a formatted
table. Use the fragment in your main index page.
Formatted List of Players
3. Modify one of your previous projects: use a
Thymeleaf fragment to display the table of data (e.g.
all the players, all the inventory items, etc).