Refresh
this page because I am probably still making changes
to it.
In this lesson you'll learn how to use a persistent storage mechanism
such as MySQL Server to store data instead of (or with) an in-memory
database. You'll also learn to use profiles to easily switch from
one run configuration to another, for easy testing and debugging.
In previous lessons you learned how to code JDBC in your
Spring Boot applications by using H2, an in-memory
database. There will be times when you will want to use
persistent storage: storage that persists between application
restarts.
For example, you might want to store the players on different
sports teams so you can go back any time and view the players
you've saved. In an inventory application, you would definitely
want to store the inventory records persistently so that you
always had an updated set of information about what products
are in stock. If you ran an online store, you'd want some
permanent storage for all of the customer information and
all of their orders and payments.
For persistent storage in a Spring Boot application, we generally
go with MySQL server: it's free and it's used a lot in
industry already.
If you haven't already, make sure you install MySQL Server
and Workbench before you proceed with the rest of this lesson.
Make sure the MySQL service is running: if you selected the
configuration option to start MySQL Server at system startup,
then it's likely already running. If you didn't select
this option, just go to Services (in Windows, search for "Services"
and run the Services application) and find MySQL80 and
start the service.
Run Workbench and connect to your database server. Add a
new database called "logindb" where "login" is your Sheridan
login name (so if your login is fred, then your db name
would be freddb):
Click the New Database button - it's the 4th button in
the button bar and it will say "create a new schema in the
connected server" when you hover over it.
Enter the name of the database as logindb,
except use your own login name instead of "login".
Click the APPLY button near the bottom-right.
To USE the database, go to the Schemas tab and double-click
the "logindb" database (you might have to refresh first by
clicking the little refresh icon in the top-right corner of the
Navigator/Schemas window.
Alternatively, if you prefer, you can just use a new SQL
statement:
DROP DATABASE IF EXISTS logindb;
CREATE DATABASE logindb;
USE logindb;
Using MySQL Server in your Spring applications is not much
different from using H2: you just need to make sure you
add the MySQL Driver dependency to your project and then
add a few properties in the application.properties file.
Start up a new project and add the following dependencies:
Spring Web, Dev Tools
Lombok, Thymeleaf
Spring Data JDBC, H2 Database (we are still going to use H2
in this project)
MySQL Driver - this dependency is new to us, and it allows
us to use the MySQL server by ensuring we have access to the
Connector/J driver.
Next, open the application properties file and add the following:
These statements indicate that you're going to use MySQL
server as the database, that you're going to
connect to the database using the connection string
"jdbc:mysql://localhost:3306/", and that you want
to USE the database called "logindb" (except
yours has your own Sheridan login instead of "login").
Additionally, when you set up MySQL server, you added a root
account and an Admin account. The root account is powerful:
the root account can do ANYTHING with the database and
the database server. The Admin account is less powerful,
but probably still has too much power than we want for
the average user.
When an unauthenticated user visits your application, you
don't want that user to have any database access at all.
Once a user is authenticated, you only want that user to have
whatever permissions they need to do what they are able
to do. For example, a customer should only be able to
view their own customer account and update some of their
own data, but they should not have permissions to add or
delete other records in the customers table, nor should
they be allowed to perform any kind of data manipulation
operations on the products/inventory table.
So when you're setting up your project to use MySQL, you'll
want to set it up to use only those users with the most
limited access to your database. You should NEVER use
the root account as the default account for your application:
not only does this give a hacker complete power over your
entire dataase server, but it makes it easy for another
member of your team to do some serious accidental damage.
You can easily create additional users using the UI in
MySQL Workbench:
In the Navigator, click the Administration tab.
Under Management, select Users and Privileges.
Click Add Account below the list of User Accounts
and enter the appropriate information.
Make sure you select only those Schema Privileges that
this user account needs at minimum.
Alternatively, you can just open a new SQL window and type
statements such as:
CREATE USER IF NOT EXISTS 'dbUser'@'localhost' IDENTIFIED BY 'dbPassword';
GRANT SELECT, INSERT, UPDATE, DELETE ON dbName.* TO 'dbUser'@'localhost';
Where "dbUser" is the name of the user account, "dbPassword" is the
password assigned to this account, and "dbName" is the name of
the database where this user has specific privileges granted to them.
In the example above, the user "dbUser" can do CRUD operations,
but nothing else.
For our example today, make sure your user has the ability to
do basic CRUD operations on the logindb database.
Once you've created the user(s) you will need, choose the default
for visitors to your application and add that information
to your application.properties file:
Make sure you replace "dbUser" and "dbPassword" with the
actual username and password for your user. For these
exercises, make sure this user has access to CRUD operations,
but nothing else.
Now copy over the Player and Team beans from the database
project you did in the CRUD Operations
lessons (or feel free to use any database project
where you have at least one read and one insert operation).
Copy over the database classes and any HTML form input
and/or tabular output that allows a user to insert
a new player and list all the players (I think in the last
version of the Player/Team project, we did the input
and the output on a single HTML page).
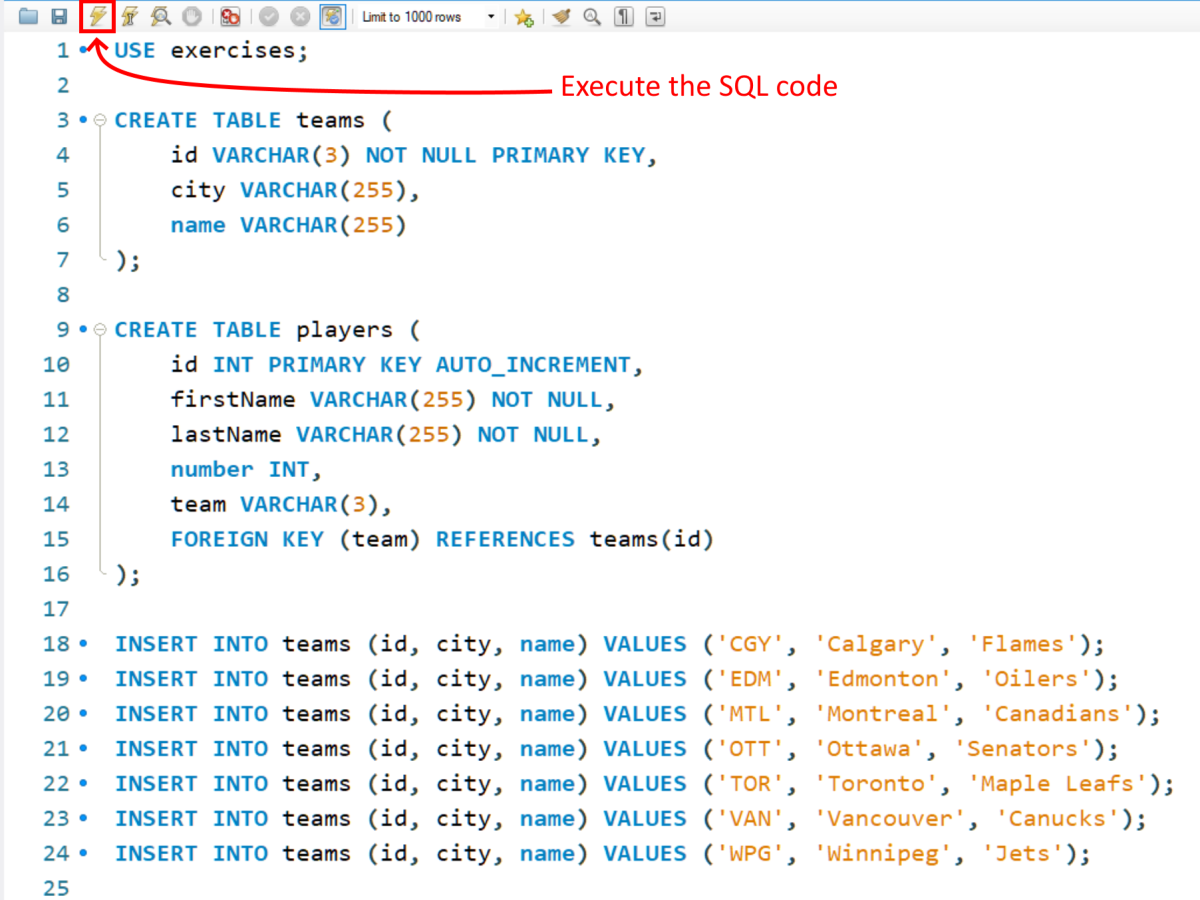
In that same project, you had a schema.sql and data.sql
file that created the teams and players table and populated
the teams table with teams. Copy the code inside those 2
files and paste it into an SQL window in Workbench. Add the command
USE logindb; (but with your
own Sheridan login instead of "login") above all of
the other code. Then execute the SQL code by clicking on the
lightning bold button on top of the query window.
Execute the SQL that creates the database schemas.
That's it.
No really, that's it.
Run your program, add a new player, etc: it works just like it
did back in week 5.
If you don't believe me, go back to Workbench and type "SELECT * FROM players;"
in a new SQL query window. See?
Why was this so easy??!!
Because you have been using SOLID principles!! We created all of
our database configuration and database access code in separate
classes, and we wrote it all in such a way that we could easily
switch database technologies with very little effort!!
If you wanted to switch back to H2, that would also be super easy,
and in fact, we'll do that next, just so you can see how simple
it really is.
Profiles
When we develop applications that use a database, we don't
want to do the testing on the actual database server: testing
can be resource-intensive, and we don't want to slow down
the same database server that the actual users are currently
using! They will notice the slowness and get annoyed, and
might even stop using the application in favour of a faster
one.
For this reason, it's common to use H2 or other in-memory
database for testing, and then switch to the actual database
server (i.e. MySQL) for production. Because you've developed
your application using good design principles, including
SOLID, this is really easy to do!
Spring allows you to easily set up different profiles.
A profile is just a collection of settings and configuration
information. For example, you can use one profile for
developing, testing, and debugging, and a completely different
profile for deployment and production.
In our example application, let's set up a "development" profile
that we'll use whenever we want to come back and continue
development on our application, perform tests, add new features,
debug, etc. Typically you would actually use this as the default
profile and then set up a separate profile for production, but
we're doing it backwards today!
Create a new profile by simply adding a new .properties file
to the /resources directory. The name of the properties
file should be application-profilename.properties, where
the value "profilename" is the name of this profile.
Make sure you use a dash to separate the word "application"
from the profile name. Let's add the development profile:
Right-click /resources and select New > Other.
There is no template for properties files, so open the
General node and select "File".
In the General tab, select File, then click NEXT
Click Next.
Enter the name of the file as application-dev.properties
Click Finish
Now just add the normal properties you would use when you want to
use H2 as the database:
Notice the extra property spring.jpa.database=h2.
This extra property says that we're using H2 for this profile
(in the past, it was detected automatically). It's a good idea
to have this extra line in here when you're working with different
profiles that have different database vendors.
Also, you might find that when you add spring.jpa.database=h2,
you may not actually need to also specify driverClassName because
it's detected automatically when you set the database vendor to H2.
Since you're using H2 for development, make sure you copy
your schema.sql and data.sql files over to this project.
H2 needs those files to create the database schema and load
the teams table.
Now create the production profile: add another properties file
but call this one application-prod.properties.
In the application-prod.properties file, add the properties to
use your MySQL database:
(Remember that logindb uses your own login name and dbUser/dbPassword
refer to the user you added that has permission to perform
basic CRUD operations)
How do we make sure the project runs with a specific profile?
You create a Run Configuration for it:
Edit the default application.properties file:
Remove any statements that you already have in the -dev/-prod
properties file: you don't need these since they're now
defined elsewhere.
Add a statement
spring.profiles.active=dev
To use the development profile. If you wanted to use the
production profile, you'd edit this to
spring.profiles.active=prod
You could just add both and comment out the one you're not using:
Now set the Run Configuration to run this project with a specific
profile:
Right-click your project and select Run > Run As > Run Configurations...
On the left side of the dialog, open the Spring Boot App node (it's
probably already open) and locate your current project. Select it.
In the main part of the dialog, look for the field labeled "Profile".
In the "Profile" drop-down box, select "dev" (or whatever you used
for "profilename" when you created the new application properties
file).
To save this change so you can use it next time you run, just click Apply
and then Close.
To run this profile right now, click the Run button.
Edit the Run Configuration and select the new profile
We might as well try it out, though. so click the Run button
if you're still in the dialog. If you're not in the dialog, you
can just run the project normally now, as long as you changed
the profile in the run configuration.
Your program runs! How do you know for sure that it's using
H2? Run the H2 console.
If you ever want to switch profiles, go back to the application
properties file and change the spring.profile.active
value (or swap the commented lines, if appropriate).
Then set the profile for the run configuration.
Now you know how to easily switch between different environments
by using profiles, and also how to switch between different
database vendors! It's so easy because you started out using
good design principles. :)
Exercises
Go to one of your previous database projects and add a production
profile (e.g. "-prod") that allows you to use MySQL Server
in a production environment. Test out your project with the
new profile. Make sure MySQL server is running!