Refresh
this page because I am probably still making changes
to it.
This lesson introduces you to Secure HTTP and shows you how to
create a free certificate you can use for testing your application
over HTTPS. You'll also see how to access authenticated user
information in a Thymeleaf template.
Pre-Requisites
Before doing this lesson, it's important that you've already
gone through the following lessons:
So far we focused on authentication (we learned basic authentication
and form authentication), and we learned about authorization by using
antMatchers().
In this lesson we'll focus on confidentiality and data integrity.
To do this, we need to learn a bit about HTTPS, or Secure HTTP.
Secure HTTP (recall that HTTP stands for Hypertext Transfer Protocol)
is the regular HTTP protocol with SSL or TLS on top of it. SSL
(Secure Sockets Layer) and TLS (Transport Layer Security) are
additional protocols that add a level of security to HTTP.
SSL and TLS
SSL is older but it has been around for long enough for it to
become standard. TLS is newer and more advanced, and is supported by newer browsers.
When you connect with HTTPS, you can't tell if your connection
is using SSL or TLS, and it really doesn't matter at this point.
Whenever you read articles or tutorials about Secure HTTP, and they
mention SSL, that generally means SSL or TLS. So here, when we say
"SSL", we also mean either SSL or TLS - it doesn't matter which.
With SSL, the client encrypts the data being sent to the server,
and it decrypts the data it receives from the server. The server
does the same thing: it encrypts the data it sends to the client and
it decrypts the data it receives from the client. This keeps the
data confidential because keys are used to encrypt and
decrypt the data, so an eavesdropper who gets access to the data
during transmission still can't read the data because they don't
have the keys.
SSL can also tell if a client or server is an imposter, or is
not who they say they are. Certificates can be used to verify
that the client/server involved in the transmission are who
they say they are.
SSL can tell if data was tampered with during transmission, so it
keeps the data integrity intact during transmission.
When you visit a page/app in your browser, you can tell if your
connection is secure because you'll see "https" as the protocol
in your URL. Also, most browsers will show some kind of icon beside
the URL (usually a little padlock). Whenever you're using a site or app
to send credit card information or other sensitive data, be sure
that the URL starts with https!
As a developer, only use a secure connection if you need to,
because secure connections are slower than non-secure ones. If you don't
need to use a secure connection, don't. UPDATE: on most servers
these days, this isn't even an option, as they only allow HTTPS
connections.
How It Works
To understand how SSL works, it's helpful to understand
symmetric encryption and asymmetric encryption.
symmetric encryption involves a single encryption key.
The sender encrypts the data with the encryption key, and then
the receiver decrypts the data with the same key. Both sender
and receiver need to know the same key so they can send and
receive encrypted data. It's a very secure way of transmitting
data because only the sender and receiver know the key, which is
often generated randomly on demand.
asymmetric encryption involves "key pairs" which consist
of a public key and a secret, private key. Both keys are mathematically
similar (you can read more about how this works at
How it Works: HTTPS under the heading "Key Pairs").
Both the sender and receiver know the public key, which is used to
encrypt the data. However, the data can only be decrypted using
a private key that is secret. It's very secure because even if someone
knew the public key, they don't have the private key, so they can't
decrypt the data.
SSL actually uses a combination of symmetric and asymmetric encryption,
and it uses certificates in order to make it work.
Certificates are granted and signed by a Certificate
Authority (CA). A CA verifies that the person/company
requesting the certificate is a real person/company.
The CA does this by checking with a Registration
Authority (RA). A RA gathers information about the person/company,
including where they are in the world and how to contact them, and verifies
who they are. The whole process is quite expensive, so not just anyone can
get a certificate, generally only large companies/entities purchase
certificates. Some certificates are more expensive than others,
depending on the strength of encryption.
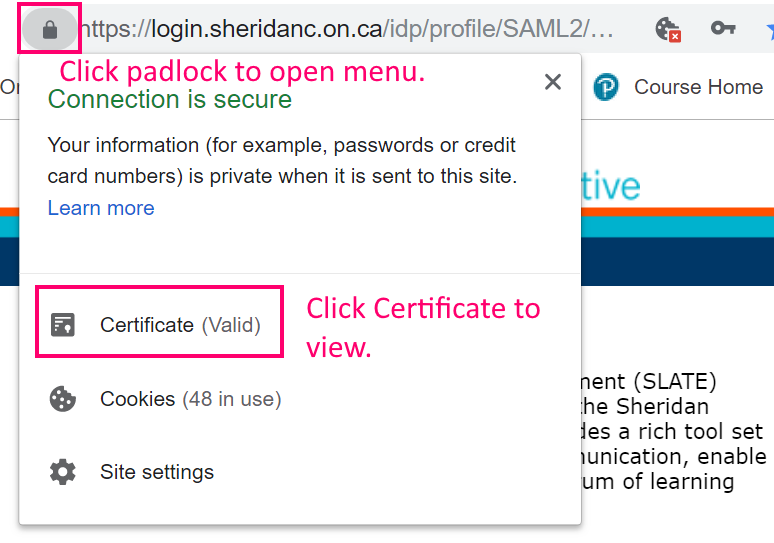
You can view any site's certificate by clicking the little
padlock icon beside the address bar in the browser. For
example, go to the SLATE web site's login page and
click the icon.
Click the padlock icon to the left of the
browser's address bar to open a menu, then click the
"Certificate" item to view the certificate.
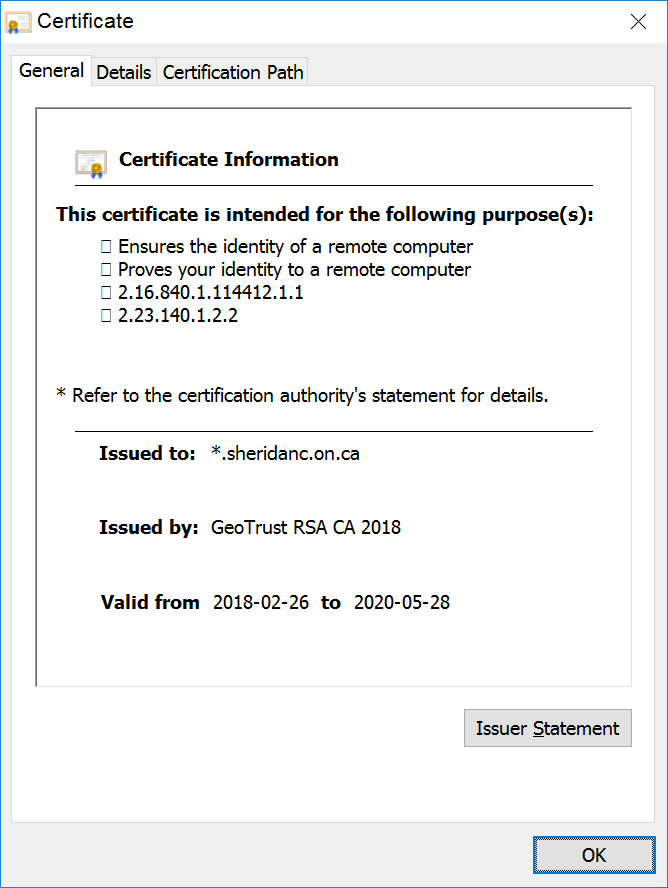
Click on the Certificate menu item to view the site's
certificate. You can see the certificate's details.
Viewing the certificate for SLATE.
When a connection is made, the client and server exchange keys
and continue the transmission securely. The process begins
using asymmetric encryption, with a public key and a private
key used on the server, and then continues with symmetric
encryption:
When the client makes a request of the server, the server then
sends its own certificate, which contains information
about who the person/company is, and also its public key.
The the certificate must be "signed" by a trusted authority
(CA) and the owner data in the certificate must match the
owner of the server that sent it, and the dates must be valid
(certificates expire after a period of time when they have to
be renewed). If the certificate is not valid, the communication
will not continue unless the user agrees (sometimes you'll
see a message in your browser to continue the request even though
the certificate is not valid). Otherwise, communication continues.
The certificate sent from the server contains the server's public
key. The client generates its own key at random and encrypts it uses the public key
sent from the server.
The client sends the encrypted key to the server. The server uses
its own secret, private key (the private key that is matched to the
public key it sent earlier) to decrypt the message.
The decrypted message contains the random key generated by the client.
Now both client and server have a key they can use to continue secure
communication using symmetric encryption.
The key generated by the client is only valid for the current session.
A new key is generated for each session, which makes transmission
very secure, since an eavesdropper is not fast enough to hack the private
key in time.
Testing Secure HTTP in a Java Web App
So we know a bit about how it works, now how to we make our Java web
applications use HTTPS? We're working in a development environment,
so some of these steps might be different in an actual production environment.
Creating a Self-Signed Certificate and Key Pair
In order to test out HTTPS, we first need a certificate, because
when we're testing, we're pretending to be both the client and
the server: to use a secure HTTP connection, our "server" needs
a valid certificate. Of course, we're not going to go out and buy
a certificate just for testing and learning purposes (even cheap
ones aren't that cheap and often require a flat fee plus an
additional fee paid annually).
Thankfully, Java includes a tool that allows us to create a
"self-signed certificate" we can use for testing. We use Java's
keytool to do this
- it creates a "pretend" certificate and a key-pair
for your development server to use.
First, you need to open a Command window (search Windows for the
Command application and run it AS ADMINISTRATOR).
You should see a black screen
with plain text, and the C:\Users\ followed by your computer name
as a prompt. If you're on a mac, I have no clue how to do this:
you'll have to search the internet.
Now execute the keytool application by typing (or copying and pasting):
You will then be prompted to enter several pieces of information.
However, if the command doesn't work, it just means you don't have a JAVA_HOME
path variable defined in your system settings, but that's ok:
try browsing to your Java/bin directory, for example
C:\Program Files\Java\jdk-14.0.2\bin
To change directories, just type into the command window a "cd"
followed by a space, followed by the absolute path to the Java/bin
directory, then press the ENTER key. Then try the keytool command
again.
When prompted for a password, enter changeit
You won't see the password appear as you type, so be careful!
You might be prompted to re-enter the password, you might not.
Once you enter/confirm the password, you'll be asked several questions
about you or your company. Make sure you enter professional information!
You can use Sheridan values if you wish. Here's an example:
C:\Users\Wendi>keytool -genkeypair -alias tomcat -keyalg RSA -keysize 2048 -storetype PKCS12 -keystore keystore.p12 -validity 3650
Enter keystore password:
Re-enter new password:
What is your first and last name?
[Unknown]:  Wendi Jollymore
What is the name of your organizational unit?
[Unknown]:  FAST
What is the name of your organization?
[Unknown]:  Sheridan College
What is the name of your City or Locality?
[Unknown]:  Oakville
What is the name of your State or Province?
[Unknown]:  Ontario
What is the two-letter country code for this unit?
[Unknown]:  CA
Is CN=Wendi Jollymore, OU=FAST, O=Sheridan College, L=Oakville, ST=Ontario, C=CA correct?
[no]:  y

Generating 2,048 bit RSA key pair and self-signed certificate (SHA256withRSA) with a validity of 3,650 days
    for: CN=Wendi Jollymore, OU=Sheridan College, O=Sheridan College, L=Oakville, ST=Ontario, C=CA

C:\Users\Wendi>
At the end when it asks you if your information is correct, you
can type "y" or "yes".
This will create a file called keystore.p12 in the root of
your user directory e.g. C:\Users\yourUserName\keystore.p12
(if you had to go into the Java/bin folder to run keytool,
your keystore file might be there, instead?)
If you ever change the keytool password and forgot it,
find the .keystore file, delete it, and run the keytool
program again.
The generated RSA key is 2048 bits, which is standard bank strength security,
and stores it in a secure keystore with an auto expiration date of 10 years.
So now you have a self-signed certificate with a key-pair. To use it,
you place a copy of the keystore.p12 file inside the /resources
root of your project.
The next thing to do is define the keystore settings in your
application by adding the following code
to the application.properties file:
These settings define where your keystore is and how the application
can access it.
We're also defining the port that we'll use to access the secure
parts of our application as 8443. That means that when you want
to test those parts of your project, you'll need to use the URL
https://localhost:8443 !!
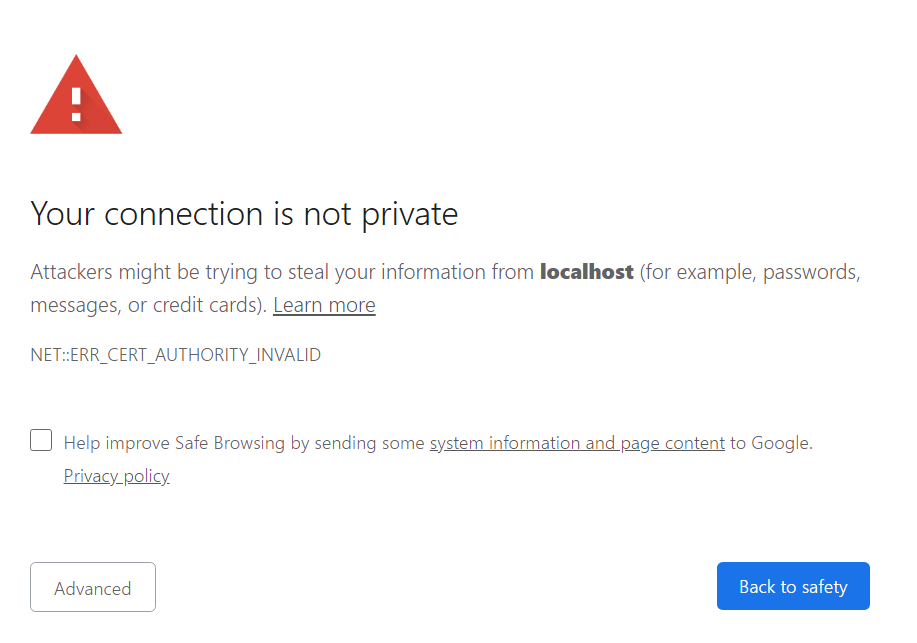
Now you can test this out! Restart your project and browse to the
main index page, but make sure you use
https://localhost:8443. Right away
you'll notice your browser warns you that you might think
you're accessing a secure site, but you're really not!
Your browser displays a security message
indicating that you are accessing a site with an invalid
certificate (remember, our certificate is self-signed, so it
hasn't been validated by a CA). In any other circumstance,
you should heed this warning!
If you ever visit a site and see this warning
or something similar, pay attention!
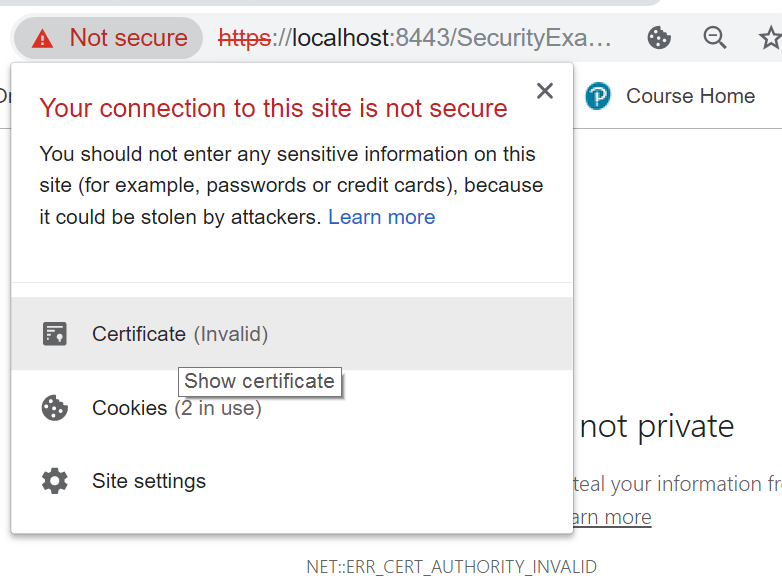
Before we proceed, let's view the certificate:
click the icon/button/whatever in the address bar (it might be a padlock,
in Chrome it's a red warning triangle with the text "Not secure")
and select "Certificate" from the menu like you did before.
Click the padlock icon to the left of the
browser's address bar to open a menu, then click the
"Certificate" item to view the certificate.
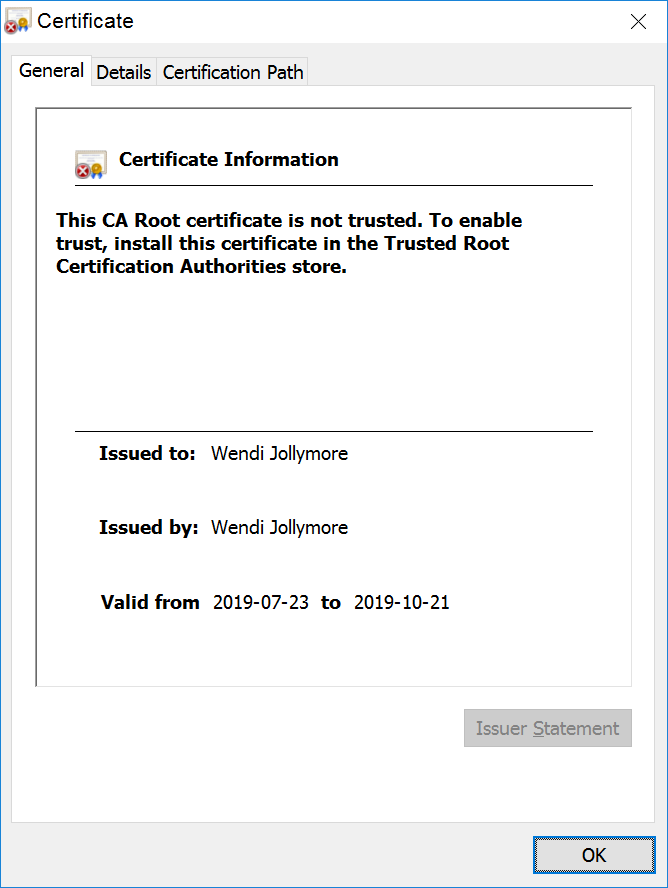
The certificate clearly says that it's not valid, because
it was not signed by a CA. You can also see that it was
issued to and from the same person, so obviously it's not
a valid certificate.
Click the padlock icon to the left of the
browser's address bar to open a menu, then click the
"Certificate" item to view the certificate.
Close the certificate window.
For today, we know everything is safe and we're not going
to be sending any sensitive data, so click the Advanced button
in the browser window (it might be something different in
other browsers) and click the "Proceed to localhost (unsafe)"
(Note that you should NEVER do this with any other web
site!!).
You are now shown your main index page. If this were a real
production server, you could now safely click links,
log in, create an account, etc, and know that everything
you input was being transmitted securely.
Note that we've learned how to test an HTTPS connection
on a development environment. In a real production environment,
there would be some different steps and a lot more configuration
information. The server's documentation will show you
what items you would need to set up and configure to work
with a real HTTPS connection. You would also require a
real certificate from a real Certificate Authority.
Accessing Authenticated User Info
Recall in previous lessons we learned how to access user
information about the currently authenticated user using
Thymeleaf. If you ever need to retrieve information about the
currently authenticated user in the controller, you can.
You can add an Authentication parameter to a controller handler
method to gain access to the currently authenticated entity.
For example, modify the /secure handler method and add the
Authentication (org.springframework.security.core) parameter
(you can probably guess that this object will be injected). Add
a model parameter too, since we're also going to use that:
@GetMapping("/secure")
public String secure(Authentication auth, Model model) {

}
Now add the code to the handler method that retrieves the
user's username (which for this application, is the email
address) and the list of roles they belong to. You've seen
some of this code before!
String email = auth.getName();
List<String> roleList = new ArrayList<String>();
for (GrantedAuthority ga : auth.getAuthorities()) {
    roleList.add(ga.getAuthority());
}
Now add both the email address and the role list to the model:
Of course, you also know how to access this information using the thymeleaf
sec:authorize and
sec:authentication - this is just another way to
retrieve the same information.
That is ALL of the things we're going to learn about Java web application
security in this course! It was a lot! Here's a summary of the topics covered:
Security concepts and terminology, why it's important.
Basic authentication
Form authentication
Authorization and handling Access Denied exceptions
Password Encryption
Using a database to store user credentials
Creating a registration page and functionality
Secure HTTP (HTTPS) and how it works
Creating a self-signing certificate for testing purposes
Exercises
Add the self-signed certificate to one of your other programs and
try it out. You don't have to create a new keystore: just copy
your keystore.p12 file into the project!